Troubleshooting guide, Archive, Evolver 202 robotic atomizers - maintenance – Ransburg Evolver 202 Solvent A11918-XXX User Manual
Page 55
AA-07-01
5 0
5 0
5 0
5 0
5 0
Evolver 202 Robotic Atomizers - Maintenance
TROUBLESHOOTING GUIDE
TROUBLESHOOTING GUIDE
TROUBLESHOOTING GUIDE
TROUBLESHOOTING GUIDE
TROUBLESHOOTING GUIDE
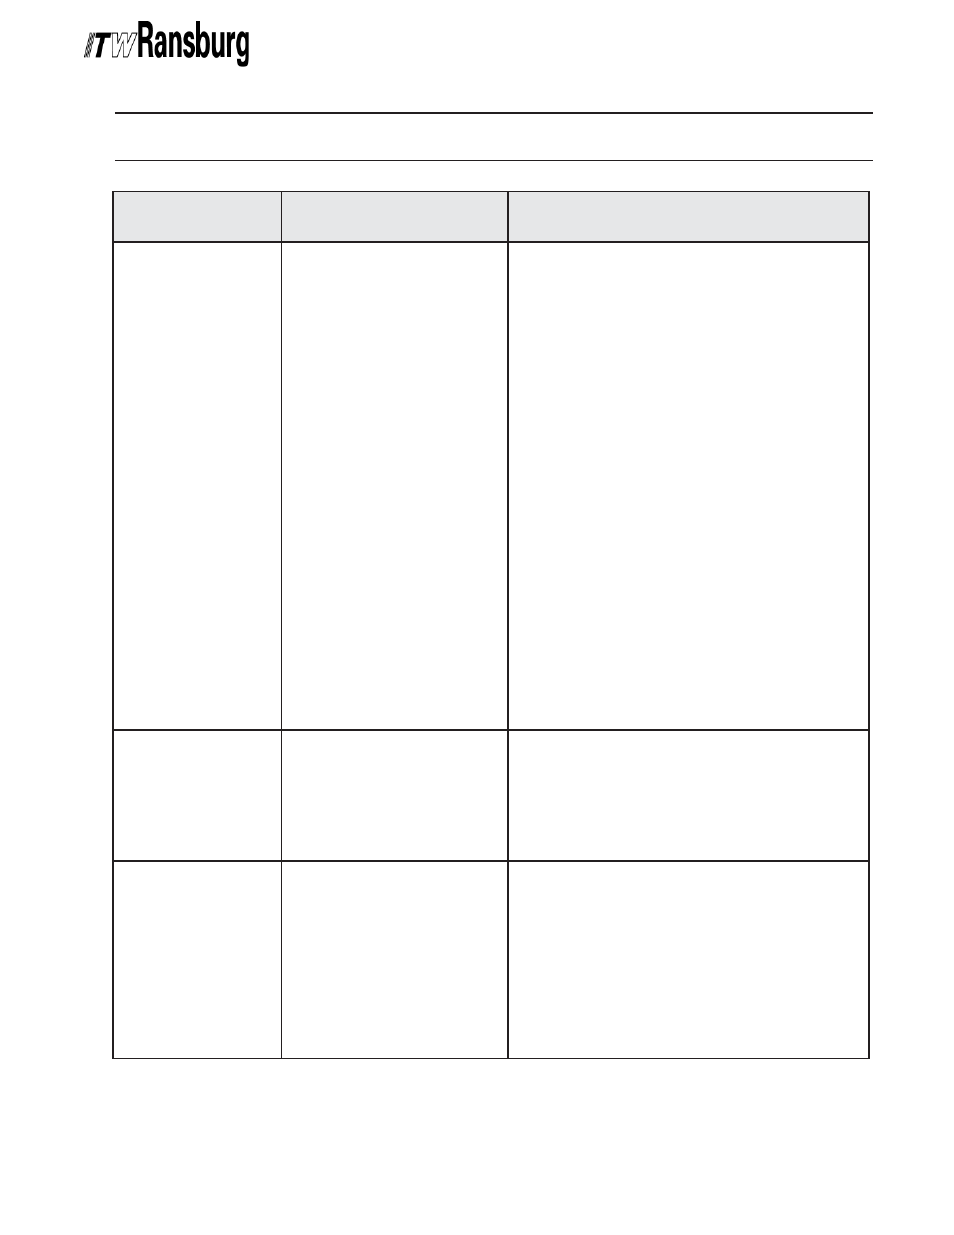
Note: A test station to bench test the applicator off-line will speed the Troubleshooting process.
General Problem
General Problem
General Problem
General Problem
General Problem
Possible Causes
Possible Causes
Possible Causes
Possible Causes
Possible Causes
Corrective Action
Corrective Action
Corrective Action
Corrective Action
Corrective Action
Fluid Does Not
Fluid Does Not
Fluid Does Not
Fluid Does Not
Fluid Does Not
Turn On
Turn On
Turn On
Turn On
Turn On
No Fan or
No Fan or
No Fan or
No Fan or
No Fan or
Atomization Air
Atomization Air
Atomization Air
Atomization Air
Atomization Air
Pressure At the
Pressure At the
Pressure At the
Pressure At the
Pressure At the
Air Cap
Air Cap
Air Cap
Air Cap
Air Cap
Excessive
Excessive
Excessive
Excessive
Excessive
Current or Loss of
Current or Loss of
Current or Loss of
Current or Loss of
Current or Loss of
High Voltage
High Voltage
High Voltage
High Voltage
High Voltage
1. Trigger pilot regulator has
not been set to a minimum
of 70 psig
2. The green air tube possibly
left disconnected during re-
assembly
3. Green tube leading from
the source to the applicator
mounting plate is pinched or
broken
4. Piston seal within the appli-
cator spray head is not in
place or there is an ex-
tremely tight fit between the
seal and the cylinder wall
5. P1T or P2T not actuated
6. Paint trigger (BA/PT) not
actuated
1. Low trigger pilot air pres-
sure (70 psi min. required)
2. Air tubes 79134-00 are not
installed properly.
3. Blue or gray 3/8" OD
tube is cut or pinched
1. Metallic particle alignment
in coiled tube
2. Fluid leaks inside
3. Fluid coil pin-holed
4. Exterior of applicator
contaminated
1. Increase to 70 psig minimum.
2. Reconnect tubing.
3. Check the tubing for kinks or damage. Re-
place if worn or damaged.
4a. Make sure that the seal is in the proper posi-
tion and/or lubricate with a small amount of
petroleum jelly.
4b. O-rings left out of small Ø tie rods.
4c. O-ring missing between mounting block and
upper manifold.
4d. O-ring missing between mounting block and
replaceable head.
5. Make sure P1T or P2T (whichever paint line is
in use) is activated. Both P1T or P2T and BA/
PT (paint trigger) must be activated to trigger
the applicator on.
6. Make sure paint trigger (BA/PT) is actuated.
Both P1T or P2T and BA/PT must be actuated
to trigger the applicator on.
1. Increase pressure.
2. Reinstall and tighten as required.
3. Examine, repair as required.
1. Start fluid flow before turning voltage on.
2. Repair/replace fittings and/or coiled fluid tube
as required.
3. Replace coil as required.
4. Clean with non-polar solvent.
(Continued On Next Page)
(Continued On Next Page)
(Continued On Next Page)
(Continued On Next Page)
(Continued On Next Page)
ARCHIVE