Ransburg, Troubleshooting guide, Rma-303 dual purge/direct charge - maintenance – Ransburg RMA Dual Purge Direct A12300 User Manual
Page 82
RMA-303 Dual Purge/Direct Charge - Maintenance
77
TROUBLESHOOTING GUIDE
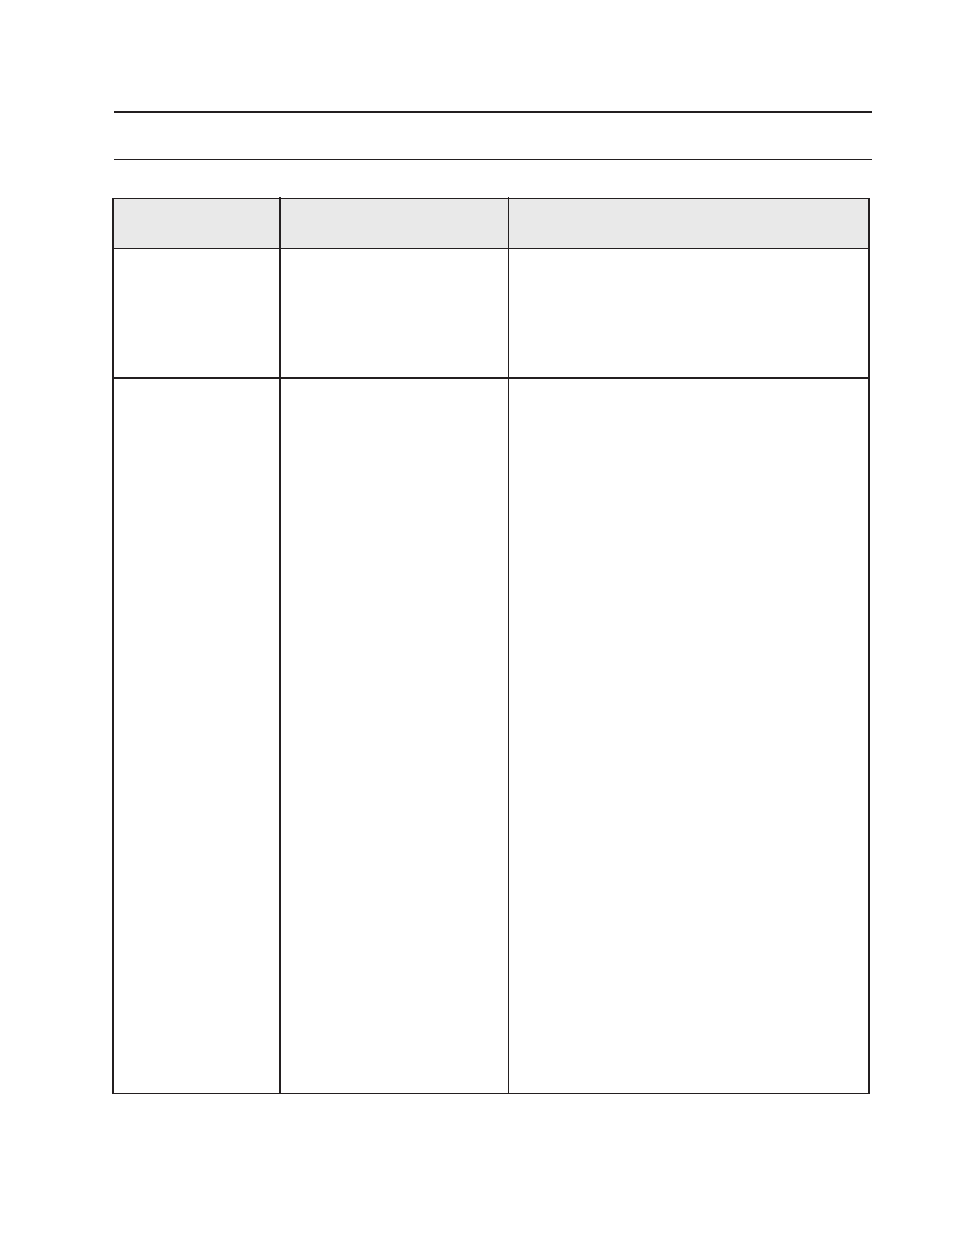
General Problem
Possible Causes
Corrective Action
Bad Spray Pattern
Low or No High
Voltage
1. Bell cup damaged
2. Low voltage
3. Paint lodged in shaping air
ring.
1. High current draw
2. Solvent valve is actuated
3. Loss of low voltage cable
connection between robot
and bell plates
4. Improperly mounted air
turbine
5. Improper limiting current
and voltage settings
6. Atomizer grounding out
(usually indicated by high
current draw or by Micro-
Pak over-current fault
light)
1. Replace bell cup.
2. See "Low Voltage" below.
3. Disassemble and clean (see "Maintenance"
section).
1. a. Paint resistivity to be .1 MΩ to
∞
.
b. Replace coiled fluid line.
2. Remove solvent valve air pilot signal (high
voltage must be interlocked with the solvent
valve air pilot signal to prevent solvent flow
while high voltage is energized).
3. a. Remove atomizer and inspect low voltage
connections on both plates. Verfiy align-
ment marks between connectors and plates
and verify that connector face is flush with
plate. Verify that set screws are secure,
but not too tight, as this will prevent the
spring-loaded pins on the robot plate from
extending and making contact.
b. Faulty low voltage cable.
4. Verify correct orientation of air turbine so that
high voltage spring makes contact with metal
pad on turbine assembly.
5. To readjust settings, refer to "MicroPak" oper-
ating manual.
6. a. Clean atomizer externally with non-polar
solvent.
b. Check the atomizer for internal fluid leaks.
c. Check for fluid leaks at quick disconnect
mounting (between bell plate and robot
plate).
d. Check for internal arcing (usually indicated
by internal sparking sounds).
e. Make sure cascade low voltage connection
is properly shielded.
(Continued On Next Page)
Ransburg
LN-9263-08.5