3 storage – GE Industrial Solutions DC OEM Module For use with Gerapid DC Circuit Breaker User Manual
Page 7
DC OEM MODULE FOR USE WITH GERAPID CIRCUIT BREAKERS
Chapter 2 Receiving, handling and storage
2011-04-26 S47183Ee rev.01
Design and specifications are subject to change without notice
7
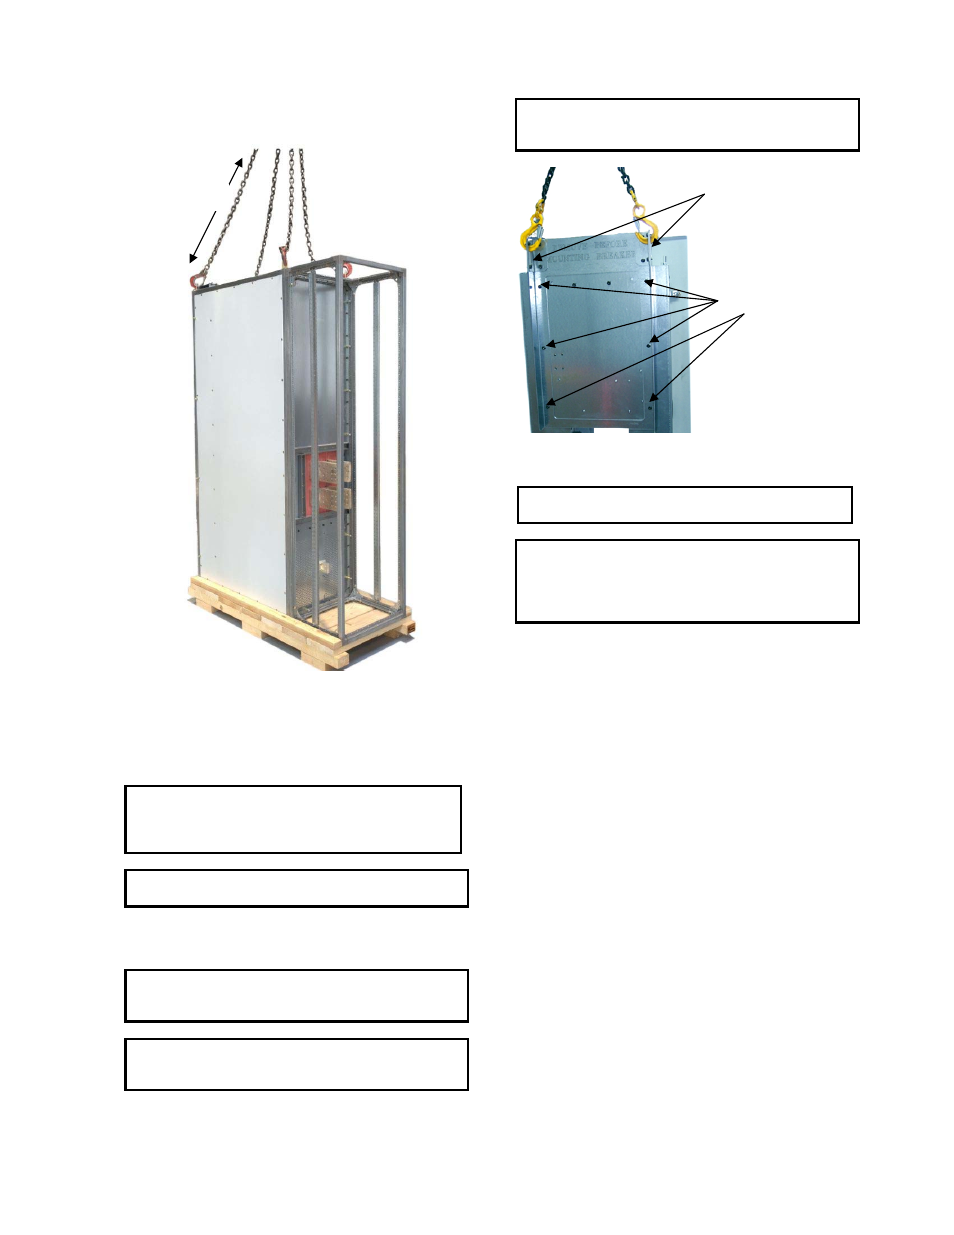
Removable lifting plates are provided on the top of each
module, as standard equipment. Using a crane or overhead
hoist, carefully lift the module from the palette using the four
lifting plates. (See Fig. 22-1)
Fig. 22-1 Overhead lifting of the module
To preserve the external appearance of the equipment, it is
suggested that the lifting plates be left in place. Utilize four
equal length cables or slings, each with a minimum load rating
of twice the weight of the Module package. See section 2.1.
NOTE: The angle between the cables and the top of the
equipment must be at least 45 degrees. This requires the
use of chains/slings at least 4 ft long. If this is not possible,
spreader bars must be used.
NOTE: Do not move, lift or handle the module with a trolley
installed.
Take up the slack in the lifting device very carefully and
manually stabilize the module to prevent it from rotating.
WARNING: Do not stand under the module while it is being
moved. Serious injury may occur if the cables or lifting
device fail.
CAUTION: Gently lower the module onto the level site
location. If the module is roughly handled or jarred, it is
possible to damage or misalign internal components.
Trolley handling and unpacking
The trolley, in its original package, should be transported using
forklift only. To unpack the trolley, remove the top cover first,
and then remove sidewalls and all inner supports. To lift the
trolley, use special lifting frame available. See Fig. 22-2.
NOTE: After transportation, but before installing of the
breaker, loosen six attachment screws and remove lifting
frame from the trolley. Replace and tighten these screws!
Fig. 22-2 Lifting of the trolley
CAUTION: Never use forklift to transport unpacked trolley,
as it is not bolted or fixed to the shipping palette
NOTE: Do not lift or transport the trolley, using forklift.
Never lift the trolley with a breaker mounted. Never roll the
trolley on the floor with a breaker set in place, unless the
breaker is properly bolted to the trolley and arc chutes
properly secured to the breaker (if installed).
2-3 Storage
Circuit Breakers
Open shipping cartons and thoroughly inspect shipping
materials for damage. If shipping plastic is in satisfactory
condition, leave the breakers in their shipping cartons for
storage. Do not remove the circuit breaker shipping material
(shrink wrap) at this time.
Store the circuit breakers in a clean, dry location in an upright
position. If shipping plastic is damaged, a plastic or canvas-
type cover should be provided to reduce the possibility of
damage or contamination to the breakers due to dust and
water. For details concerning Gerapid breakers handling
consult the breaker’s User Guide, S47183De.
Modules and Trolleys
Remove protective covering. Check thoroughly for damage.
Store in a clean, dry, rodent-free location with moderate
temperature and provide protective coverings to prevent dirt,
water, or other foreign substances from entering the
equipment.
If dampness or condensation may be encountered in the
storage location, heaters must be placed inside the module
breaker compartment (module must be without trolley) and in
the front of the trolley with trolley door open to prevent
condensation. Approximately 250 watts of heat in each
section is required. Incandescent lamps can be used and
located in the bottom of the breaker compartment and
supported so the bulbs will not touch adjacent materials.
Min. 4 ft
Lifting slots.
Fixing screws.