Testing the module with remote racking option – GE Industrial Solutions DC OEM Module For use with Gerapid DC Circuit Breaker User Manual
Page 44
DC OEM MODULE FOR USE WITH GERAPID CIRCUIT BREAKERS
APPENDIX H Field Test Procedure.
44
Design and specifications are subject to change without notice
S47183Ee rev.01 2011-04-26
Testing the module with Remote Racking option
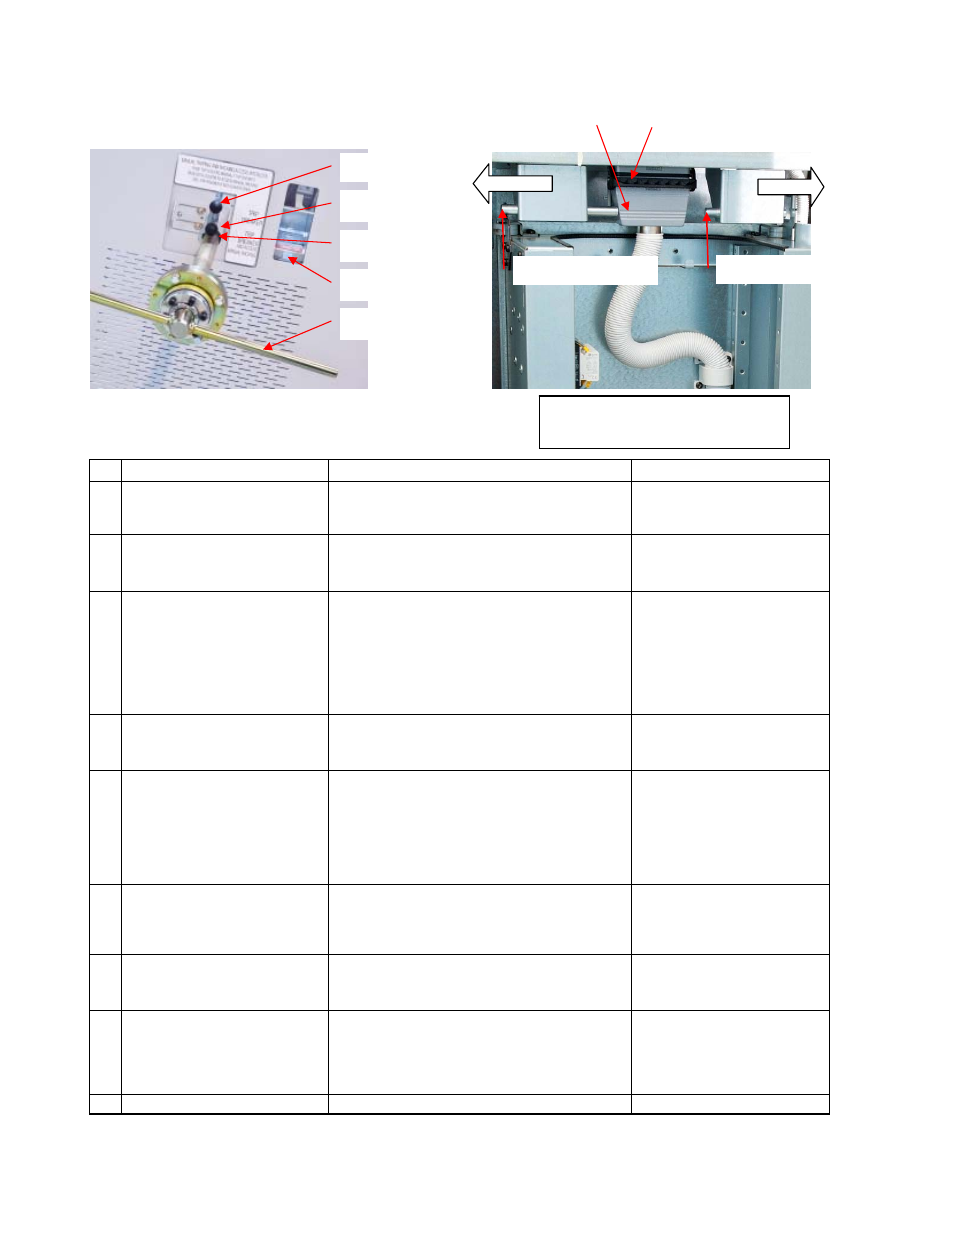
Fig. H-2 Access Console and Secondary Disconnect of the trolley
Table H-3 DC Module with Remote Racking - Field Test Procedure
Step Starting Point
Check Points
Pass Criteria
1.1
Trolley is in WITHDRAWN position.
Breaker is OPEN.
Insert Crank Handle (b) into Access Slot.
a.
Try to rack-in the trolley to TEST position.
a.
The trolley must not move into
TEST position, while Plug (g) is
disconnected.
1.2
Trolley is in DISCONNECTED position.
Breaker is OPEN.
Insert Crank (b) into Access Slot (c).
Connect the Plug (g).
a.
Manually rack-in the trolley to TEST position, using the
Crank Handle (b).
b.
Try to CLOSE the breaker at TEST position.
a.
The breaker must not CLOSE,
while Crank Handle (b) is inserted.
1.3
Trolley is in TEST position.
Breaker is OPEN.
Remove Crank Handle (b) from Access
Slot (c).
a.
CLOSE the breaker.
b.
Check the position indication in TEST.
c.
Send a command to rack-in the trolley to CONNECTED
position.
d.
Try to lift up Access Lever (e).
e.
Try to lift up Trip Lever (d).
a.
The breaker must CLOSE.
b.
“Positions Check” signal must be
active.
c.
The trolley must not move.
d.
Access Lever must not open,
while breaker is CLOSED.
e.
Trip Lever must release and open
the breaker.
1.4
Trolley is in TEST position.
Breaker is OPEN.
Insert Crank Handle (b) into Access Slot
(c).
a.
Use Crank Handle (b) to rack the trolley between TEST
and CONNECTED positions.
b.
Remove Crank Handle.
c.
CLOSE the breaker.
c.
The breaker must not CLOSE, if it
is not in TEST or CONNECTED
position.
1.5
Trolley is in CONNECTED position.
CLOSE the breaker.
a.
Send a command to rack-out the trolley to TEST
position.
b.
Try to lift up Access Lever (e).
c.
Send a command to OPEN the breaker.
d.
Check “Position Check” signal in CONNECTED position
a.
The trolley must not move, while
the breaker is closed.
b.
Access Slot (c) must not open, if
breaker is CLOSED.
c.
The breaker must OPEN.
d.
“Positions Check” signal must be
active.
1.6
Trolley is in CONNECTED position.
Breaker is OPEN.
Insert Crank Handle (b) into Access Slot
(c).
a.
Use Crank Handle (b) to rack-out the trolley into
position between TEST and CONNECTED.
b.
Remove Crank Handle.
c.
CLOSE the breaker.
d.
OPEN and move the trolley to TEST position.
c.
The breaker must not CLOSE, if it
is not in TEST or CONNECTED
position.
1.7
Trolley is in TEST position.
CLOSE the breaker.
Remove Crank Handle (b) from Access
Slot (c).
a.
Send a command to rack-in the trolley to CONNECTED
position.
b.
OPEN the breaker.
a.
The trolley must not move, while
breaker is CLOSED.
1.8
Trolley is in TEST position.
Breaker is OPEN.
Insert Crank Handle (b) into Access Slot
(c).
a.
Use Crank Handle (b) to rack-out the trolley to
DISCONNECTED position.
b.
Remove Crank Handle.
c.
Try to manually pull trolley out of the module.
d.
Disconnect Secondary Plug (g).
e.
Try to manually pull trolley out of the module.
c.
The trolley must not move out of
the module, while Plug is
connected.
e.
The trolley must move out of the
module.
1.9
END OF PROCEDURE
(d) Trip Lever
(e) Access Lever
(a) Position Indicator
(c) Access Slot
(b) Crank Handle
NOTE: Please refer to section 7 for
module operating instructions and hints.
(f) Receptacle Snap Latch
(g) Secondary Plug
(i) Rack-In Interlock
(h) Rack-Out Interlock
UNLOCK
LOCK