Install differential carrier assembly – Spicer Tandem Drive Axle Dual Range & Double Planetary 34,000-45,000 lbs User Manual
Page 31
Install Differential Carrier Assembly
IMPORTANT:
D341, 381(P), 401-P, 402(P), 451-P models do NOT use an output shaft Rear Bearing Retaining Washer
WARNING:
WHEN INSTALLING DIFFERENTIAL CARRIER ASSEMBLY, IT IS IMPORTANT TO
FOLLOW CORRECT PROCEDURES TO ASSURE USEFUL LIFE. FAILURE TO CORRECTLY INSTALL
REAR BEARING AND RETAINING WASHER COULD RESULT IN PREMATURE AXLE FAILURE.
IMPORTANT:
Before installing carrier assembly, inspect and thoroughly clean interior of axle housing.
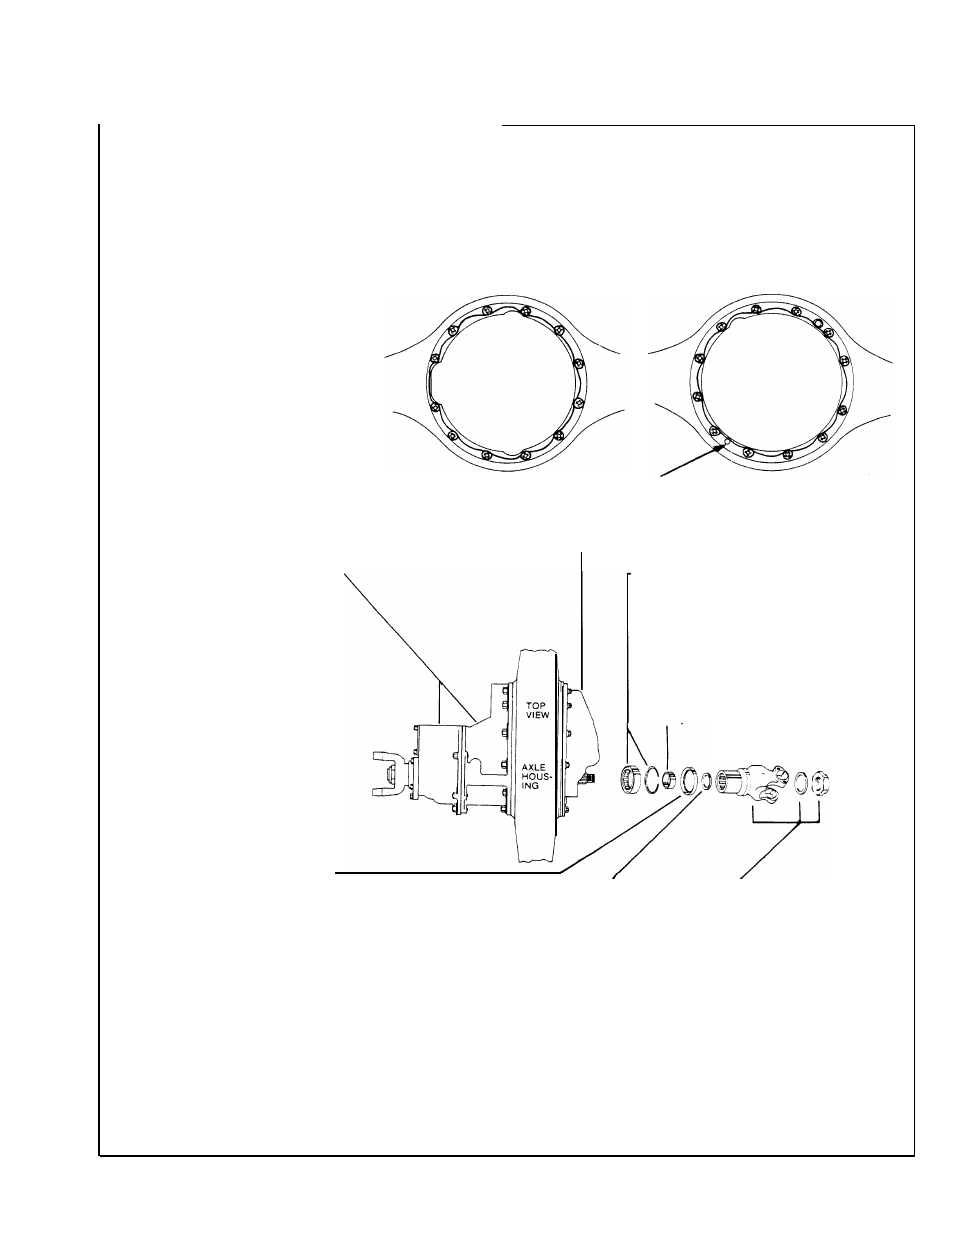
NOTE: Use silicone rubber
SILICONE GASKET COMPOUND
SILICONE GASKET COMPOUND
gasket compound on axle housing
PATTERN. DIFFERENTIAL CARRIER
PATTERN. HOUSING COVER
mating surface as shown in the
MATING SURFACE.
MATING SURFACE.
illustrations. Compound will set in
20 minutes. Install carrier and axle
housing cover before compound
sets or reapply.
Location
of hole in
(Follow procedure in numerical sequence.)
rear cover.
1.
Apply silicone gasket compound.
2.
Axle Housing Cover and Output Shaft Bearing Parts.
If removed,
Install differential carrier assembly
install cover and fasten with nuts, cap screws and lockwashers. Tighten
in axle housing. Install nuts and “
to correct torque. If removed
lockwashers. Tighten to correct
torque.
Reference torque chart
page 76.
5.
Install a new output shaft’
seal in the axle housing cover *
until flush with chamfer in bore.
Lubricate the seal inner
diameter to prevent damage
during yoke installation.
8.
Install axle shafts, and stud
nuts (if used, also install lock-
washers and taper dowels).
9.
Connect main and inter-axle
drivelines.
10.
Fill axle with correct lubricant
(see Lubrication Section).
install bearing parts (see steps 3 through 6).
-3.
Install output shaft rear bearing.
Tap the outer race (with a sleeve or
drift) until it is seated firmly in the
machined pocket of the cover.
Secure with snap ring.
4.
Lubricate and install the rear bear-
ing sleeve on the output shaft. Make
certain it fits snugly against the
shoulder at the forward edge of the
\
shaft splines.
6.
Slide the rear bearing retaining
washer over the splines of the
outer shaft until it seats flush
against the output shaft bearing.
IMPORTANT:
*D341, 381 (P),
401-P, 402(P), 451-P models do
NOT use an output shaft Rear
Bearing Retaining Washer.
11.
Connect differential lockout
air line.
12.
Dual Range Axle only — Install
shift unit, nuts and lockwashers.
Torque nuts to 55-61 ft.-lbs. (74-82
N.m). Connect air line.
7.
Install output yoke, flat washer
and self-locking nut. Tighten to
correct torque. Ref. chart on page
26, 76.
NOTE:
Flat washer not used with
metric threaded nuts.
IMPORTANT: When axle has been
disassembled or housing, gears,
axle shafts or wheel equipment
replaced, check axle assembly for
proper differential action before
operating vehicle. Wheels must
rotate freely and independently.
*IMPORTANT See page 15
for service information on Seals, Yokes & Slingers.
31