Toshiba TLPX10E User Manual
Page 41
41
Operations
Projecting images stored in a memory card (continued)
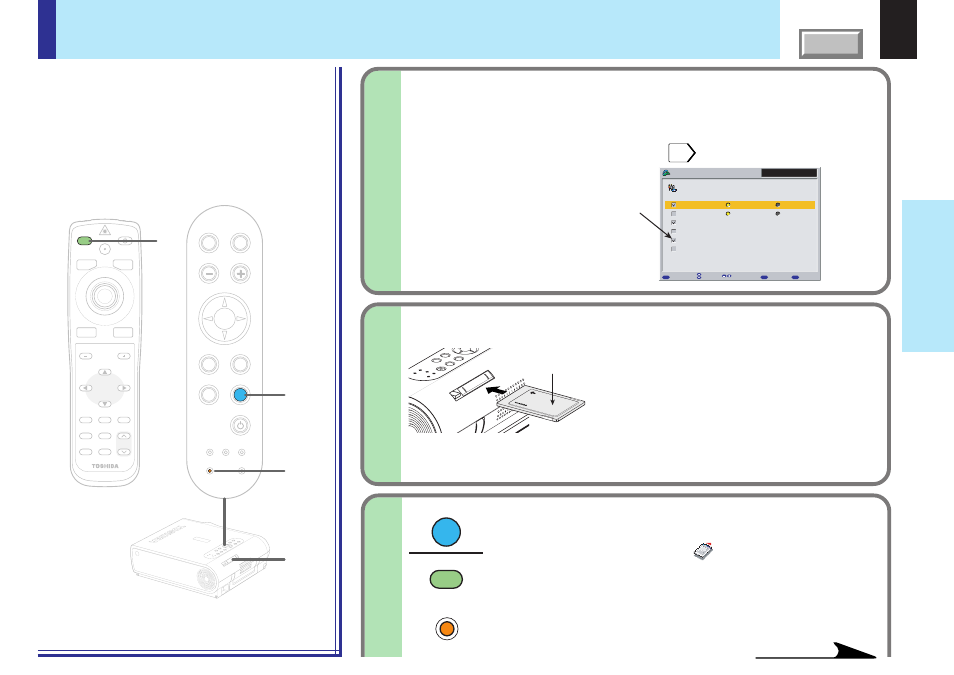
When using the memory card function for the first time,
set the “Input source setting” on the menu screen.
With the factory default setting, it is impossible to select the memory card
input by the INPUT button. Change the setting following the instructions of
“QUICK MENU Adjustments and Settings”
to make the memory card
input selectable.
Insert the memory card into the
card slot.
Insert the card securely, pressing it as far as it
can go.
Be careful to insert the card in the proper
direction.
The slot is designed so that it is
difficult to insert cards in the wrong direction.
Inserting the card forcibly may deform the
internal terminals or cause other problems.
1
2
Analog RGB(1)
QUICK MENU
MENU
EXIT
FULL
Item
Change
Back
ENTER
Set
COMPUTER-1
COMPUTER-2
Video
Memory card
Camera
S-video
Analog RGB(1)
Y/P
B
/P
R
Analog RGB(2)
Digital RGB
Input source setting
TEMP
LAMP
ON
BUSY
FAN
ON/ST
ANDBY
EXIT
ENTER
MENU
INPUT
Insser
t
Up side
LASER
MENU
ON/STANDBY
INPUT
L-CLICK
R-CLICK
ENTER
KEYSTONE
AUTO
SET
EXIT
PIP
FREEZE
MUTE
CALL
RESIZE
VOLUME/ADJUST
TEMP LAMP
ON
BUSY
FAN
KEYSTONE
SET
AUTO
AUTO
EXIT
ENTER
MENU
INPUT
VOL/ADJ.
3
3
3
TEMP
LAMP
ON
BUSY
FAN
ON/ST
ANDBY
KEYST
ONE
SET
AUTO
AUTO
EXIT
ENTER
MENU
INPUT
VOL/ADJ
.
ON/STANDBY
2
INPUT
INPUT
BUSY
(Light in orange)
3
Press INPUT repeatedly to select the memory
card input.
The “Memory card” input display
appears on the screen.
• Start to read the data on the memory card and display the
image data sequentially as thumbnails.
• The BUSY indicator lights in orange while the memory card is
being accessed. (Do not eject the memory card while the
BUSY indicator is lit.)
Check “Memory card”.
Continued
Remote control
Control panel
(Main unit side)
BUSY
indicator