Front and reat panels – Roland Vs-880 User Manual
Page 14
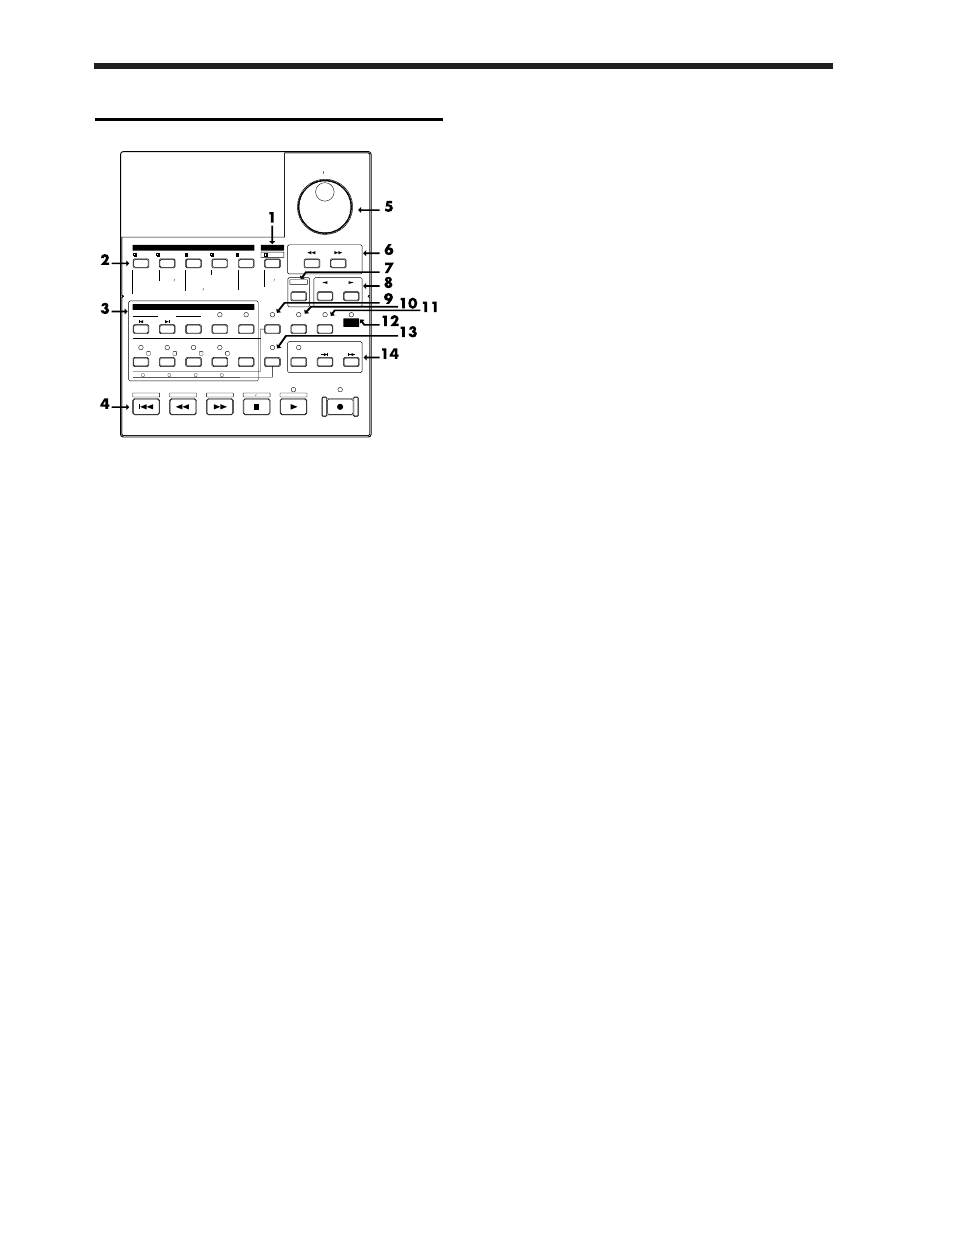
Recorder section
1.
PLAY/DISPLAY button
Press this button to return from making a setting (edit con-
dition) back to normal status (play condition). To switch
display items in the bar display, hold down [SHIFT] and
press this button.
2.
EDIT CONDITION buttons
The functions and parameters of the VS-880 are organized
within these buttons. To use a desired operation, press the
appropriate button.
3.
LOCATOR buttons
Press these buttons when using the Locator function or the
Tap Marker function.
When the NUMERICS indicator is lit, these buttons function
as numeric keys to directly input numbers. When the
SCENE indicator is lit, these buttons are used to store and
recall scenes (snapshots of mixer settings).
4.
Transport control buttons
These buttons are used to operate the recorder.
[ZERO]:
Return the current time to Ò00h00m00s00Ó
(zero return).
[REW]:
While the button is held down, the current
time will be moved backward. This corre-
sponds to the rewind button on a tape
recorder.
[FF]:
While the button is held down, the current
time will be moved forward. This corre-
sponds to the fast-forward button on a tape
recorder.
[STOP]:
Stop song recording/playback.
[PLAY]:
Start song recording/playback from the cur-
rent time.
[REC]:
Press this button to record a song.
5.
TIME/VALUE dial
Normally (i.e., in Play condition), this dial is used to move
the current time. When making settings (i.e., in Edit condi-
tion), this dial is used to modify parameter values.
6.
PARAMETER buttons
Use these buttons to switch the parameter display.
7.
SHIFT button
This button is used in conjunction with other buttons to
access additional functions of that button. For details refer
to ÒSpecial key operationsÓ (p.136).
8.
CURSOR buttons, NO/YES buttons, CANCEL/ENTER
buttons
When a YES/NO response is required during an operation,
use these button to reply. When two or more parameters are
shown in the display, use these buttons to select parame-
ters.
9.
NUMERICS button
When this button is pressed to make the indicator light, the
ten LOCATOR buttons will act as numeric keys to enter
numerical values.
10.
VARI PITCH button
Press this button when you wish to change the playback
pitch.
11.
UNDO button
Press this button to cancel a recording that you have made.
Also, after performing a song edit operation, you can press
this button to return to the condition before editing. When
undo is executed, the button indicator will light.
12.
MIDI/DISK indicator
This indicator will light green when MIDI messages are
being received, and red when data is being written or read
on the disk drive. If both of these are occurring, the indica-
tor will light orange.
13.
SCENE button
Press this button when you wish to memorize or recall
scenes (snapshots of the mixer settings).
14.
PREVIEW button
Press this button to use the Preview function that plays back
a specific length before and after the current location.
LOOP
NEXT
MARKER
PREVIOUS
TAP
CLEAR
AUTO PUNCH
LOC
1/
LOC
2 /
LOC
3 /
LOC
4 /
SCRUB
PREVIEW
NO
CURSOR
CANCEL
ENTER
FROM
TO
DISPLAY
1
2
3
4
5
6
7
8
9
0
1 /
2 /
3 /
4 /
CLEAR
TIME VALUE
SCENE
UNDO
NUMERICS
Pre Level
Post Level
Play List
Amp Profile
TRACK
SYSTEM
EFFECT
Track
- Move
Copy
- Xchg
- Insert
- Cut
- Erase
Time Comp Exp.
EFFECT
- 2
- 1
Marker
Locate
Loop
A.Punch I O
System
MIDI
Sync
Scene
DISK
Song Select
- Name
- New
- Copy
- Erase
- Optimize
Drive Select
- Initialize
DAT
- Recover
Backup
LOCATOR
SONG
Fader Pan
STOP
PLAY
REC
FF
ZERO
REW
VARI PITCH
LOCATOR
EDIT CONDITION
PLAY
SONG TOP
STORE
SONG END
SHUT EJECT
RESTART
DISK
MIDI /
5
6
7
8
YES
SHIFT
PARAMETER
5
6
7
8
Front and reat panels
14