7 position (date) – Ricoh JP8000 User Manual
Page 411
User Tool Menus in Detail
163
4
CCCC
Enter 4 with the number keys,
and then press the [OK] or
{{{{q
q
q
q}}}}
key.
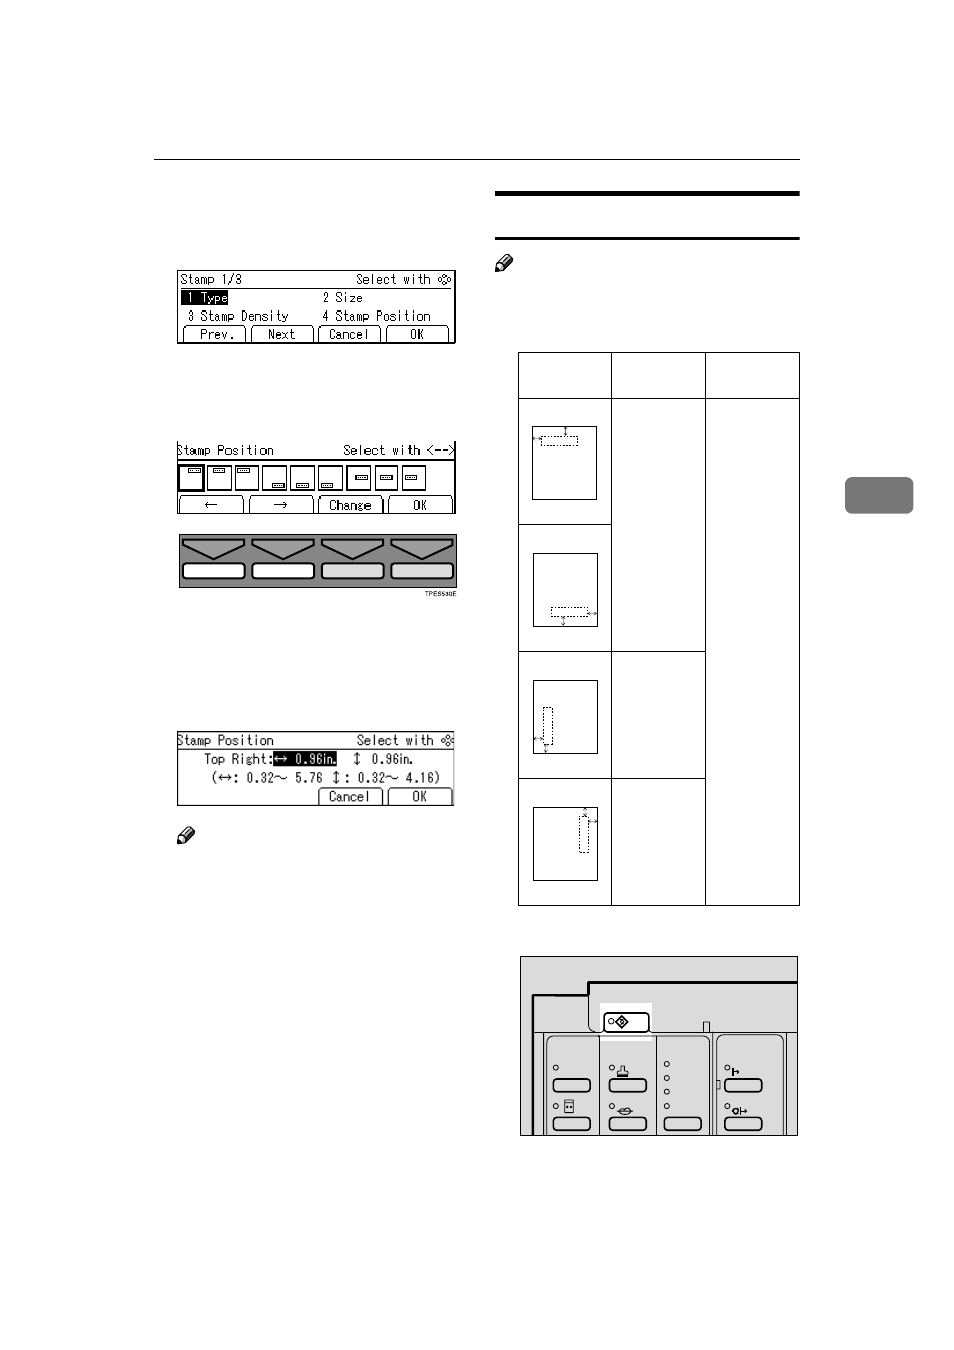
DDDD
Select the stamp position you
want with the [
←
←
←
←] [→
→
→
→] or {{{{~
~
~
~}}}} {{{{}
}
}
}}}}}
keys.
EEEE
Press the [Change] key.
FFFF
Adjust the horizontal stamp posi-
tion with the
{{{{|
|
|
|}}}} or {{{{{
{
{
{}}}} key, and
then press the
{{{{}
}
}
}}}}} key.
Note
❒ The value increases or decreases
in 4mm, 0.16" steps.
GGGG
Adjust the vertical stamp position
with the
{{{{|
|
|
|}}}} or {{{{{
{
{
{}}}} key.
HHHH
Press the [OK] key twice.
5-7 Position (Date)
Note
❒ The default position and available
settings of each date stamp are as
follows.
AAAA
Press the
{{{{User Tools}}}} key.
Stamp po-
sitions
Default
Available
settings
a = 8mm,
0.32"
b = 20mm,
0.80"
a = 8 –
40mm, 0.32"
– 1.60"
b = 8 –
40mm, 0.32"
– 1.60"
a = 20mm,
0.80"
b = 12mm,
0.48"
a = 20mm,
0.80"
b = 8mm,
0.32"
a
b
dd.mm.yy
GRDPOS0E
a
b
dd.mm.yy
GRDPOS1E
a
b
dd.mm.yy
GRDPOS2E
a
b
dd.mm.yy
GRDPOS3E
Make-Up
Image Density
Lighter
Darker 2
Darker 1
Normal
On Line
Auto On Line
ZDZS110N
Stamp
- Aficio SP C231N (4 pages)
- Aficio MP C2030 (2 pages)
- EMP 156 (4 pages)
- Aficio 3035 (136 pages)
- Aficio IS 2416L (64 pages)
- Aficio CL2000 (2 pages)
- Infoprint 1767 (7 pages)
- LD235 (196 pages)
- Aficio BP20 (172 pages)
- Aficio SP 3410DN (2 pages)
- Aficio IS 2230 (180 pages)
- FT1208 (65 pages)
- DSm721d (108 pages)
- CP6346 (204 pages)
- 150TLA (1 page)
- Aficio GX7000 (272 pages)
- 3010 (158 pages)
- D053 (41 pages)
- Aficio 3035SPi (136 pages)
- BY1000 (250 pages)
- 220-240 V (370 pages)
- Pro 906EX (6 pages)
- Aficio 8080 (144 pages)
- 2018 (814 pages)
- Aficio MP 3500/MP 4500 (6 pages)
- M40 (49 pages)
- Aficio 402026 (2 pages)
- Printer/Scanner (56 pages)
- Aficio MP3010 (114 pages)
- MP 3350 (6 pages)
- MP 5001 (6 pages)
- AP2610N (472 pages)
- INFOPRINT 1811 (6 pages)
- Aficio SP 1000SF (59 pages)
- Printer/Scanner Unit Type 8000 (174 pages)
- CL3000DN (84 pages)
- PRO 1357EX (12 pages)
- Aficio AP610N (117 pages)
- Laser MFP Printer (129 pages)
- Printer Reference (162 pages)
- MP 161SPF (6 pages)
- DSc428 (196 pages)
- Aficio MP C2050 (8 pages)
- Aficio AP400N (20 pages)
- Aficio CL7200 (4 pages)