Punchi/o, Punch i/o, English – Roland KR111 User Manual
Page 35
Other recording functions
KR111 Digital Intelligent Piano
r
33
ENGLISH
ENGLISH
ENGLISH
ENGLISH
Note: If you use the “Solo” recording mode for adding parts to
a Standard MIDI File recorded with another instrument or
sequencer, track 16 (or any other track defined as “second
drum track”) may also use a Drum Set that can be changed.
(4) Press [Play÷Stop¥®÷ª] to start recording.
After the count-in, you will hear all parts that have
already been recorded. Start playing (and recording)
your new part.
Note: In “Solo” mode, the entire track you record is
replaced by your new material. (If you don’t play anything
during recording, the entire track will be empty after-
wards.)
(5) Press [Play÷Stop¥®÷ª] to stop recording.
(6) Return to step (2) to record additional parts.
Note: Do not forget to save your song to disk (see p. 54).
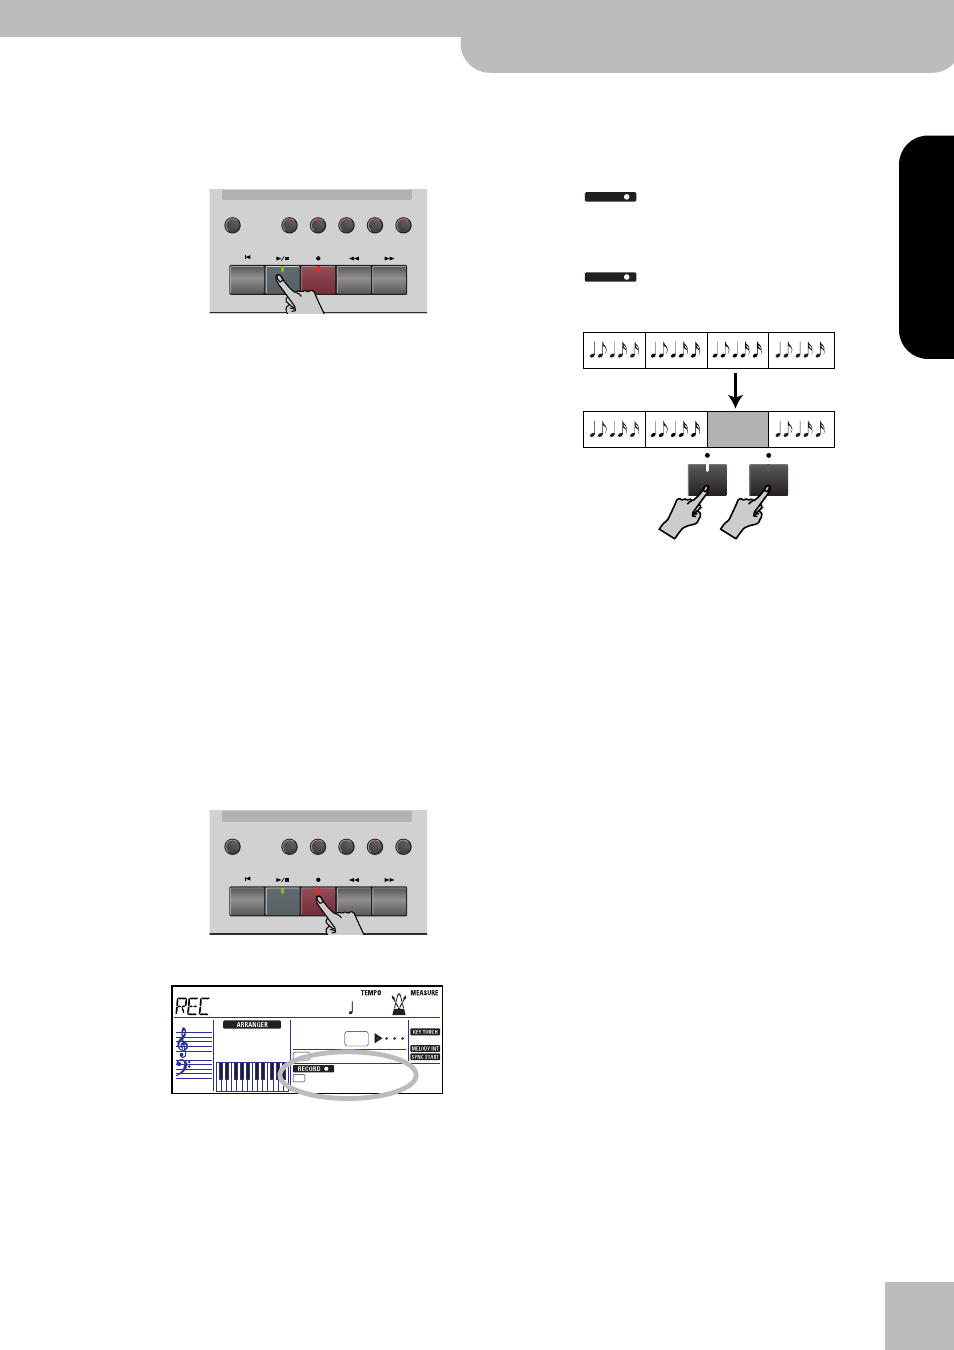
Punch I/O
In this mode, you can re-record part of the selected
track (the second chorus, for example). The important
aspect of this mode is that newly recorded material
does not erase the material before or after the passage
you redo. By contrast, in “Solo” mode, the entire track
you record is replaced by your new material. (If you
don’t play anything during recording, the entire track
will be empty afterwards.)
“Punch I/O” can only be selected if the KR111’s memory
already contains song data.
(1) Press the [REC¥∏] button (its indicator flashes).
(2) Press [√][®] to make the display look as follows:
The flashing track icon (only one) depends on the
first track that already contains data. In the above
example, track 1 contains data, which is why its icon
flashes. The indicator of the Recording/Playback but-
ton that corresponds to the selected track also
flashes.
(3) Use the [+][–] buttons to select the track you wish
to record to.
You can only select one track at a time.
(4) Press [Play÷Stop¥®÷ª] to start playback of the (old)
song data.
The
icon, the [REC¥∏] button, and the icon
of the selected track flash.
(5) When the Recorder reaches the measure where
you wish to start recording, press [REC¥∏] again.
The
icon and the [REC¥∏] button now light
steadily.
(6) Play the passage you want to redo.
You could select another sound while recording. Be
aware, however, that the selected track does not
change back to the previous sound when you stop
recording.
(7) Press [REC¥∏] again to deactivate recording.
Song playback still continues, so…
(8) Press [Play÷Stop¥®÷ª] to stop playback.
(9) Press [|ôReset] to return to the beginning of the
song, then [Play÷Stop¥®÷ª] to listen to the new ver-
sion.
If you are not satisfied, return to step (4) above.
Return to step (3) to correct another track.
Note: Do not forget to save your song to disk (see p. 54).
Record/Playback
Reset
Fwd
Bwd
Rec
Play/Stop
Upper
Lower
Whole
Rhythm
Bass
Accomp
Menu
R
4
3
2
1
Record/Playback
Reset
Fwd
Bwd
Rec
Play/Stop
Upper
Lower
Whole
Rhythm
Bass
Accomp
Menu
R
4
3
2
1
INTRO
FULL
BAND
=
1
ORCHESTRATOR
BEAT
PunchI/O
120
001
RECORD
RECORD
Rec
Rec
Original track
This passage is redone