Insert time, Delete time, Split – Teac X-48MKII User Manual
Page 44: Play from selection, History list, Moving clip borders and adjusting crossfades, Insert time delete time split play from selection, History list moving clip borders and adjusting, Crossfades, 6 – editing
44
TASCAM X-48MKII
Insert Time
This command (Control-T) inserts silence into the
selected time range and shifts all audio after that selection
later. It’s the same as splitting the clip at the In point and
moving all audio after that point back the same amount
of time as the selection length.
Delete Time
This command deletes the time from the timeline
represented by the selected time range and shifts all
audio after that selection forward.
Split
The Split command (Control-E) slices a clip wherever
the timeline is. If you have selected a range of a clip, it
separates that selection into a new clip. This separation
would allow one part of a clip to be treated or editing
differently from the other part of the clip.
Play From Selection
This function (shortcut “P” on the keyboard) begins
playback from the beginning of the selection range. It
ignores the pre-roll setting, if any. You might use it to hear
the effects of an edit in context of the program.
History List
The History List command (Control-H) opens a window
that shows you every edit you’ve done in the project,
up to a maximum of 200 edits. You can press the Undo
and Redo buttons at the bottom of this window, or click
on a command in the list and it will undo that edit and
everything after it.
History is saved with a project, so undoing is possible
even after closing and reloading a project.
You can also Clear the history list. Check Delete unreferenced
audio file and press OK to delete all editing data, including
unused, unnecessary audio files, from the undo history.
After doing this, previous operations cannot be undone.
Moving clip borders and adjusting
crossfades
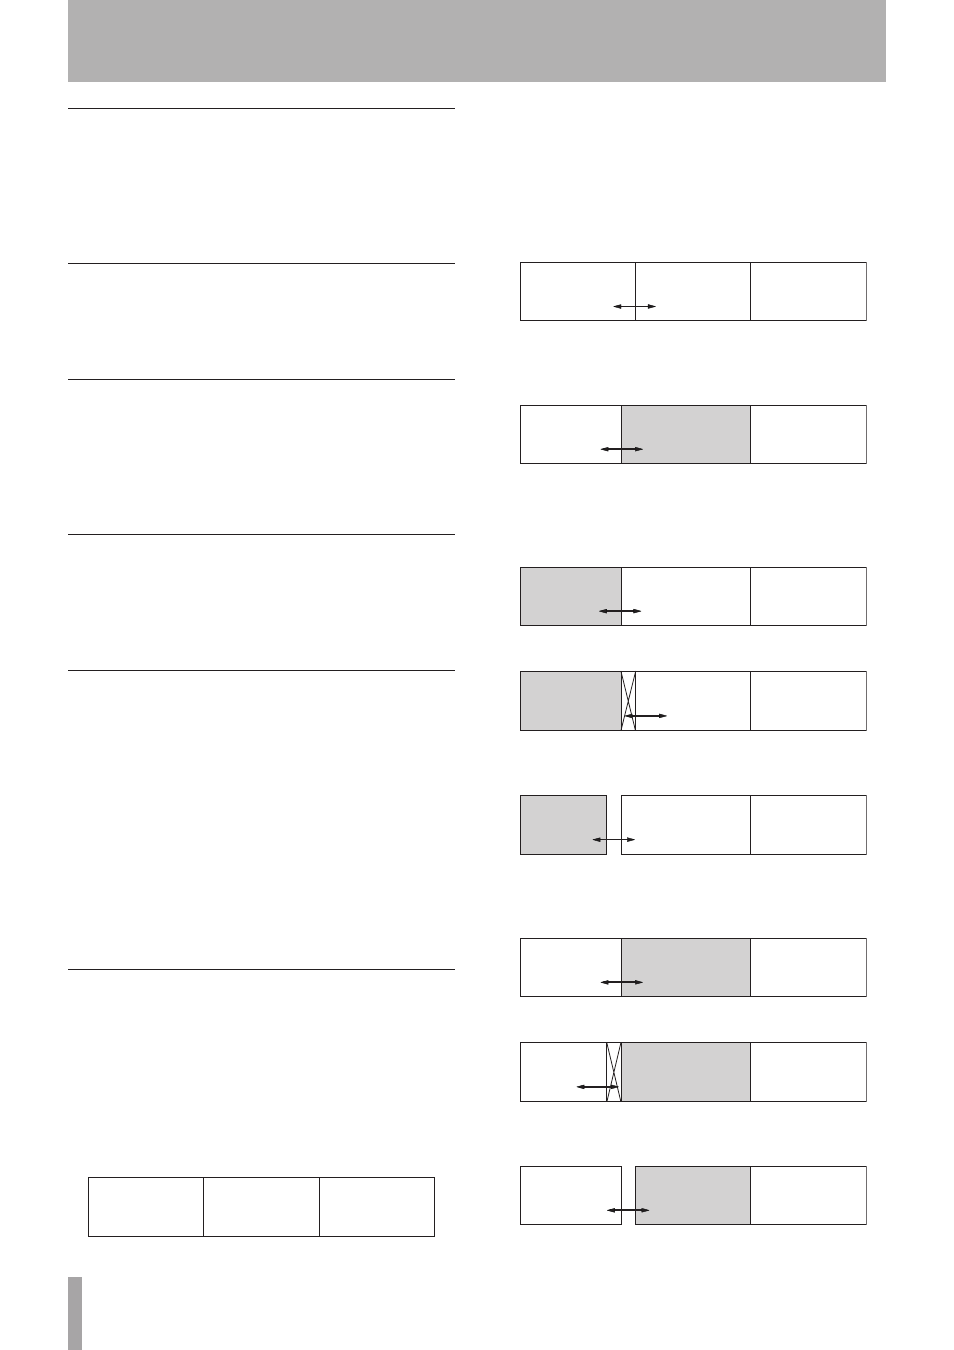
As shown below, the following example of editing
involves three clips—Clip 1, Clip 2 and Clip 3.
1 Clip 2 is a recorded WAVE file that has been edited
to remove unnecessary beginnings and endings
and then copied and pasted into place. In this case,
the beginning and end of Clip 2 can be extended,
altering the borders with Clip 1 and 2.
Clip 1
Clip 2
Clip 3
2 Select the object tool.
When you move the cursor near the border of Clip
1 and Clip 2, it becomes the fade tool, which can be
used to adjust the fade-in or fade-out at the top of
the clips. At the bottom of the clips, it becomes a
double-headed arrow cursor, which can be used to
adjust the border between Clip 1 and Clip 2.
Clip 1
Clip 2
Clip 3
3 First, move the double-headed arrow cursor a little
to the right of the border and click to make Clip 2
active, and then move the border to the left.
Clip 1
Clip 2
Clip 3
4 You can also edit the crossfade once the clips
overlap. Move the double-headed arrow cursor a
little to the right of the border and click to make
Clip 1 active.
Clip 1
Clip 2
Clip 3
5 Drag right to adjust the crossfade.
Clip 1
Clip 2
Clip 3
6 You can also drag left to adjust the endpoint of Clip
1. This will not adjust the crossfade.
Clip 1
Clip 2
Clip 3
7 In step 4 above, move the double-headed arrow
cursor a little to the left of the border and click to
make Clip 2 active.
Clip 1
Clip 2
Clip 3
8 Drag left to adjust the crossfade.
Clip 1
Clip 2
Clip 3
9 You can also drag right to adjust the start point of
Clip 2. This will not adjust the crossfade.
Clip 1
Clip 2
Clip 3
6 – Editing