Display – Futaba 14MZ User Manual
Page 33
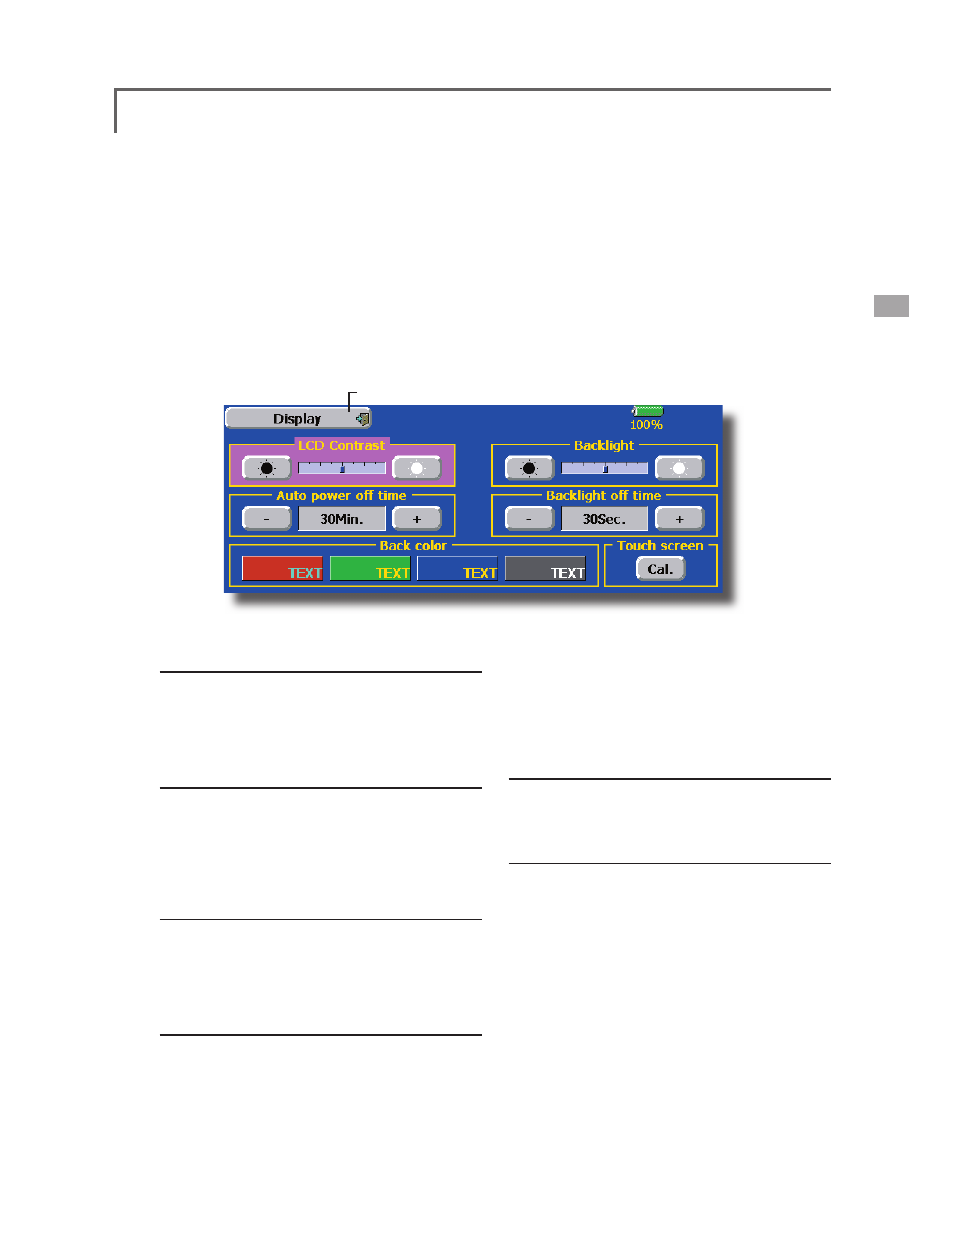
LCD contrast adjustment
1. Adjust the LCD contrast with the left and right
side buttons.
*When the right side button is pressed, the LCD contrast
decreases. When the left side button is pressed, the LCD
contrast increases.
Auto power off time setting
1. Adjust the auto power off time with the left
and right side buttons.
*When the time the transmitter is inactive exceeds the set
time, the power is turned off automatically. This time can be
set up to 1 hour in 10 minutes increments. The auto power
off function can also be deactivated.
Backlighting brightness adjustment
1. Adjust the backlighting brightness with the
left and right side buttons.
*When the right side button is touched, the backlighting
becomes brighter. When the left side button is touched, the
backlighting becomes darker.
Backlight power-off time
You can set a time period to turn off the LCD
backlight. This function counts the period
that the touch panel has been not operated.
This time can be set by ten-second steps. You
can also turn off the backlight-power-off” if
you like.
Display
LCD screen adjustment and auto power off setting
The following LCD screen adjustments and auto
power off setting are possible:
● Contrast adjustment
● Auto power off time setting
● Backlighting brightness adjustment
● Background color change
● Touch panel screen position correction
● Touch the [Display] button in the System Menu to
call the setup screen shown below.
●Return to System Menu
*The backlight consumes a large amount of power. We
recommend you to turn off the backlight by setting the
backlight power-off time to about one minute.
*Since the backlighting power consumption is extremely
high, we recommend that the backlighting off time be made
short.
Background color
1. Touch the button of the color you want to
change.
*There are four background colors.
Touch panel calibration
This function adjusts the location of touch
panel. Touch "Calibration" button and then
press "Yes", the calibration screen will pop
up. Touch the center of the cross hair cursor
on the screen with the stylus pen. As soon as
the system recognizes the position, the cursor
will move on to the next position. Repeat
this procedure as long as the cursor moves
to next position. You will do this five times.
Calibration will be carried out based on the
five positions. Disappearance of the cross
hair cursor means the calibration has been
completed. Touch any point on the screen
to return to the previous screen.
*In ordinary operation, this calibration is not necessary. If
you notice the touch panel is not functioning correctly after
long use, we recommend you to carry out this calibration.
33