Installation guidelines, Rw atlas – Waterworks R.W. Atlas Exposed Thermostatic System with 8" Shower Rose, Extended Arm, and Metal Wheel Handles User Manual
Page 3
PRODUCT SUPPORT 800.927.2120 8am - 6pm EST
RW ATLAS
Exposed Thermostatic System with 8" Shower Rose
INSTALLATION GUIDELINES
Page 3 of 6
8.26.2014
These guidelines have been prepared for the professional contractor to aid in the installation of:
RW ATLAS EXPOSED THERMOSTATIC SYSTEM WITH 8" SHOWER ROSE WITH METAL WHEEL OR
LEVER HANDLE & WITH HANDSHOWER STYLE #'S RWXS21, RWXS31, RWXS41 & RWXS51
[RW21XS (UK), RW31XS (UK) RW41XS (UK) & RW51XS (UK)].
All dimensions are based on original specification and are subject to change and variation.
Please consult your Design Associate for current specifications.
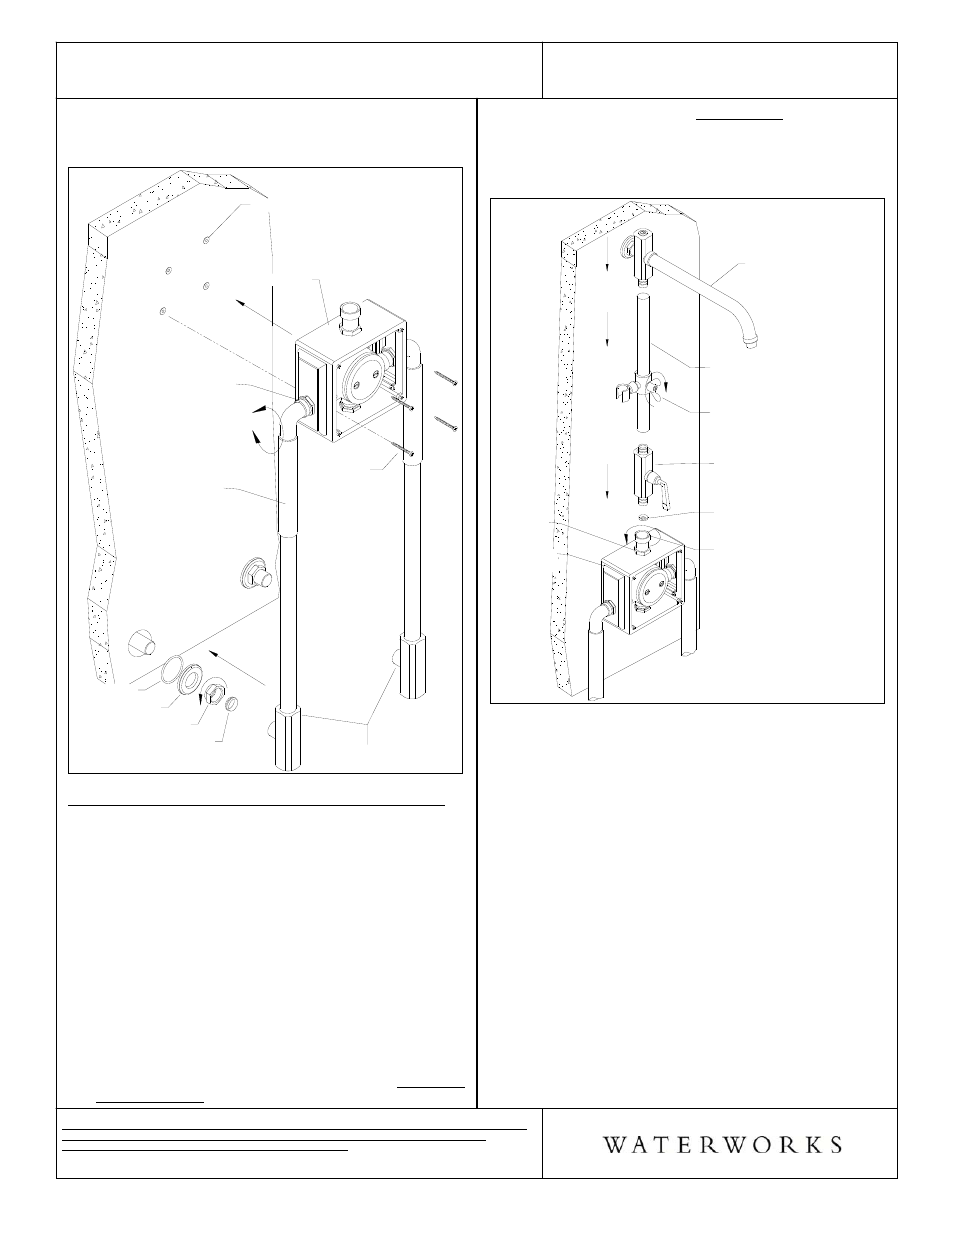
12. Install the screws, through the valve body and into
the wall anchors to fully secure the assembly.
Figure - 03
SCREW
KNURLED COLLAR
COMPRESSION RING
COMPRESSION NUT
ESCUTCHEON
O-RING
WALL ANCHOR
INLET LEG
INLET CONNECTIONS
VALVE BODY
WALL VALVE/RISER/SHOWER ARM INSTALLATION:
¾ See Figure - 04 for Steps 13-16.
13. After the exposed valve body and inlets are fully
installed, connect the wall valve using the knurled
nut on the top of the valve body, making sure the
rubber washer is between. Once the knurled nut
fully tightened, make sure the wall valve if facing
forwards and then tighten the hex nut on top of the
valve body.
14. Place shower riser with shower arm assembly onto
the top of the wall valve, making sure the riser tube
is fully seated into the wall valve and shower arm
mount.
15. Mark the center location of the shower arm mount. If
the shower arm assembly is too high, the riser tube
can be field cut to the desired height.
16. If you are installing a Handshower, available on
Style# RWXS40 & RWXS50 only, attach
handshower slider to the shower riser and tighten
the wing-nut.
Figure - 04
SHOWER RISER
[CAN BE FIELD CUT]
KNURLED
NUT
VALVE
BODY
SHOWER ARM
ASSEMBLY
WALL VALVE
HEX
NUT
HANDSHOWER
SLIDER
[RWXS40 & RWXS50 ONLY]
RUBBER GASKET
¾ See Figure - 05 for Steps 17-20.
17. Remove the shower arm assembly from the riser
tube and remove the wall mount plate and set screw
from the escutcheon.
18. Install the wall mount plate at the center mark made
in Step 15, using the screws and anchors.
19. Carefully install shower arm assembly back onto
shower riser, while aligning the shower arm
escutcheon over the wall mount plate. NOTE:
Adjusting the shower riser may help with this step.
¾ WARNING: MAKE SURE THE RISER TUBE IF FULLY
SEATING IN BOTH THE WALL VALVE AND THE
SHOWER ARM MOUNT IN ORDER TO PREVENT
ANY LEAKS. ADJUST MOUNT IF NECESSARY.
20. Once the shower arm assembly is fully seated on the
shower riser and mounted on the wall plate, use the
set screw to secure shower arm assembly.