AVer SEB5116 series User Manual
Page 39
33
Name
Function
(5) Playback
Control Buttons
From left to right order:
Begin: Move at the beginning of the recorded video file.
Previous: Go back to the previous frame.
Slower: To reduce the playback speed. When each time press slower button, the
speed will reduce 1/2 from original speed (32X, 16X, 8X, 4X, 2X, 1X, 1/2X, 1/4X,
1/8X, 1/16X, 1/32X).
Rewind: Wind back the recorded video file.
Pause: Briefly stop playing the recorded video file.
Play: To faster playback speed. When each time press faster button, the speed will
double the playback speed (1/32X, 1/16X,1/8X, 1/4X, 1/2X, 1X, 2X, 4X, 8X, 16X,
32X).
Faster: Play the recorded video file at the speed of 2x, 4x, 8x, 16x, or 32x.
Next: Go to the next frame.
End: Go to the end of the recorded video file.
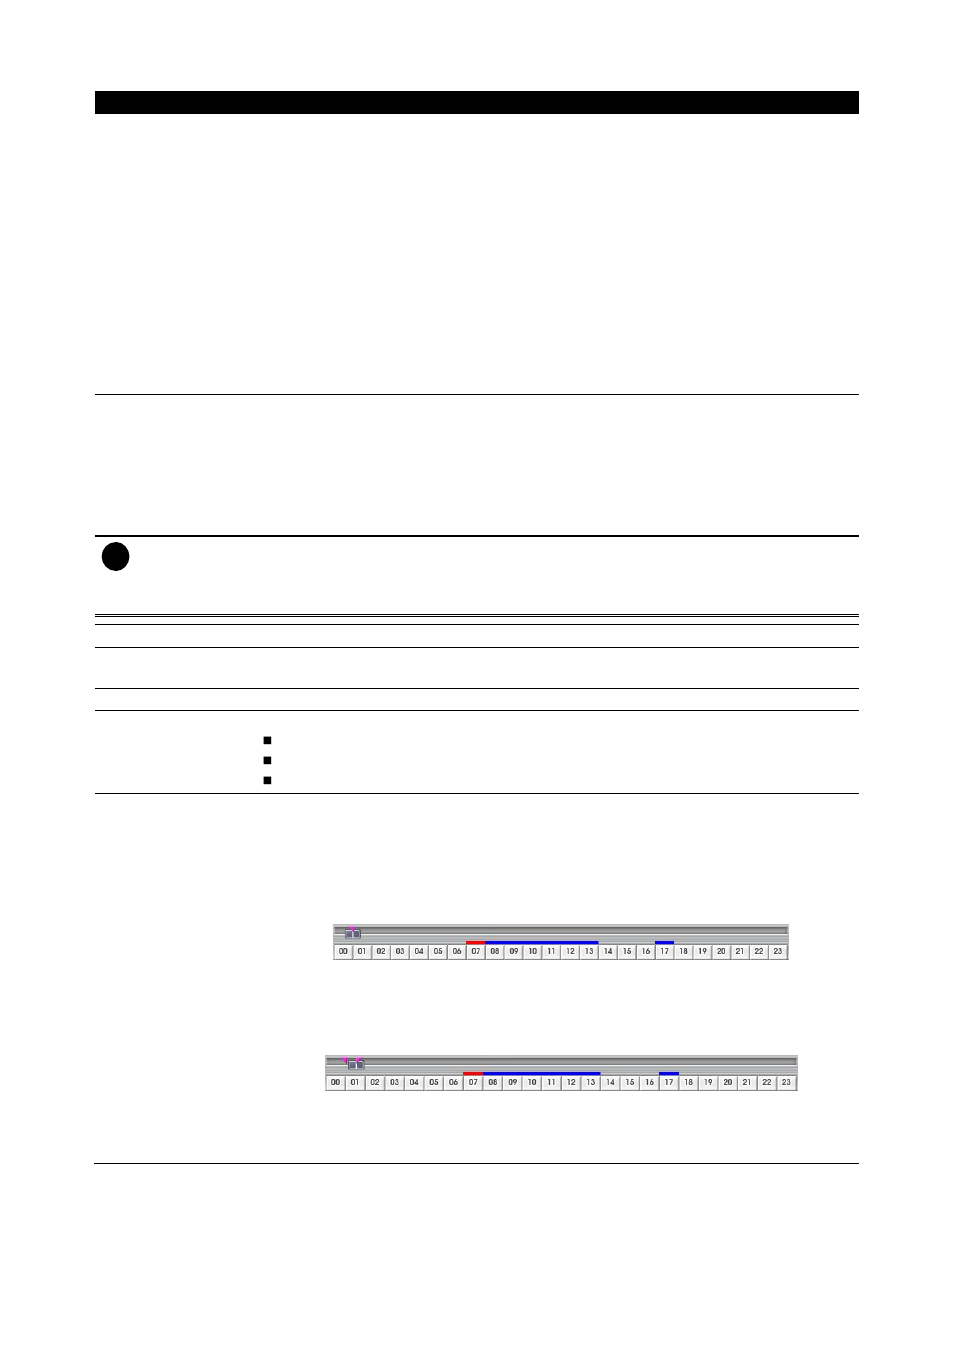
(6) Archive
Select the date on the calendar and the time from 00 to 23 to where to start playing
the recorded video file.
– OPEN FILE: User can open the recorded file from certain location.
– Channel 01~ 16 and Channel 17 ~ 32: Click the button to switch to different
channel group of playback calendar.
– Day Light Saving: Mark to display available playback records during day light
saving period only.
i
The numbers from 00 to 23 represent the time in 24-hour clock. The numbers from 01 to 16
represent the camera ID. The blue colored column indicates that there is a recorded video file on
that period of time. While the red colored column indicates on where to start playing the recorded
video file.
(7) Status bar
Display the recorded date, time and play speed.
(8) Camera ID
Show the number of cameras that are being viewed. When you are in single screen
mode, click the camera ID number to switch and view other camera.
(9) Language
Switch to different UI tool tip language
(10) Export
Export includes Snapshot, Print, and Output function.
Snapshot: Capture and save the screen shot either in *.jpg format.
Print: Print the screen shot.
Output Video Clip: Save the segmented file in *.mpg, *.avi, *.dvr format.
(11) Segment
Keep a portion of the recorded video.
Following the below steps to Cut and Save the Wanted Portion of the Recorded
Video
1. Use the Playback Control buttons or drag the bar on the playback progress
bar and pause on where you want to start the cut. Then, click Segment to set
the begin mark.
2. Use the Playback Control buttons or drag the bar on the playback progress
bar and pause on where you want to end the cut. Then, click Segment to set
the end mark. To cancel segmentation or set the segment marks from the
start, click Segment button again.
3. Click Export
button → Output to save the wanted clip.
4. In the Save As dialog box, locate on where you want to save the file, type the
filename, and select the video format.