E-flite Super Cub 25e ARF User Manual
Page 16
16
E-flite Super Cub 25e ARF Assembly Manual
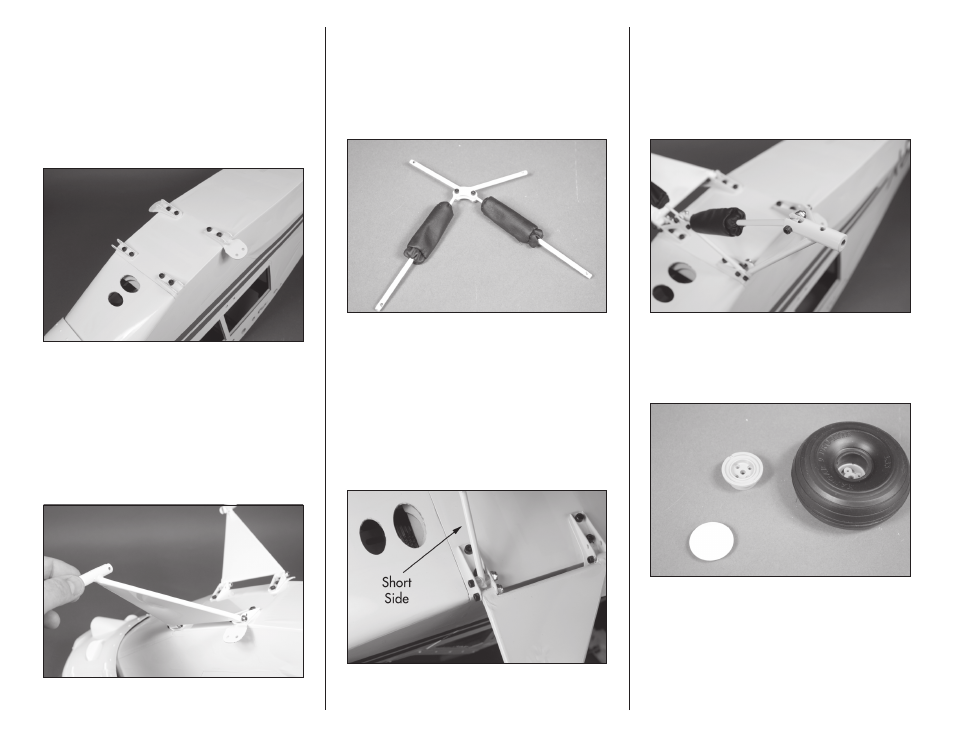
1. Place the wing strut tabs between the rear
landing gear mounts and fuselage. Make sure
the angle on the tab faces toward the top of the
fuselage. Secure the four landing gear mounts and
the two wing strut tabs to the fuselage using eight
6-32 x 1/2-inch socket head cap screws and a
1/8-inch hex wrench. Leave the screws loose so
the mounts can be positioned when installing the
landing gear legs.
2. Attach the landing gear legs to the landing gear
mounts using four 4-40 x 5/8-inch socket head cap
screws and four 4-40 lock nuts. Use a 3/32-inch
hex wrench and 1/4-inch nut driver to tighten the
hardware. Do not over-tighten the hardware and
prevent the landing gear from moving. Once the
gear is in position, use a 1/8-inch hex wrench to
fully tighten the hardware securing the landing gear
mounts to the fuselage.
3. Attach the landing gear shocks to the landing
gear spreader using two 4-40 x 1/2-inch socket
head cap screws and two 4-40 lock nuts. Tighten
the hardware using a 3/32-inch hex wrench and
a 1/4-inch nut driver. Do not over-tighten the
hardware, preventing the shocks from moving freely
where they are attached to the spreader.
4. Attach the ends of the shocks to the front landing
gear mount using two 4-40 x 5/8-inch socket head
cap screws and two 4-40 lock nuts. Make sure to
place a piece of silicone tubing on either side of
the landing gear spreader to prevent the spreader
from rubbing on the mounts. Tighten the hardware
using a 3/32-inch hex wrench and a 1/4-inch nut
driver. Do not over-tighten the hardware, as it could
prevent the shocks from moving freely where they
are attached to the landing gear mounts.
5. Attach the ends of the spreader to the landing gear
using two 4-40 x 5/8-inch socket head cap screws
and two 4-40 lock nuts. Tighten the hardware using a
3/32-inch hex wrench and a 1/4-inch nut driver. Do
not over-tighten the hardware, as it could prevent the
spreader from moving freely where it is attached to
the landing gear.
6. Remove the hub cap from the wheel using a flat
blade screwdriver. Use care not to damage the hub
cap or hub. Remove the outer hub from the wheel at
this time as well.