Installation instruc tio ns – Poison Spyder JK FRONT ROCKBRAWLER BUMPER User Manual
Page 5
INSTALLATION INSTRUC
TIO
NS
Poison Spyder Customs • JK FRONT ROCKBRAWLER BUMPER INSTALL
Page 5
©2009 POISON SPYDER CUSTOMS, INC. • 951-849-5911 • WWW.POISONSPYDER.COM
able to install the bracket later without having
pre-positioned it.
13. Re-install the RockBrawler bumper onto
the Jeep. It should fully seat this time, with
the weld-nuts mentioned in Step 9 fitting
through the clearance holes you drilled.
Install and tighten all eight (8) lock nuts and
flat washers onto the bumper mounting studs
(two inboard and two outboard of each frame
rail).
14. If you installed the OE fog lamps into the
RockBrawler bumper, plug the harness
connectors back into the sockets in the back
of each lamp. Use the OE wire harness
push-in retainers to secure the harness to the
three (3) provided holes on a flange inside
the RockBrawler bumper. These holes are
shown in Figure 15, with the bumper off the
Jeep for clarity. You will have to locate them
by feel as the area is hard to see once the
bumper is installed.
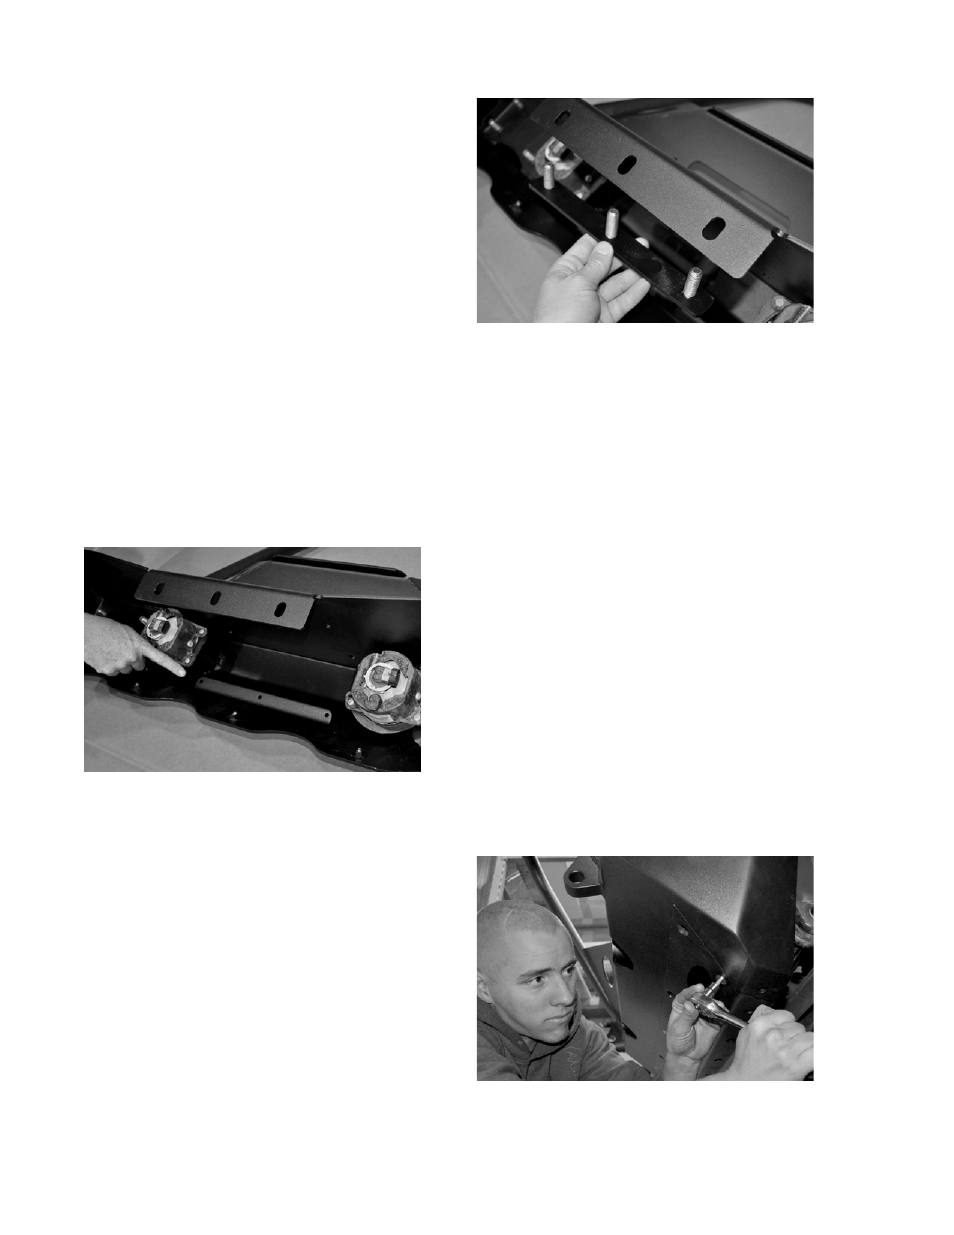
FIGURE 15
15. Pre-position the Sub-Frame Bracket
Retainer Plate. There are three slotted
holes in the vertical flange at the top/rear of
the bumper. Insert the three captured studs
on the retainer plate through these slots,
from the inner side of the bumper (so that
the threads are pointed toward the rear of the
Jeep). Figure 16 illustrates this on an un-
installed bumper for clarity.
FIGURE 16
16. Install the Sub-Frame Bracket, which you
may have already pre-positioned in Step 12
(cut the zip ties if you did). The three slotted
holes along the top of the bracket are to be
slipped over the three protruding threaded
studs of the Sub-Frame Bracket Retainer
Plate (which was pre-positioned in the
preceding step). The lower edge of the Sub-
Frame Bracket will fit against the backside
and underside of the crash bar. Where the
90° flange fits against the underside of the
crash bar, it will fit between the crash bar
and the lower lip of the bumper at either end.
Install a 1/2-20 lock nut and 1/2” flat washer
onto each of the three (3) threaded studs of
the Sub-Frame Bracket Retainer Plate, but
do not tighten them at this time.
17. Pre-Install the Removable Skid Plate. Use
three 3/flat head cap screws to temporarily
hold it in place, one at the center along the
top and one along the bottom at each end.
Ensure that the skid plate is properly seated
into its recess in the bumper, and snug the
three flat head cap screws.
FIGURE 17
18. The five countersunk holes along the
bottom edge of the skid plate will require