Using your saw – SawStop 3.0HP User Manual
Page 52
50 SawStop 10” Professional Cabinet Saw
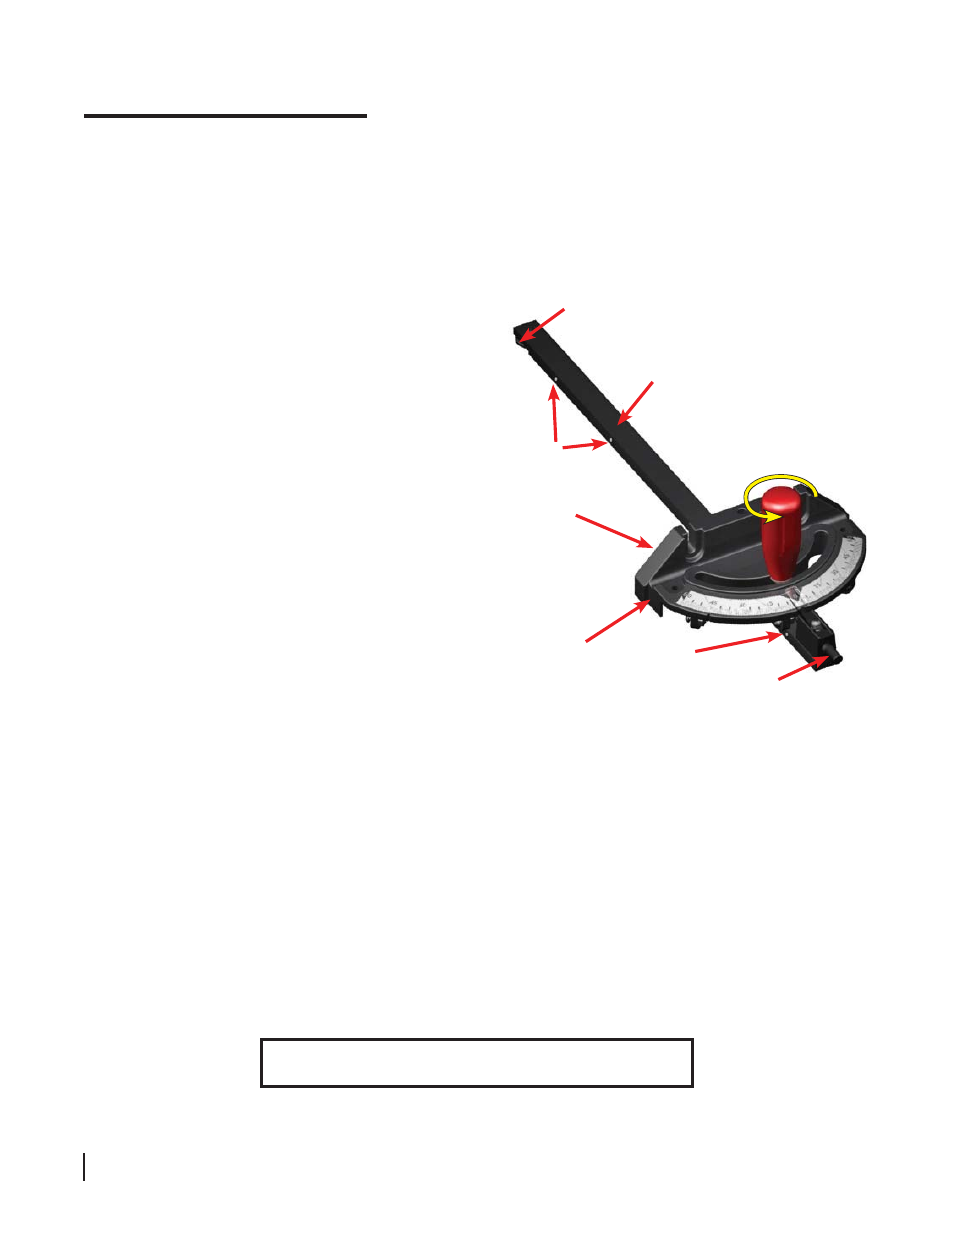
A guide plate is mounted on the end of the main bar (see Fig. 77) and fi ts in the bottom of the slots to hold the
front of the miter gauge in place when the miter gauge head is positioned in the front of the forward edge of
the table. Three spring bearings are mounted in the side of the main bar to ensure the bar slides smoothly in
the slots without excessive play. These spring bearings are preset at the factory to allow smooth operation of
the miter gauge, and should not require further adjustment. If you wish to adjust the spring bearings, see page
83 for instructions.
The face of the miter gauge can be adjusted
between -60° and +60° relative to the blade. To
adjust the miter angle, turn the handle counter-
clockwise approximately
1
⁄
2
turn to unlock the miter
gauge head (see Fig. 77). Pull the indexing pin
out until it stops, and then rotate the head until the
indicator is positioned over the desired angle on the
miter gauge scale. Use an angle gauge to set the
angle between the miter gauge head and the blade
if precise alignment is needed. Once the angle is
correct, turn the handle clockwise to lock the miter
gauge head.
Adjustable index stops at -45°, 0°, and +45° are
provided to allow quick and precise alignment at
those angles. To use the index stops, rotate the
miter gauge head until the angle indicator reads
approximately 5° higher (more positive) than the
desired angle, and then push the indexing pin
forward until it stops. Next, rotate the miter gauge
head counter-clockwise until the index stop hits the
indexing pin, and then tighten the handle to lock the
gauge at the desired angle. The index stops are
preset at the factory so further adjustment should
not be necessary. If you wish to adjust the index
stops, see page 83 for instructions.
For added safety, an optional wood face can be mounted to the miter gauge face to provide additional support
when cutting large or small workpieces. To mount the face, use wood screws with shanks sized to fi t through
the slots in the miter gauge head. The wood face should be at least 1 inch higher than the maximum depth of
cut, and should extend beyond the edges of the miter gauge head.
When using the miter gauge, start with the workpiece and miter gauge well in front of the blade. Grip the
miter gauge handle with the hand closest to the blade, and place your other hand on the workpiece opposite
the blade (see Figs. 78 and 79 on page 51). Make sure the workpiece is held squarely and fi rmly against the
miter gauge face and the table. Move the miter gauge and workpiece slowly and smoothly past the blade. For
through-cuts, shift the workpiece slightly away from the blade before pulling the miter gauge and workpiece
back toward the front of the saw. Do not touch the portion of the workpiece that was cut off until the blade is
stopped.
Using Your Saw
WARNING! Never make freehand cuts. Never hold or touch
an unsupported piece of wood while the blade is spinning.
miter gauge
head
indexing
pin
turn handle to unlock
miter gauge head
face
Fig. 77
spring
bearing
spring
bearing
main bar
guide plate