Av1410, Sy stem setup menu – Audiovox AV1410 User Manual
Page 16
AV1410
12
SY
STEM SETUP MENU
In “System Setup” mod
e
, “ASP CONFIG”
and “GENERAL
SETUP”
are available for
adjustment.
S
e
tup ca
n be
perfor
m
ed by pressing
the dedicate
d button on t
he remote
co
ntrol or on
the front
p
anel. For
system set
tings, pr
ess the
SYS
SETUP
button (
31) on
the remot
e
cont
rol to enter
the
“System
S
e
tup” menu.
“ASP CONFIG” is hi
ghlighted in
green
.
Ge
ne
ral
Se
tu
p
Men
u
Accessi
ng t
h
e Gen
e
ral Setup
Menu
T
o
access the “GENERAL SETUP”
Menu, press
th
e
d
ir
e
ction
buttons on
the
joystick (16
, 17,
18, 19
) or
r
e
mote contr
o
l
(14,
17, 18, 19
, 22) to h
ighlig
ht “GENERAL SETU
P
” in
green.
Press t
he
button
(18)
on the re
mote control to enter
the
“GENERAL SETU
P
” menu. A menu a
ppears with the op
tion
for the
fir
s
t item, “
R
adio”, highlighte
d
in light blue.
Selectin
g a F
eatu
re fo
r Adju
stm
e
nt
Press t
he
or
buttons (14
, 22) on t
he remote
contr
o
l
or
the
or
buttons (18, 1
9
) on the
joyst
ick to
select the
featur
e to be adjusted.
Ad
just
ing a
Feat
ure
1.
Enter
the option fie
ld for
the featu
re you want to
adju
s
t
by pressing th
e
bu
tton (18)
on the r
e
mote or
by
pre
s
sing
the
ENTER
(
joyst
ick)
button
(20)
on th
e unit. A
submenu appe
ars in a
second r
o
w with the selected
option highlighted
in lig
h
t blu
e
.
2.
Select a n
e
w value b
y
pr
essing the
or
but
tons (
14,
22)
on the remo
te con
trol or the
or
buttons (18,
19)
on the joystick.
3.
Confirm your
selection
by pr
essing the
,
, or
buttons (14, 17, 19)
on the remo
te
contr
o
l, or the
or
button (
16, 17)
on the joystick. T
he new value is
highlighted in ligh
t blue
and setup is complete.
Ad
justing
the
Clock
Met
hod
1 – T
FT
screen o
p
en
:
1.
Access the “C
lock” setting
under th
e Gen
e
ral Setup
menu.
2.
Press the
or
butto
ns (
14, 22)
on the re
mote
control or
the
or
b
u
ttons (18, 19)
on the joystick to
move the cursor
to the “H
our”
or “
M
in”
position.
3.
Press the
, or
button
s
(
17, 19)
on the re
mote
control or
the
or
button
s
(
16, 17) o
n
the joystick to
adjust the hour
or minutes.
4.
Press
the
button (1
4) on the remote control to conf
ir
m
setup.
Met
hod
2 – T
FT
screen clo
sed:
1.
Press and hold the
DI
S
P
b
u
tton (5)
until the
clock
flash
e
s in the LC
D display
.
1.
Press the
or
buttons (18, 1
9
) on the
joyst
ick to
move the cursor
to the “H
our”
or “
M
in”
position.
2.
Press the
or
butt
ons (
16, 17)
on the joystick to
adjust the hour
or minutes.
3.
Press the
DISP
butto
n (5)
on the unit to confirm setup.
R
e
tu
rn
in
g
to
th
e
Sy
s
te
m
Se
tu
p Me
n
u
T
o
retur
n
to the System Setup menu,
move to
, then
pr
ess the
button on t
he remote
contr
o
l.
ASP (Audio Sound
P
rocessing) Co
nfig
Menu
T
he ASP
C
onfig Menu allow
s
you to make fine audio
adjustment
s.
Acc
essing
th
e ASP Con
fig
Menu
T
o
access the “ASP CONFIG” Menu, press the direction
button
s
on
the
joystick
(1
6,
17
,
18, 19) or remote co
ntrol
(14,
17, 18
, 19, 22) to hi
g
h
light “ASP CONFIG” i
n
green. Press
the
button (18) on t
he remote
c
ontrol
to enter t
he “ASP
CONF
IG”
menu. A menu a
ppears with the opt
ion for
the first
item, “Bass Center
Freq
”, highlighted
in lig
h
t blu
e
.
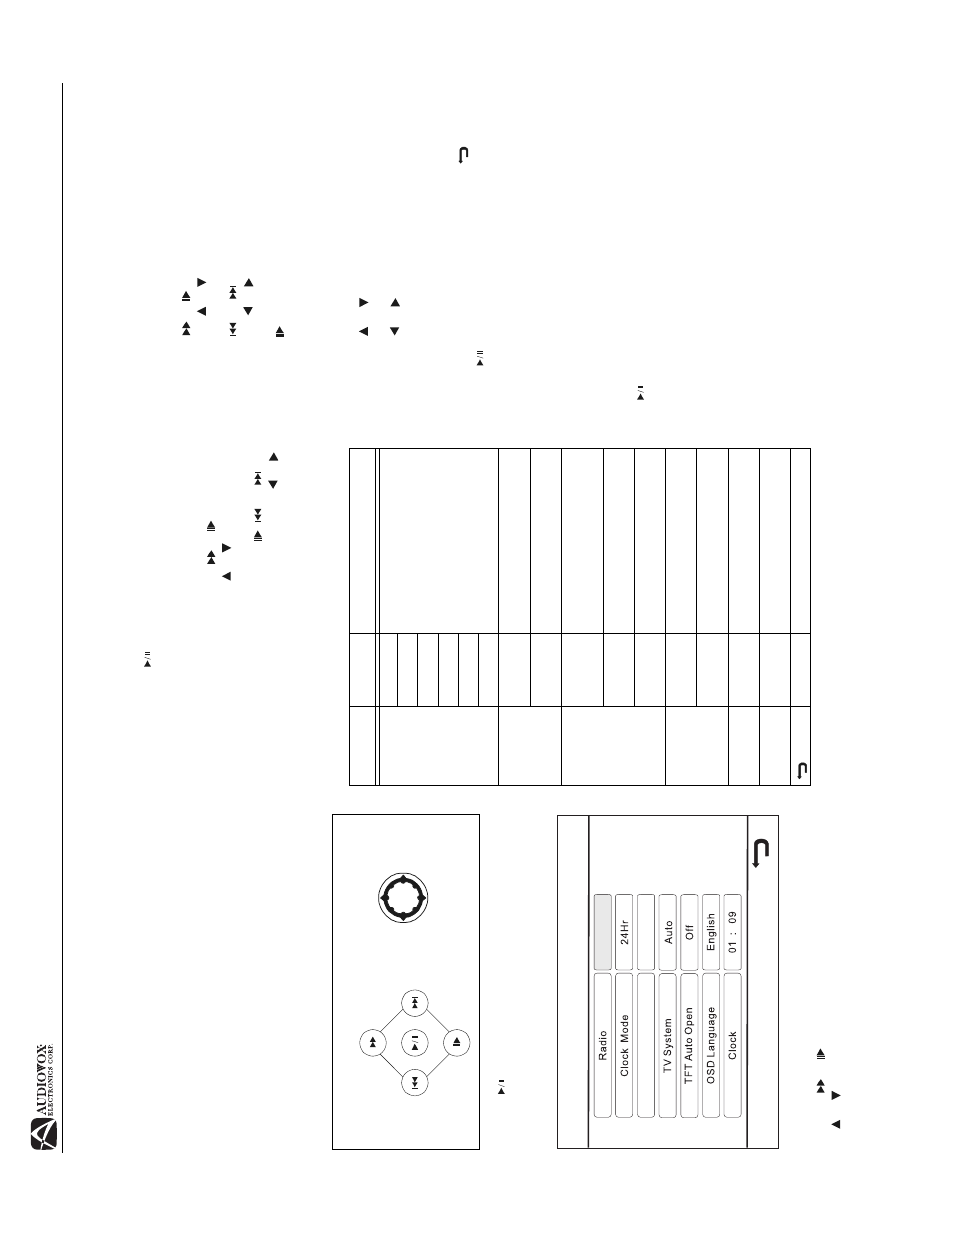
DIRECT
ION BUT
T
O
N
S
General
Setup
USA1
T
a
b
le 7: Gene
ra
l
S
e
tup
Menu
Feat
ures
Se
tt
in
g
O
pt
io
n
s
Fu
nc
ti
on
Ra
dio
U
SA
1
S
el
ect th
e
a
ppro
p
riat
e set
tin
g
based
on
t
he count
ry in which yo
u
reside.
USA
2
Ar
abia
Chin
a
S-
Americ
a
Eu
rope
Clo
ck
Mode
12H
Clock di
sp
lays 12
ho
ur
ti
me u
s
ing
AM and PM.
24H
Clock di
sp
lays 24
ho
ur
ti
me u
p
t
o
23:
59.
TV
Syst
em
Au
to
The
color
signa
l o
u
tp
ut
is
swit
ched
aut
omat
ically based on
t
he curre
nt
disc.
NTSC
The color signa
ls ar
e
o
u
tp
ut
in
t
he
st
and
ard NTSC
fo
rma
t.
P
A
L
T
he color signa
ls ar
e
o
u
tp
ut
in
t
he
st
and
ard P
A
L f
o
rmat
.
TFT Auto
O
pen
On
The TFT
p
a
nel au
toma
tical
ly
o
pens
when t
he unit
is
tu
rne
d
on.
Of
f
Y
ou must
pr
ess t
he OPE
N
bu
tt
on
(1) t
o
open
t
he TFT
p
ane
l.
O
S
D Lan-
g
uage
En
glish
T
he men
u
s are d
isplayed i
n
Eng
lish
only
.
Clo
ck
(HH:
MM)
See
“A
djust
ing t
he cl
ock”
t
o
learn
how t
o
set t
h
e
clock.
Ret
u
rn t
o
p
revious menu.