Av1410, Using the tft monitor – Audiovox AV1410 User Manual
Page 14
AV1410
10
USING THE TFT MONITOR
Open/Close TFT Monitor
O
p
e
n
TF
T Mo
ni
to
r
Press t
he
O
PEN
b
u
tton (1)
on the fr
ont p
a
n
e
l or
press the
(
)
button (2
5) of the
front zone r
e
mote control to activate
the mechanism th
at move
s the
di
spla
y p
anel into the
viewing
position.
Clos
e TF
T Mon
ito
r
Press t
he
O
PEN
b
u
tton (1)
on the fr
ont p
a
n
e
l or
press the
(
)
button (2
5) of the
front zone r
e
mote control to load the
display p
anel back into the comp
ar
tment.
TFT
Moni
tor A
u
to
Open
If “T
FT
Auto Op
en” is “
on” w
hen the unit is tu
rned on,
the
monitor automa
tically move
s to t
he viewing position.
If “T
FT
Auto Op
en” is ”
o
ff
” when
the unit is tur
ned on, pr
ess
the
OPEN
button (
1
) or
(
) b
u
tton (25
) on the
front zone
remote
contr
o
l
to move
the monitor into the viewing position.
Rev
e
rse D
riv
ing Use
If
th
e
rear-view video camer
a
is
connected,
the unit
is on
, and
the monitor is st
atione
d inside the main comp
artme
n
t of the
unit, the monitor au
tomatically moves
into th
e viewing
position and switches to
CAMERA mode upon
reverse
driving. When t
he reverse dr
iving
stop
s, th
e monito
r ret
u
rns
to the main storage
comp
artment.
If the monitor is in
display mod
e
, the monitor au
tomatically
sw
itches to CAMERA mode u
pon reverse dr
iving. When the
reverse dr
ivin
g stop
s, th
e monit
o
r re
turn to it
s original input
mode.
Moni
tor T
ilt
Angle
Adjustment
A kno
w
n characteristic of LC
D
p
anels is the quality of th
e
display in r
e
lationship to the vie
w
ing
angle
. The monitor
angle ca
n be adjuste
d for opt
imum vie
w
ing
using one
of the
following metho
d
s:
S
tep b
y
S
tep
Ang
le Ad
justm
e
nt
Press t
he (
) or
(
) button (3
, 4) on th
e monitor fr
ame to
adjust th
e tilt angle of the screen o
ne ste
p
at a time.
Con
tin
uo
us An
gle A
d
jus
tme
nt
Press a
nd hold
the (
) or (
) button (
3
, 4) o
n
the monitor
frame t
o
adju
s
t the
tilt angle in
a con
tinuou
s motion.
Aspect Ratio
Press t
he
WIDE
button (
28) on
the remote
contr
o
l
or
WIDE/
PICTURE
button
(2)
on
the mo
nitor
to
adju
s
t
the aspect r
a
tio
as follows:
Image Setting
V
ideo
O
u
tp
ut
Fo
rm
at
T
able
3
show
s th
e video outp
u
t format fo
r each playing
source.
*CVBS – Composite V
ideo Baseband Signal
Ad
justable Param
e
ters
While in DVD or
TUN
E
R mode, the o
n
ly p
a
ra
meter th
at can
be adjusted is br
ight
ness (BR
IGHT
). T
o
access “PICT
URE”
,
“C
OLO
R
”,
“CO
N
T
R
AST”, a
nd “T
INT”
you
must b
e
in AU
X o
r
CAMERA mode.
NOTE:
T
h
e d
e
fau
lt ad
justm
e
nt is “0” in P
A
L mo
de. T
in
t is
un
availab
le fo
r adju
stm
e
nt.
Paramet
e
r Adju
stm
e
nt
Proced
ure
1.
Ent
e
r Picture Qu
ality Set
ting
mo
de:
Press the
PIC
butto
n (24)
on the r
e
mote or
p
ress an
d
hold
the
WIDE/PICT
URE
but
ton (2)
on the monitor
pa
n
e
l.
2.
Select Item
to
Set:
Press the (
) (
) buttons (14, 2
2
) on the
remote or
pr
ess and ho
ld
the
(
) or (
) button
s
(
18, 19)
on the
monitor p
anel.
3.
Set Pa
ram
e
ters:
Press (
) (
)
button
s
(17,
19)
o
n
the
r
e
mote
or
press
(
) (
) bu
ttons (
16, 17)
on the monitor
p
anel.
4.
Exit P
icture Qua
lity Setting
Mod
e
:
Pr
ess the
PIC
but
ton (24)
on the r
e
mote or
press a
nd
hold
the
WIDE/PICT
URE
but
ton (2)
on the monitor
pa
n
e
l.
Parking Brake
Inhibit
•
W
hen the
“PRK SW” cable
is
connected to the br
ake
switch,
the disp
lay on
the T
FT
monito
r will d
ispla
y video
only when the vehicle is a
pplied.
•
P
arking bra
k
e fun
c
tion is overr
id
den when th
e video
source is set to C
A
MER
A
.
•
W
hen the
p
a
rkin
g brake inhib
it is a
c
tive
, the fron
t
monitor d
ispla
ys “Par
king Is
On
”, pr
eventing the
driver
fr
om watching content
while dr
iving
. Rear vid
eo scree
n
s
ar
e not af
fected.
Monitor Movement
Mechanism
If an o
b
str
u
ct
ion occurs in
the monitor p
a
th, the follow
ing
pr
otective measurement
s can be e
x
ecuted to p
revent
damage
to the mechanism o
r monitor:
Af
ter
the pr
otective procedur
e is executed, nor
mal ope
ration
is r
e
sumed by pre
s
sing
the
OPEN
button (2) or
disconn
ecting
and r
e
connecting th
e power
.
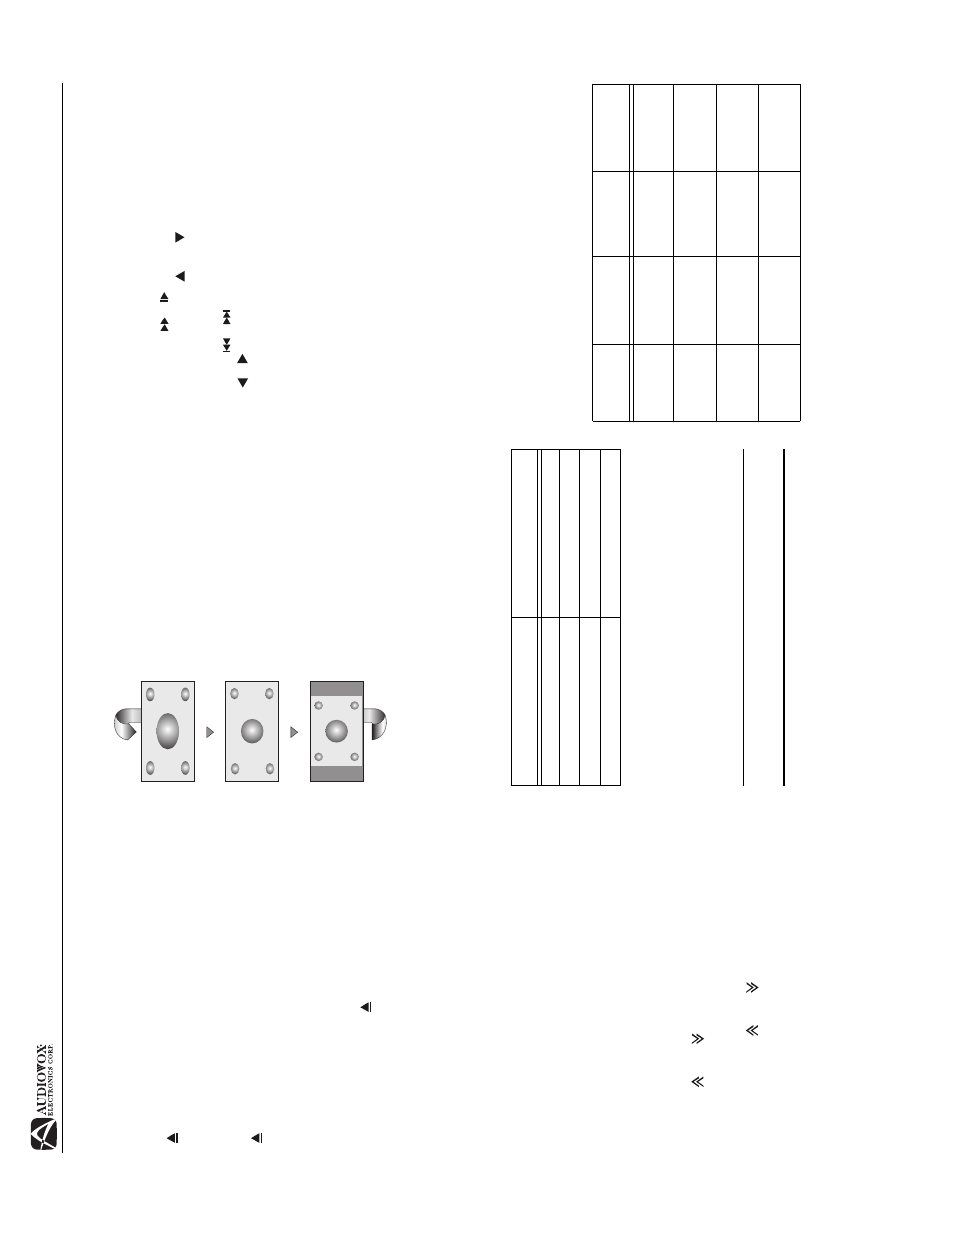
T
a
ble 3:
V
id
e
o O
u
tp
u
t Fo
rmat
s
Pla
y
ing
Source
V
id
e
o O
u
tput
Fo
rmat
TUNER
R
GB M
o
de
DVD
R
GB
M
o
d
e
A
U
X IN
CV
BS Mode
CA
MERA
CV
BS Mode
FU
L
L
T
he entire screen is exten
ded
ho
rizont
a
lly to the aspect
ra
tio
of 16 to
9.
The extension
ratio is the same at
an
y point.
WIDE
T
he screen is extended horizo
n
ta
lly
to
the
aspe
ct r
a
tio
of 16 to 9. T
he
extension ratio incr
eases tow
a
rd the
ri
ght
and le
ft
ends of the screen.
NO
R
M
AL
T
he con
v
entional display image has a
4 t
o
3 ratio of hor
izont
a
l to vertical,
leaving
a blan
k ar
ea on the r
ig
h
t and
lef
t sides of
the display
.
T
a
ble 4:
Mon
itor Prot
ectiv
e Measures
Ob
st
ru
ct
io
n
Sel
f
Pr
otect
ion
O
PEN Button
Pr
es
sed
Pow
e
r
Rec
o
n
n
ec
ted
Mon
ito
r load-
in
g o
u
t ho
ri-
zont
ally
Monit
o
r is aut
o-
mati
c
a
lly
loade
d int
o
u
n
it
M
o
n
ito
r fu
lly
ext
ended
h
o
ri-
zont
a
lly
Monit
o
r is aut
o-
matically
load
ed int
o
unit
Mon
ito
r load-
in
g i
n
h
o
ri-
zont
ally
Unit stop
s
at
obstr
uctio
n
point
M
o
n
ito
r fu
lly
ext
ended
h
o
ri-
zont
a
lly
Monit
o
r is aut
o-
matically
load
ed int
o
unit
Mon
ito
r load-
in
g o
u
t verti-
call
y
Unit stop
s
at
obstr
uctio
n
point
Monit
o
r swiv-
els
back
t
o
t
h
e
uni
t
Monit
o
r swiv-
els back
to
th
e
unit
Mon
ito
r load-
in
g i
n
ver
ti-
call
y
Unit stop
s
at
obstr
uctio
n
point
Monit
o
r swiv-
els
back
t
o
t
h
e
uni
t
Monit
o
r swiv-
els back
to
th
e
unit