En + drawings, Diagram 4. preparation, Diagram 5. how to put the harness on – Petzl NAVAHO SIT FAST User Manual
Page 5: Na vaho sit or na vaho sit fast + top, 19 mm, 6a. 6b
5
NAVAHO SIT / NAVAHO SIT FAST / TOP / TOP CROLL C79502-C (200907)
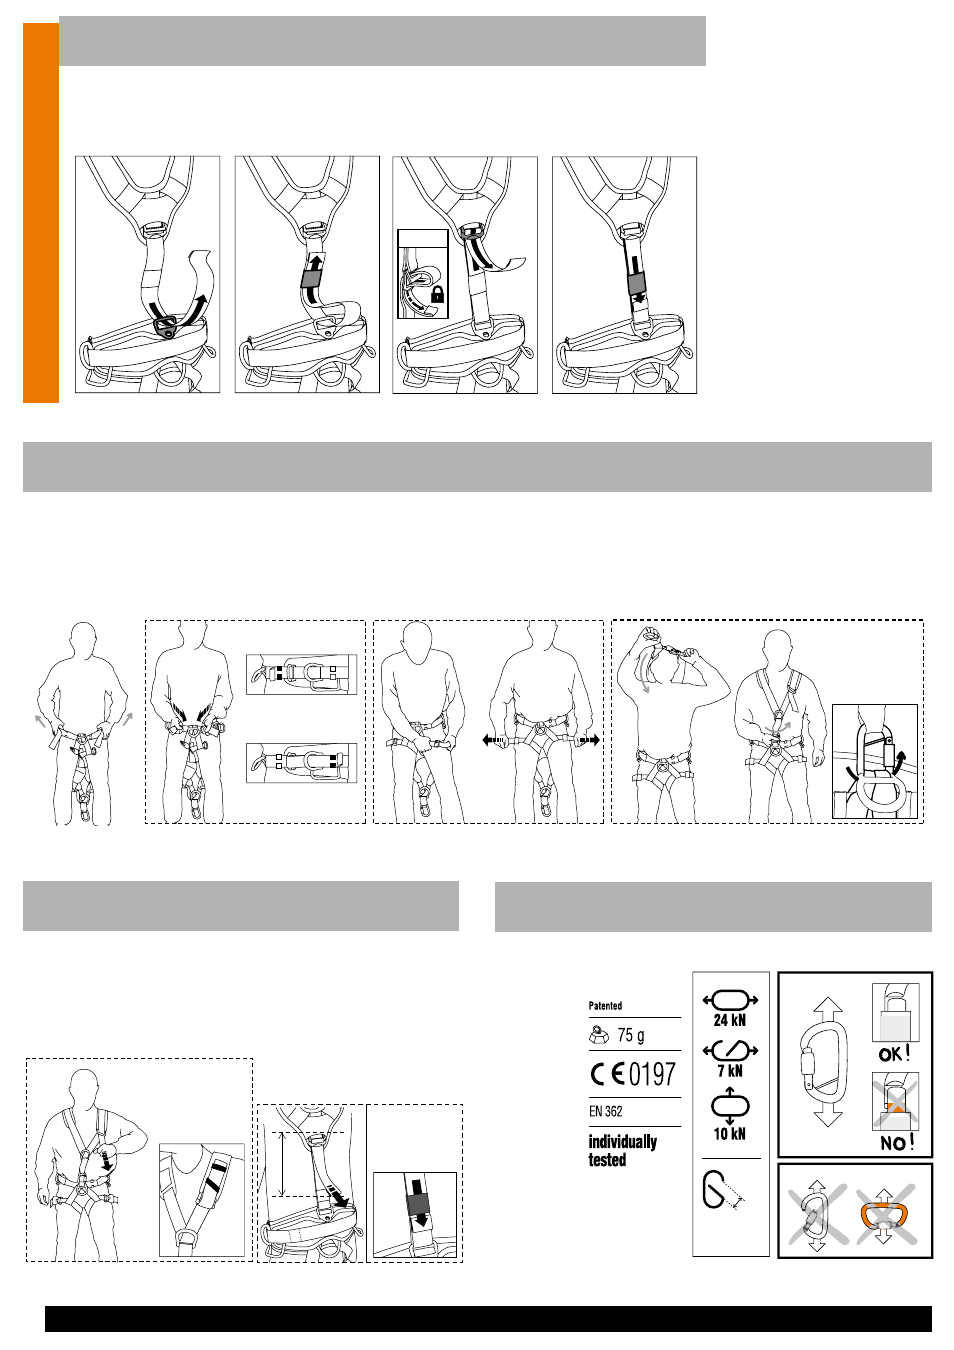
Diagram 4. Preparation
To attach the chest harness to the seat harness, pass the dorsal strap
through the rear chest-seat joining buckle (9), then through the elastic
retainer. Then thread the strap through the adjustment buckle for the dorsal
adjustment (2), then again through the elastic retainer.
1.
2.
E
NA
VAHO
SIT or NA
VAHO
SIT
FAST + TOP
3.
4.
Diagram 5. How to put the harness on
Open the buckles on the leg loops.
Adjustment and
suspension test
Your harness must be
adjusted to fit snugly to
reduce the risk of injury in
case of a fall.
You must move around
and hang in the harness
(suspension test) from
each attachment point
with your equipment to
verify that the harness
fits properly, provides
adequate comfort for the
intended use and that it is
optimally adjusted.
5F. Initial dorsal adjustment
This adjustment should be done
only once when putting on your
harness for the first time. Have
another person help you do it.
Slide the strap retainer so that
both layers of webbing are
taut between the two buckles,
(2) and (9) (no slack).
Be sure to neatly stow the excess
webbing (flat - no loops of slack)
in the strap retainer so that it
doesn’t interfere with your work.
Adjust the position to suit your
individual body shape and size,
position the DoubleBack buckle at
the level of the shoulder blades.
5E. Adjust the shoulder straps. Stow the excess webbing
using the strap retainer on the shoulder strap.
5D. Position the shoulder straps on the shoulders. Put the connector in the
ventral point (textile) connecting the chest harness to the seat harness (5).
Lock the connector by turning the locking sleeve.
5C. Fasten and adjust the leg loops.
- NAVAHO SIT: DoubleBack buckles.
- NAVAHO SIT FAST: Fasten the FAST buckles. Be careful of foreign
bodies which can impede the operation of the FAST buckles (such as
pebbles, sand, clothing...). Check for correct locking.
5B. Adjust the belt by pulling on the belt straps. Stow
the excess webbing neatly using the strap retainers
(flat against the waist belt).
5A. Putting the shoulder
straps off to one side, hold
the seat harness by the belt,
put your legs through the belt
and pull it up to your waist.
- Long ends: pass them through
the lateral rings then through the
retainers behind the rings.
- Short ends: use the retainers
in front of the adjustment buckles.
5A.
5B.
5C.
5D.
5F.
F
F
5E.
Class T
19 mm
Diagram 6. Manual locking oval directional
connector
This EN 362: 2004
connector, a component
of the harness, is a
connecting element for
linking the chest harness
to the seat harness. Do not
use it to attach a lanyard
or energy absorber.
6A. ATTENTION DANGER,
the connector must always
be used with the gate
closed and locked. The
strength of the connector
is greatly reduced if the
gate is open.
Systematically verify the
gate is closed by pressing
it with your hand.
6B. The connector (closed)
is strongest when loaded
on its major axis. Any
other position reduces its
strength.
Class T
19 mm
Class T
19 mm
6A.
6B.
G