Press the menu/enter button, 2 select an item with the cursor button ^ a or t, 0 set (adjust) the item – Ask Proxima D-ILATM Pro AV SX1 User Manual
Page 34: 2 select an item with the cursor button, Main menu, Operating the main menu (cent.)
Attention! The text in this document has been recognized automatically. To view the original document, you can use the "Original mode".
Operating the Main Menu (Cent.)
Operating the Main Menu (Basic Operation of the Main Menu)
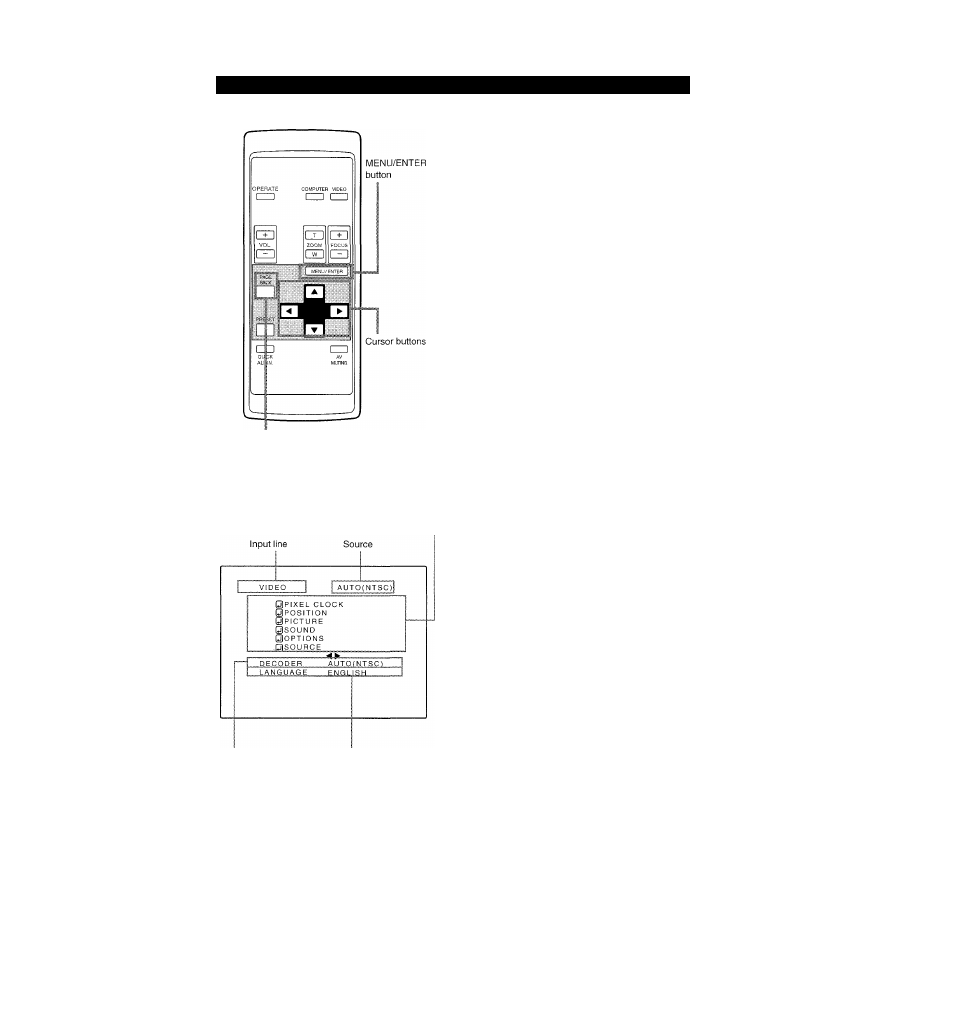
Remote control unit
For projector’s menus, the setting menu and the main menu are
available.
For the setting menu, refer to “Making Basic Settings” on page 31.
-| Press the MENU/ENTER button.
• The main menu is displayed on the screen.
2 Select an item with the cursor button
^
A
or
T.
• The selected item (displayed text) is shown in magenta color
on the screen.
0 Set (adjust) the item.
■ When you have selected DECODER or LANGUAGE,
• Set it with the cursor button ◄ or ►.
* To finish the main menu, press the PAGE BACK button.
■ When you have selected an item on the submenu,
• Press the MENU/ENTER button to display the submenu, then
set (adjust) the item with the cursor buttons ^ / ► or A / ▼.
* To return to the main menu, press PAGE BACK again. (To
finish the main menu from the submenu, press PAGE BACK
twice.)
PAGE BACK button
Main menu
(Example: During video signal input)
Submenu items
Color system (DECODER) Language
About main menu display:
Input line:
The selected input-mode designation is
displayed. For input-mode designation, “Y/
C”,
“VIDEO”,
“Y,
P
b
/B-Y,
P
r
/R-Y”,
“COMPUTER
1”
and
“COMPUTER
2”
are
available.
Source:
The type of signal being input is displayed.
With this projector, unique designations are
previously given to specific horizontal and
vertical frequencies. This allows the source
selected under SOURCE (submenu item) to
be indicated. The source setting can be
selected from AUTO mode and dedicated
(forced) modes. When AUTO is selected, the
horizontal
and
vertical
frequencies
of
a
signal
being
input
are
detected and
the
matched designation is displayed in ( ).
Display
example:
“AUTO
(NTSC)”
Therefore, be careful as the source display
does not always correspond to the indication
or type of the input signal.
For the unique designations for the specific
horizontal
and
vertical
frequencies,
see
pages 19 and 46.
Submenu items:
PIXEL CLOCK: See page 37.
POSITION
PICTURE
SOUND
OPTIONS
SOURCE
Decoder (Color system)
Language
See page 38.
See pages 39-41.
See page 42.
See pages 43-45.
See pages 46 and 47.
: See page 35.
: See page 36.
34