Operating the setting menu, O perating the setting m enu, Making basic settings – Ask Proxima D-ILATM Pro AV SX1 User Manual
Page 31: J press the “setting” button of the projector
Attention! The text in this document has been recognized automatically. To view the original document, you can use the "Original mode".
Operating the Setting Menu
Making Basic Settings
Projector’s buttons
Ш
emergency
( — )
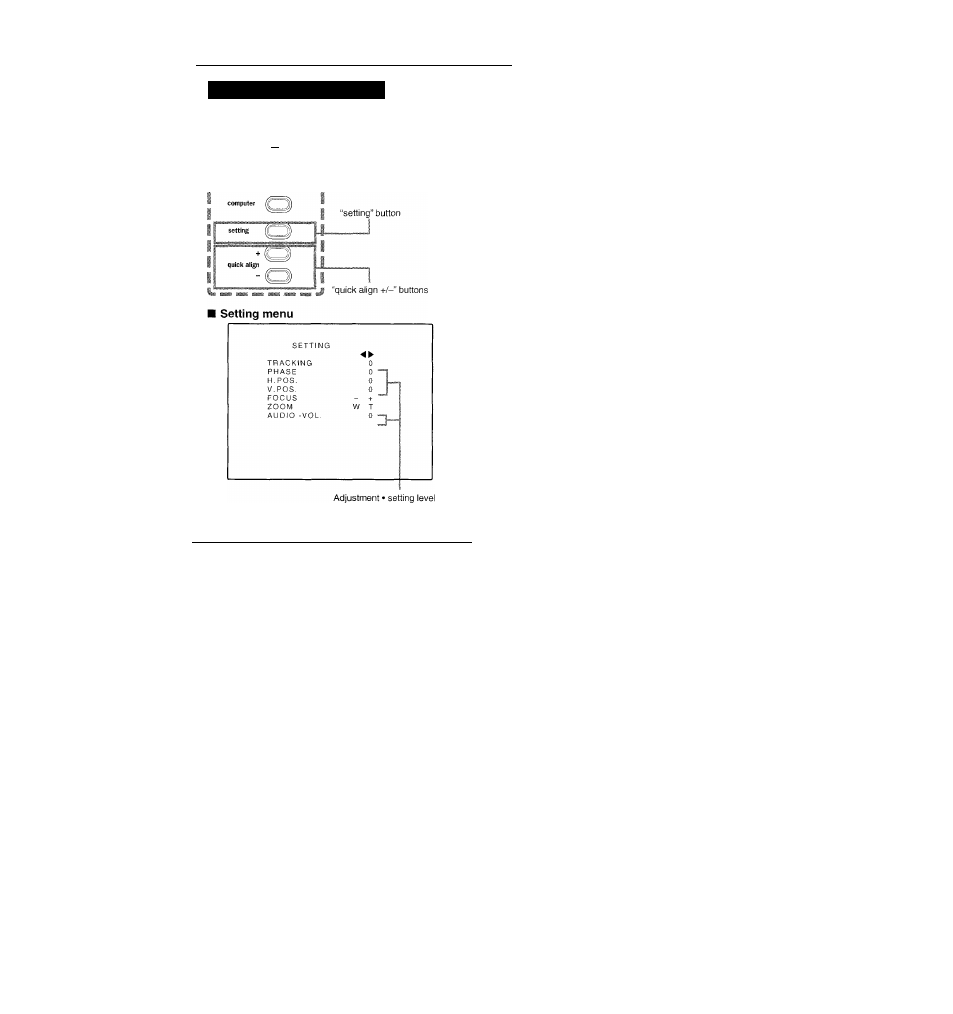
Description of adjustment and setting items
TRACKING
;
; If wide vertical stripes appear on the screen,
adjust the lateral video size and display area
so that they disappear. (-255 0 «-> -i-255)
PHASE
; If characters on the screen flicker or become
dim, adjust so they become clear.
(-127 ^^0 e^-r127)
H. POS.
; If the screen position is displaced to the right
or left, adjust the horizontal position of the
screen. (-255 0 -t-255)
V. POS.
; If the screen position is displaced upward or
downward, adjust the vertical position of the
screen. (-120 0 ^ -i-120)
FOCUS
; Adjust the focus of video picture.
Focuses on near points.
+: Focuses on farther points.
ZOOM
; Adjust the screen size (angle of view).
T : Becomes smaller.
W: Becomes larger.
AUDIO-VOL. ;
; Adjust the sound level.
(0 ^ 50)
• This adjustment menu (setting menu) can be displayed with only the
projector’s button. After displaying the setting menu, you can select
or set (adjust) items with cursor buttons on the remote control unit,
• If settings and connections are changed, adjust and set those items
again.
• After this adjustment (setting menu), if video picture adjustment is
necessary by using the devices connected, perform the details setting
and adjustment on the main menu (pages 34 to 47).
• For computer-related inputs, use of the quick alignment function
allows automatic adjustment of TRACKING, PHASE, H. POS. and
y. POS. (See pages 31,37 and 38).
■j Press the “setting” button of the
projector.
• The setting menu is displayed on the screen.
2 Press the “setting” button to
select the desired item.
• The selected item is shown in magenta color. Each time
you press the button, the selected item changes as
follows:
TRACKING
Menu clearing
PHASE
AUDIO-VOL.
H. POS.
ZOOM
V. POS.
FOCUS
To select items using the remote control unit:
Items can be selected using the cursor buttons
a
(backward) or
t
(fora/ard) on the remote control unit. In this case, menu clearing in the
above order is not available. The selection changes from AUDIO-VOL
to TRACKING directly.
Q Adjust and set the selected item
using the “guick align +/-”
buttons.
• To adjust and set multiple items, repeat steps 2 and 3.
•To
reset
the adjustment value
of the selected item
(TRACKING,
PHASE,
H.
POS.
or
V.
POS.)
to
the
factory-set value, press the remote control’s PRESET
button. This button does not work for focus, zoom or
sound volume.
To adjust and set items using the remote control unit;
Items can be adjusted and set using the cursor buttons or ► on the
remote control unit.
Clear the setting menu by
pressing the “setting” button
repeatedly.
To clear the setting menu using the remote control unit:
You can also clear the setting menu by pressing the PAGE BACK
button on the remote control unit.
Using the quick alignment function:
This function works only for computer-related signals inputted. Press
the remote control’s QUICK ALIGN, button, or after clearing the menu
displayed, press the projector’s “quick align +/-’’ at the same time.
TRACKING, PHASE, H. POS. and V. POS. are automatically adjusted.
During the adjustment, “QUICK ALIGNMENT” appears on the screen,
and disappears after the adjustment finishes.
31