Lubrication, Water valve adjustment (water-cooled units only), Factory oil charge – Carrier 07D User Manual
Page 28: Solenoid valve electrical characteristics, 06d,07d, Installation
Attention! The text in this document has been recognized automatically. To view the original document, you can use the "Original mode".
06D,07D
INSTALLATION
blocking the air flow on air-cooled units, allow
ing the head pressure to rise gradually. The
cutout and cut-in pressures should be within
10- to 15-pounds of the values shown in Table 6.
If they are not, the pressurestat should be re
placed or adjusted if it is an adjustable type.
Check the low-pressure cutout by closing the
suction shut-off valve or by closing the liquid
line shut-off valve to allow the compressor to
pump down. The cut-in and cutout points may
be adjusted if necessary.
Lubrication
A properly adjusted compressor should run with
the crankcase warm to the touch. Check oil level
frequently to see that a sufficient amount of oil
remains in the crankcase. Check the oil pres
sure by looking thru the crankcase sight glass
at the oil pressure relief valve, (For 2 cylinder
compressors, see Fig, 22.) If oil is discharged
from the relief valve, pressure is adequate.
To check the oil charge on 2 cylinder 6D com
pressors, proceed as follows;
1. Pump down the compressor, turn off power
and close the shut-off valves.
2. Remove the suction manifold pressurestat
connection and half-union coupling.
3. Insert a dipstick in the hole and measure the
oil charge.
Below is a sketch of a simple dipstick that may
be used on 2 cylinder 6D compressors.
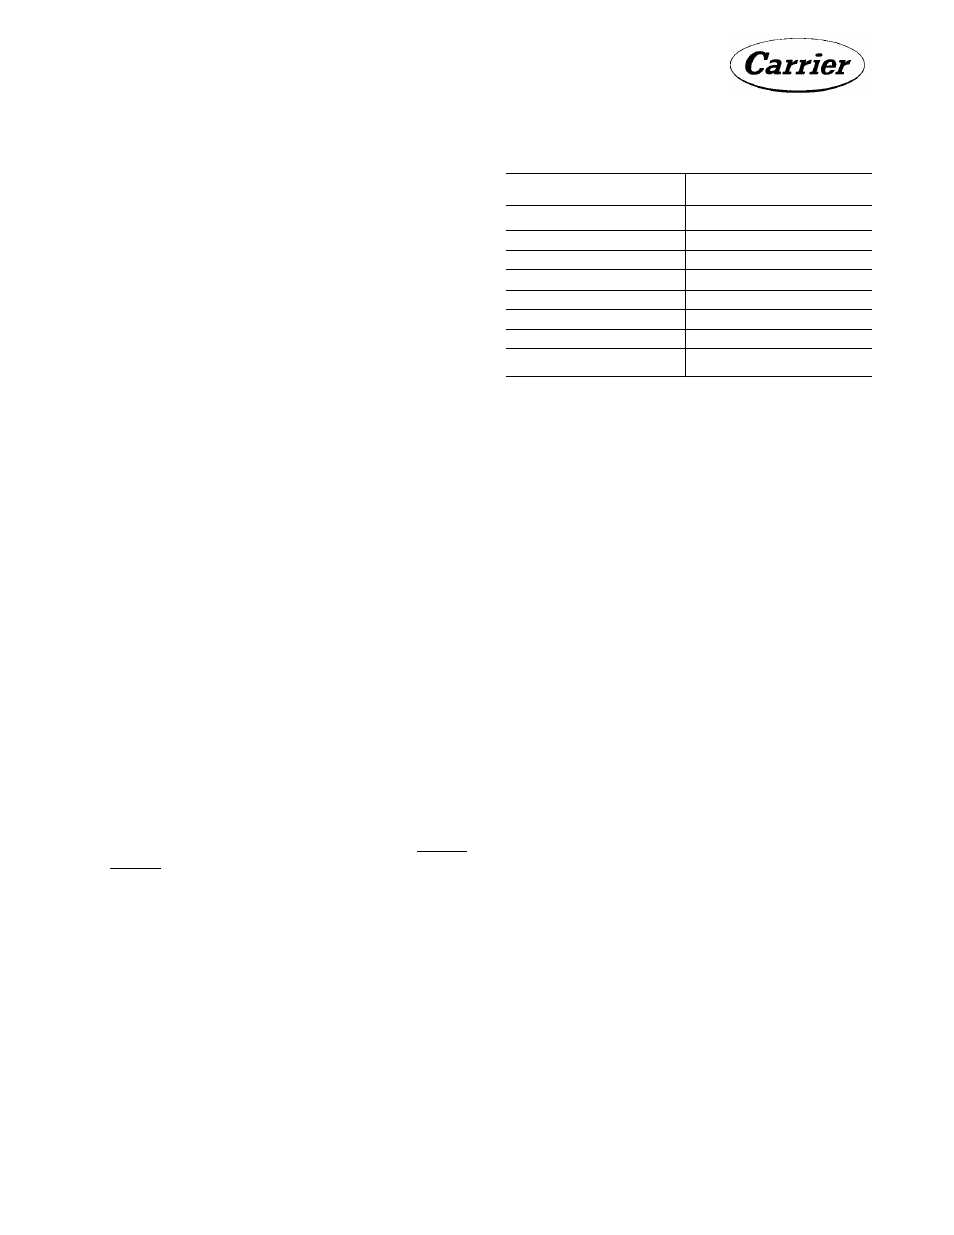
Table 7 - Factory Oil Charge (Pts)
Compressor
Oil Charge
06DA109
3-1/2
06DA808
3-1/2
06DA013
5
06DA718
7
06DA518
7
06DA724
10
06DA337
10
06DA537
10
ADDING OIL
1. Pump down the compressor to 2-psi gage; stop
the compressor and close shut-off valves.
2. Add oil thru the low-side pressurestat con
nection or the oil fill plug on 6 cylinder
compressors.
NOTE: Be sure to connect the low-side
equipment and to size the piping, so oil
will return to the compressor under
all operating conditions.
Water Valve Adjustment (Water-Cooled Units
Only)
Adjust the water regulating valve to the most
economical head pressure for the locality. Nor
mally this is between 120- and 140-psi for R-12
and between 200- and 230-psi for R-22,
Factory Oil Charge
The unit compressors are shipped with the oil
charges of PP33-2 oil shown in Table 7. Do not
assume that the charge is sufficient. Run the^
unit for 15- to 20-minutes until conditions have*
leveled off. Stop the compressor without pump
ing down and immediately check the oil level.
The oil level must be 1/3 to 2/3 of the way up
on the sight glass. If the oil level is low, add oil.
PRESSURESTAT BOSS TO END OF STICK
------- MIN OIL LEVEL- 4^/16
r
NORMAL
OIL
LEVEL-3k4-
M AX OIL LEVEL - 3 ^''16 —
Fig. 22 - Oil Level Measurement 2 Cylinder
Compressors
07DA210,112,215 ELECTRICALLY OPERATED
CAPACITY CONTROL DEVICE
The Capacity Control Device is a cylinder head
bypass type, solenoid operated. Energizing the
control solenoid unloads a complete cylinder
bank and de-energizing the solenoid loads a
complete cylinder bank.
Controls to operate the solenoid valve are not
furnished with the 07DA210,112,215 condensing
units. They must be field furnished and may be
either temperature or pressure operated as per
job requirements.
Solenoid Valve Electrical Characteristics
208/220 volts
1
(/>
60 cycle 10 4 VA holding
41 6 VA inrush
220 volts
1 0 50 cycle 10 4 VA holding
41.6 VA inrush
115 volts
1 0 60 cycle 10.4 VA holding
41.6 VA inrush
28