Top Flite TOPA0145 User Manual
Page 39
will provide clearance when mounting the cowl. Be
sure to only drill the clearance hole in F1CM, not the
firewall. Apply some thin CA to the holes in the balsa
cowl ring and F1CM to harden them.
❏ 5. When the plastic cowl fits well to the fuse, glue the
cowl to F1CM and the cowl ring. Be careful not to glue
the cowl to the firewall or NR. Hint: slide some wax
paper or part of a plan protector between the F1CM
and the firewall and between NR and the nose ring.
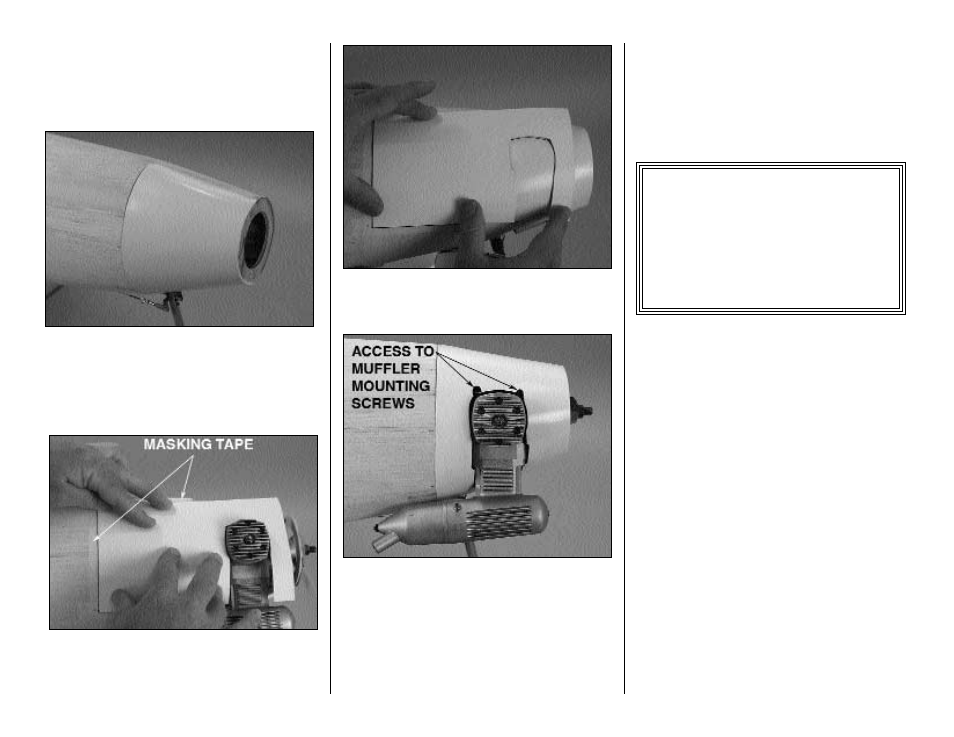
❏ 6. Use poster board to make a pattern of the
engine cut-out. Place masking tape under the
pattern and trace the pattern. This will help you put it
in place when the cowling is reinstalled.
❏ 7. Remove the engine and re-install the cowl. Put
the pattern back in position and trace the shape to be
cut away onto the cowl.
❏ 8. Cut out the area you masked on the plastic
cowl. You will probably need to make some small
adjustments to the cut-out area. Remove small areas
at a time to get a good fit.
Hint: Do not cut the plastic cowl all the way through
below the muffler. Make the cutout to fit the engine
and muffler exactly. Mount the cowl over the engine
and the install the muffler. Access to the muffler
mounting screws is in the cut-out above the engine.
Mount the Receiver and Battery
We found there was more than adequate room to
mount the receiver and battery in foam between the
fuselage side and the wing saddle structure. We
would recommend you do the same, holding the
receiver and battery in place with #64 rubber bands.
FINISHING
Prepare the model for covering
❏ 1. At this stage, there shouldn't be much left to do.
We've installed the radio system along the way, all the
hinge slots are cut and the control surfaces are all
temporarily connected, the engine is mounted and the
retracts (if you are installing them) have been fitted. If
there are any areas left that you haven't fuelproofed,
now is the time to do it. We recommend removing the
engine, landing gear and any other systems that may
get in the way of painting or fuelproofing. Make sure
you fuelproof the inside of the flaps and the flap area
in the wing, the wheel wells, the fuel tank
compartment, the wing saddle and the front of the
wing, etc. For fuelproofing, we recommend any kind of
fuelproof model airplane paint but, of course, we
prefer Top Flite LustreKote.
®
See the Hot Tip that
follows on how to use LustreKote to fuelproof these
important areas.
Note: You should always fuelproof the model before
you cover it. Otherwise, some types of paint may
soak through the wood and cause blemishes that
may show through the covering.
P
P
P
P
-
-
3
3
3
3
9
9
9
9
F
F
F
F
a
a
a
a
c
c
c
c
tt
tt
The Bell engineers wanted to mount the
cannon so it would fire directly through the
propellor shaft. This meant the engine would
have to be located deep in the fuselage,
behind the pilot. This, in turn dictated that the
machine would have a tricycle gear--the first
such ever used on a production fighter.
39