Top Flite TOPA0145 User Manual
Page 11
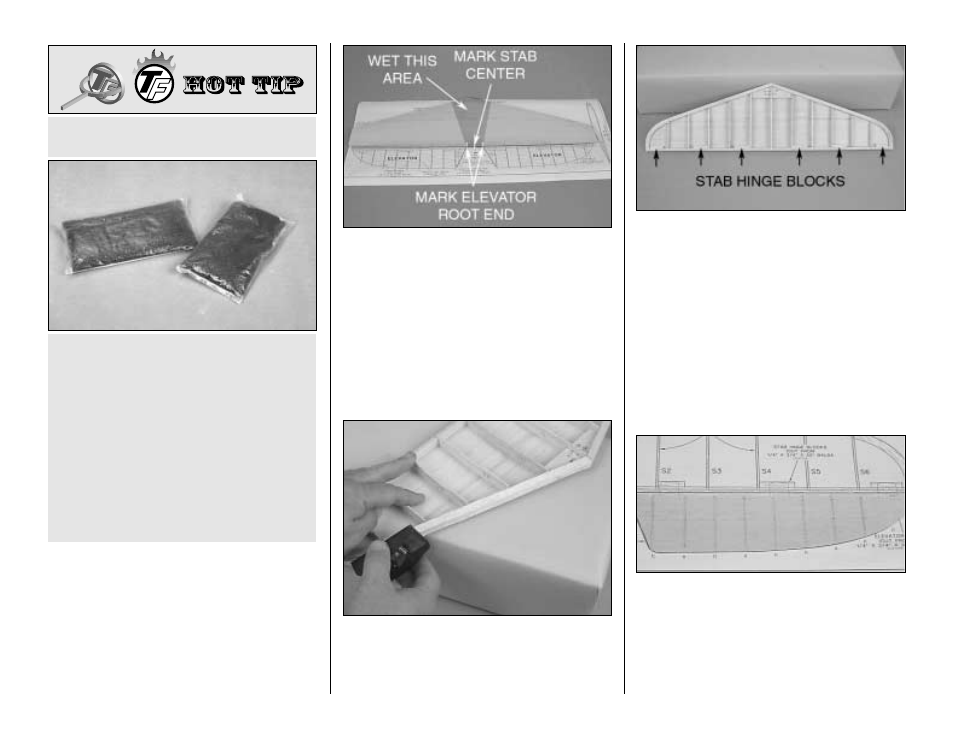
❏ 9. Before you sheet the top of the stab, refer to the
photo at step 10. Use a ballpoint pen and a square
to mark the center of the stab and the root end of
both elevators on the TE of the stab. The marks will
help you align the stab with the fuse and align the
elevators with the stab later on.
❏ 10. Sheet the top of the stab with one of the stab
skins you've already prepared. We recommend
using aliphatic resin to glue the skin to the ribs and
CA to glue the skin to the TE, LE and tips. Wet the
outside of the sheeting in the middle near the leading
edge. This will make the skin flexible enough to glue
to the structure. Apply aliphatic resin to the ribs and
position the top skin on the stab. Place your weights
on top of the stab skin, then use CA to glue the skin
to the LE, TE and tips. Leave the weights in position
until the aliphatic resin dries. Thirty minutes to an
hour is enough time.
❏ 11. Remove the stab from your building board. Turn
the stab over and cut the jig tabs from the bottom of
the ribs, then trim the bottom of the LE even with the
ribs. Trim the stab tips and the bottom of the TE near
the tips the same way you did on the top.
❏ 12. Cut the stab hinge blocks from one of the
1/4" x 3/4" x 30" [6.4 x 19.1 x 762mm] balsa sticks.
Glue the hinge blocks to the TE, ribs, and top
sheeting where shown on the plan. Trim the hinge
blocks even with the TE and ribs.
❏ 13. Sheet the bottom of the stab with the other
stab skin you prepared. Use care not to add any twist
to the stab as it is no longer supported by the jig tabs.
Once again, we suggest using aliphatic resin to glue
the skin to the ribs and medium CA for the rest.
Build the elevators
❏ ❏ 1. Mark the location of the elevator ribs on both
sides of one of the die-cut 3/32" [2.4mm] balsa
elevator core where shown on the plan. This is easy.
Simply lay the die-cut core on the plan and draw a line
from the "tick" marks at the leading and trailing edge
of the elevator core. This will give you the positioning
for the ribs. When you have completed one side
transfer the lines to the other side.
When we glue sheeting to a structure (wing, stab,
fin), we use plastic bags filled with lead shot to
hold the sheeting down. These plastic bags filled
with lead take the shape of the curved surfaces to
apply uniform pressure and do not put marks in
the balsa wood. You can purchase lead shot at
most stores where hunting supplies are sold. We
use #6 lead shot. One 25 lb. [1.134kg] bag costs
approximately fifteen to twenty dollars. You may
use small zip lock food storage bags to hold the
shot. Tape the bags shut to make sure they don't
open. Each bag should hold between 2-3 lbs.
[907-1361g.] of lead. Ten to fifteen 2-3 lbs. [907-
1361g.] bags should be enough for most projects.
WEIGHT BAGS
11