Top Flite TOPA0145 User Manual
Page 22
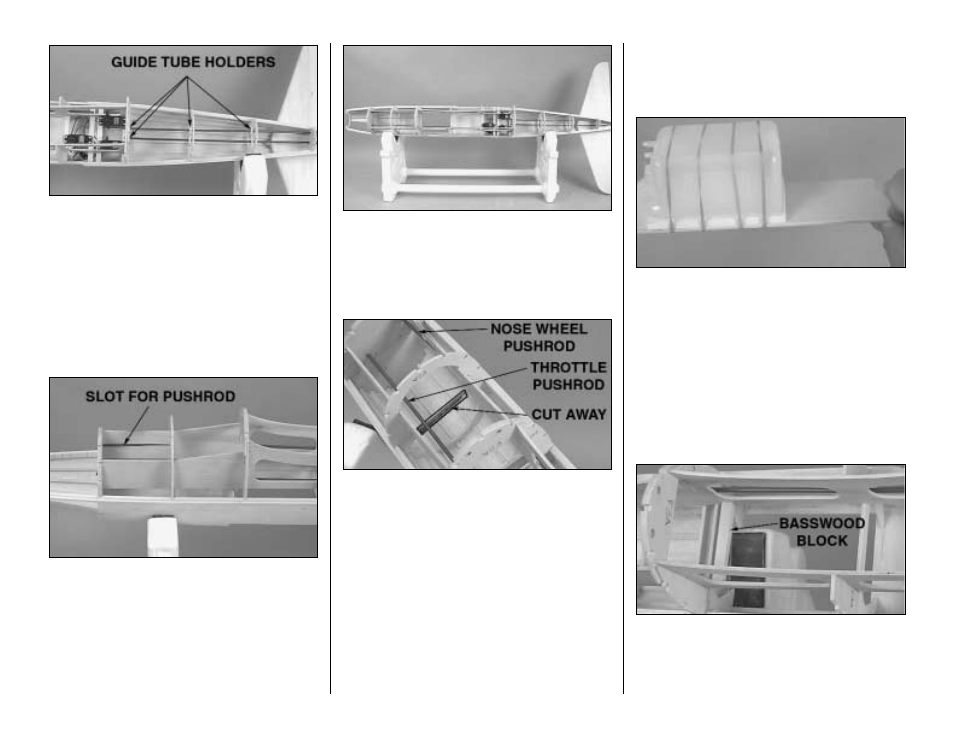
❏ 21. Locate five die-cut 1/8" [3.2mm] ply guide
tube holders. Drill a 3/16" [4.8mm] hole through the
punch mark on the holders.
❏ 22. Support the plastic outer pushrod tube with
the five die-cut 1/8" [3.2mm] ply guide tube holders
by gluing them in place at F6 - F8.
This next step only applies if you are going to
have a fixed gear. Skip step 23 if you are
installing retracts.
❏ 23. Install the plastic pushrod outer tube for the
nose wheel steering by cutting the tube to length and
then inserting it through the holes that you drilled in
the die-cut fuselage formers F2A through F5A on the
left side of the fuselage. The tube should pass
through the slot in the wing saddle and reach to the
front of the firewall. Use a 3/16" [4.8mm] drill to make
a hole in the firewall at the position the pushrod will
exit the firewall.
❏ 24. Mount the elevator, rudder and throttle servos
into position as shown on the plan. Once they are in
place and you are satisfied with the position of the
servos and the plastic outer pushrod tubes, glue the
tubes in place with a few drops of CA.
❏ 25. This is a good time to get the fuel tank
installation finished. Cut the cross-brace on F2 out of
the fuselage. This is necessary to give clearance for
the fuel tank.
❏ 26. It's time for you to make another decision. The
P-39 (as in other models you may have built) has a
very tight compartment for the fuel tank. The easy
way would be to make the fuel tank a permanent
installation. Though it is easier, this has some
potential long-term problems. If you wish to mount it
permanently, go ahead and do that now.
We recommend that you take a little time and use the
following instructions to mount the tank so it can be
removable. It will be a little tedious and may require
you to do a little shaping, but the end result will be
fairly easy tank removal if needed.
❏ 27. Locate the die-cut 1/8" fuel tank floor. Put a
piece of 1/4" [6.4mm] foam between the floor and the
fuel tank. Attach the tank to the floor with #32 rubber
bands (included in the kit). Trial fit the fuel tank into the
fuselage. The floor should extend all the way to the
firewall and 1/4" [6.4mm] beyond former F3. The
notches in the leading edge of the floor are there to
allow some clearance for the blind nuts that will be
added to the firewall later. The tab in the center of the
floor is going to be the point at which the floor will attach
to the firewall. Remove the assembly from the fuselage.
❏ 28. Cut a piece of 1/4" x 3/8" [6.4 x 9.5mm]
basswood to fit between the wing saddles and locate
it approximately 1/4" [6.4mm] behind F3. Glue it in
place so that the basswood strip is flush with the top
of the wing saddle structure.
22