Top Flite TOPA0145 User Manual
Page 16
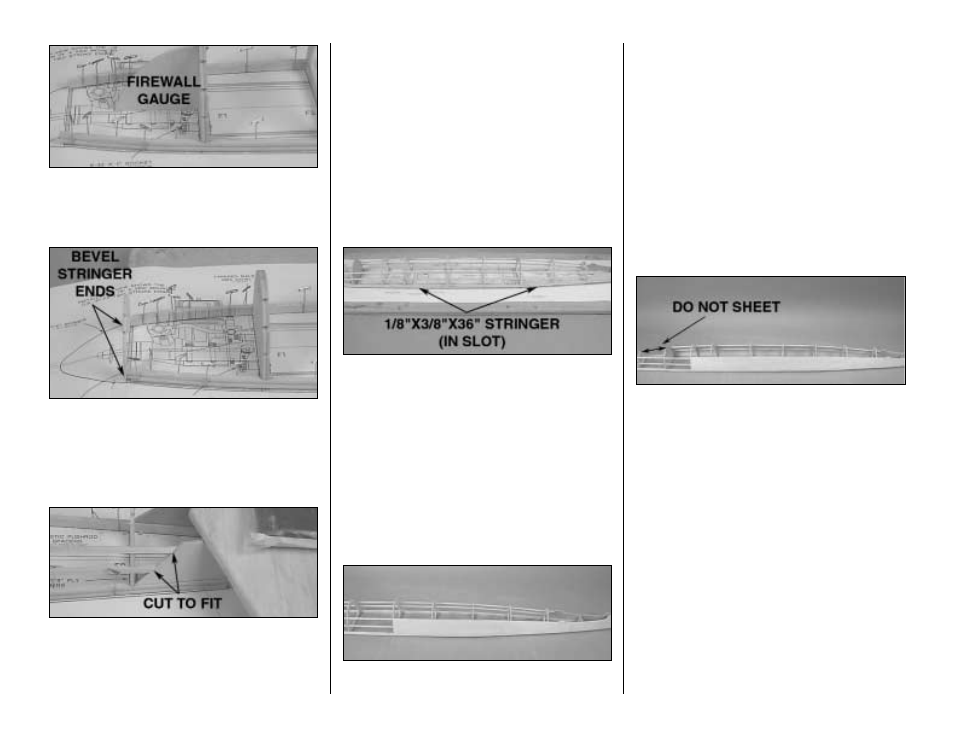
❏ 10. Test fit former F1 onto the main stringers. Use
the die-cut 1/8" [3.2mm] ply firewall gauge (FG) to
set the proper amount of down thrust. Permanently
glue F1 into position.
❏ 11. Carefully bevel the front of the main stringers
to the angle shown on the plan. Glue one half of the
nose ring, part NR, to the face of the main stringers.
Be certain when gluing the nose ring into position
that the notches for the stringers are on the left side
of the fuselage.
❏ ❏ 12. Temporarily place the stab on the stab saddles
and hold it in place with weights. Cut the ends of two
3/16" x 3/16" x 30" [4.8 x 4.8 x 762mm] balsa stringers
so they fit the stab saddle as shown in the photo (from
now on, all 3/16" x 3/16" x 30" [4.8 x 4.8 x 762mm]
stringers will be referred to as just stringers). Cut the
other end of the stringers so they end in the middle of
former F3. Use a small square to hold the formers
vertical as you glue the stringers to them and to the
stab saddle.
❏ 13. Repeat step 12 for the right side of the fuselage.
❏ 14. Glue stringers from F3 to the front of the nose
ring on the left side of the fuselage. Glue stringers
from F3 to F1 on the right side. Use the firewall gauge
to set the down thrust angle on the nose ring to match
the firewall.
❏ 15. Glue one of the 1/8" x 3/16" x 36" [3.2 x 4.8 x
914mm] stringers into the slot in the side of the main
stringer. Cut part of another stringer to length to fill
the rest of the slot. Repeat this for the other side of
the fuselage.
❏ ❏ 16. Test fit one of the 3/32" x 3" x 36" [2.4 x 76
x 914mm] balsa sheets onto the main stringer on the
left side of the fuselage. Fit the sheet from the back
of the fuselage forward. Minor trimming may be
required to get a good fit. When you are satisfied
with the fit, tape the sheet in place where the
sheeting meets the main stringer.
❏ ❏ 17. Trim the sheeting so that it can be glued to
the second stringer. When you are satisfied with the
fit, cut the excess sheeting at F4. Glue the sheeting
to the two side stringers, the main stringer, the stab
saddle and F4.
Hint: Form the sheeting to the stringer and draw a
line along the stringer from the back side of the
sheet. Now mark a line 3/32" [2.4mm] below that
line. This will give you a cut line that will allow the
sheeting to be in the center of the stringer.
❏ 18. Repeat step 16 & 17 for the right side of
the fuselage.
❏ 19. Cut one of the 3/32" x 2 3/4" x 30" [2.4 x 70 x
762mm] balsa sheets to a length of 14" [356mm].
Test fit the 14" [356mm] long balsa sheet onto the
main stringer from F4 forward to former F1 on the
fuselage right side. Trim the sheeting to fit between
the main stringer and the second stringer. When
satisfied with the fit, glue the sheeting to the stringers
and the formers F1- F4.
❏ 20. Measure the distance from former F4 to F2.
Cut the remaining piece of sheeting to that length
and glue it in position on the left side of the fuselage.
Note: The photo in step 19 shows the proper
positioning for the sheeting when you have
completed steps 19 and 20. Subsequent
photographs show the sheeting already in place to
the nose ring. Disregard the fact that the sheeting is
there, the instructions will be correct.
16