Top Flite TOPA0145 User Manual
Page 20
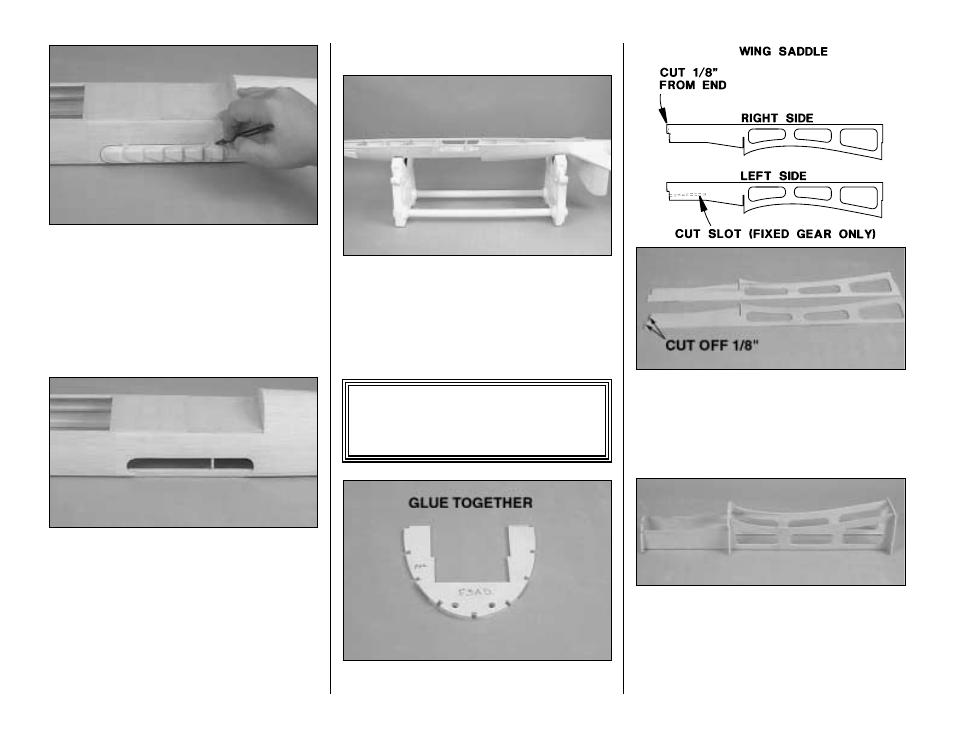
❏ 10. Cut out the ABS plastic exhaust stacks. After
trimming, mark "left"on one and "right" on the other,
on the back of each piece so you are sure to get a
good fit when doing the final assembly. Tape one in
place on the side of the fuselage as shown on the
plan. Trace around the part with a pen to indicate
where you will be cutting balsa wood away.
❏ 11. Cut out the area you just marked. Do this
carefully so the exhaust stack will have a good fit into
this cavity. Set the stack aside for now. It will be
glued in place after the final covering.
❏ 12. Do the same for the other side of the fuselage.
That's it for the top half of the fuselage. You're
halfway there! Let's proceed with the bottom half.
Build The Bottom Of The Fuselage
❏ 1. Place the fuselage upside down in a stand. We
prefer the Robart Super Stand. You can see it in
many of the following photos.
❏ 2. Locate the die-cut 1/8" [3.2mm] plywood
fuselage formers F1A through F10A for the bottom
of the fuselage.
❏ 3. Glue former F3AD to F3A. From now on the
F3A/F3AD assembly will be referred to as F3A.
❏ 4. Locate the two wing saddles. Cut 1/8" [3.2mm]
off of the front end of one of the saddles. This will be
the right wing saddle. This is very important! By
assembling the saddle correctly you will have the
proper amount of right thrust needed for the plane to
fly well.
❏ 5. If you will be installing fixed landing gear, drill
3/16" [4.8mm] holes in formers F2A through F5A for
the nose gear steering pushrod. These holes are on
the left side of the former. Refer to the plan for the
location of the holes. Cut the slot on the left wing
saddle as shown in the sketch above. There are
embossed cut lines on the saddle.
P
P
P
P
-
-
3
3
3
3
9
9
9
9
F
F
F
F
a
a
a
a
c
c
c
c
tt
tt
At the time this manual was published there
was only one flyable P-39 in the world!
20