Top Flite TOPA0145 User Manual
Page 28
If you have installed the fixed gear, skip the
following 6 steps.
P
P
P
P
-
-
3
3
3
3
9
9
9
9
F
F
F
F
a
a
a
a
c
c
c
c
tt
tt
The Airacobra was never outstanding in
combat and was shunned by the American and
British pilots. However, it was excellent for low-
level operations against ground targets and
used successfully by the Soviets who scored
an impressive number of air victories.
❏ ❏ R5. Though this is not absolutely necessary,
we recommend that you create a wheel well in the
wing. This will help to support the wing sheeting
after the final hole has been cut in the sheeting of
the wing. Our wheel well was made from some
.030" plastic sheet. You can do this or use balsa, lite
ply or even some poster board material. Be sure to
support the wheel well with some leftover balsa.
If you choose not to make a wheel well, be sure to
add some additional balsa around the well so that
you have something to glue the sheeting to.
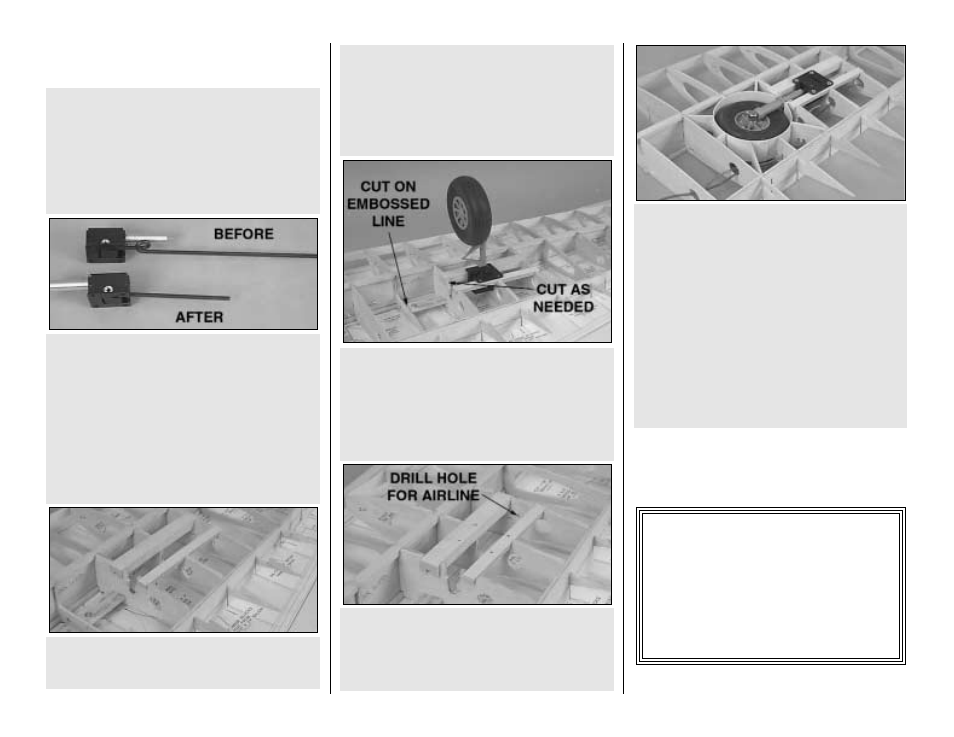
❏ ❏ R6. Install all of the retract air lines through
ribs W1 - W6.
❏ ❏ R4. When you are satisfied there is adequate
clearance, mark the position for the landing gear
and drill holes for the mounting screws in the
hardwood rails. Also, drill a hole in W6 to allow for
the air line to pass through.
❏ ❏ R3. Cut the embossed lines on W3 to open
the wheel cavity. Using your retract landing gear
as a guide, cut away the portion of W5 that is
needed to make clearance for the air cylinder.
Note: The plastic strut cover shown is an optional
item. See the Retract items on page 3 for the
part number.
❏ ❏ R2. Cut the grooved landing gear block to 5-3/4"
[146mm] in length. Test fit this into the notches in the
wing. When you are satisfied with the fit, use 30-
minute epoxy to glue the plywood rail and the landing
gear block into place. Be sure that when you glue the
landing gear block in place you glue it in with the
groove towards the top of the wing.
❏ ❏ R1. Cut the 1/4" x 5" x 16" [6.4 x 127 x 406mm]
plywood rail to a length of 5-3/4" [146mm] and test
fit it into the aft notches in ribs W4, W5 and W6.
❏ Before starting on any of the landing gear
installation move the air cylinder to the other side
of the retract unit as shown in the photograph.
This is very easy and the full instructions are
included with the Robart landing gear. Please
refer to the instructions included with the retracts.
You will also need to cut the 3/16" [4.8mm] wire to
a length of 4-7/8" [124.2mm]. Cut the wire so that
the coil is no longer a part of the wire. This length
is the proper length if you are using the
recommended 4"[102mm] tires.
Retract Installation (Main Gears)
We have designed this kit around the Robart
#TFP39 Nose Gear Retract and the #606 HD 85-
degree main gear retract. If you have chosen to
install the retractable gear, you should already
have the nose gear installed. The following steps
show the installation method for the main gear.
28