0 belt, 0 blower bearings and belts, 0 drive components – Reznor MAPSII Series REDA Users Manual User Manual
Page 7
Form RZ-NA O-MAPS II, P/N 209179 R7, Page 7
������
�����
������
������
�����������
�����������
�������������
����������
��������
������
������
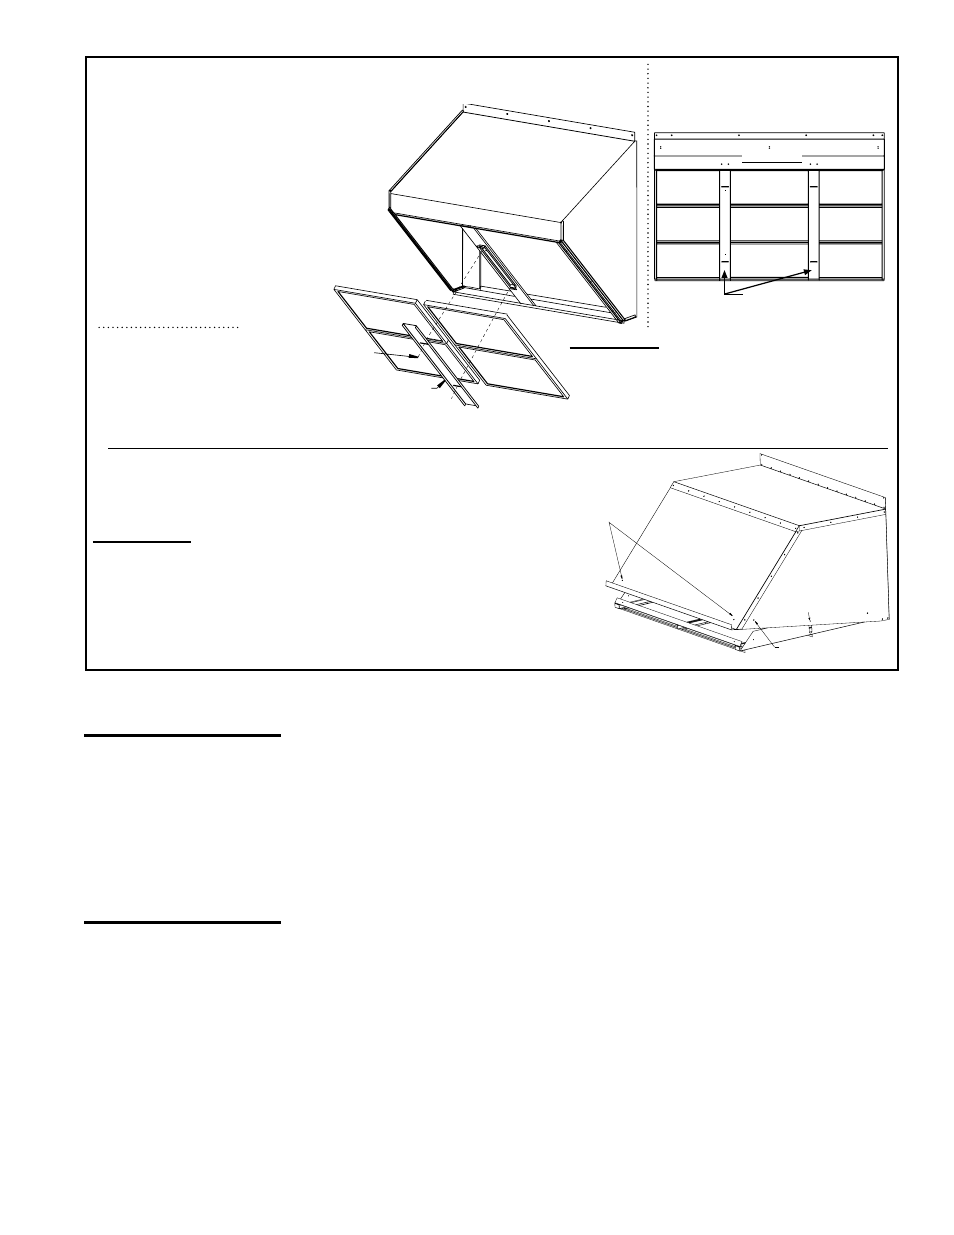
FIGURE 2A -
Removing Filters
from Outside
Air Hood
1" Permanent Aluminum
Filters for Outside Air
Hood are listed by
Cabinet Size A, B, or C
(see page 6)
*A - (4) 16 x 20,
P/N 101607
*B - (4) 16 x 25,
P/N 101609
C - (3) 16 x 25, P/N
101609; (6) 16 x 20,
P/N 101607
Cabinet Sizes A and B with Option
AS16 Outside Air Hood
(Does not apply if
system includes
Option PE
power
exhaust;
see below.)
��������������������
����������������
����������
������
�������
������
�������
������
�������
������
�������
������
�������
������
�������
������
�������
������
�������
������
�������
����������
All Cabinet Size C with
Outside Air Hood Option
AS16 or AS19
Instructions: Remove filters by loosening the
wing screws and sliding the filter clamp(s).
Clean with soap and water, allow to dry,
and replace. If it is more convenient to keep
an extra clean set of filters, quantities, filter
sizes, and part numbers are listed.
* Apply only to Cabinet
Size A and B with outside air hood Option AS16.
�������������
�������������
������������
����������
�������������������
������
���
�������
FIGURE 2B - Removing Filters from Option AS19
Outside Air Hood Installed on a Cabinet Size A or B
with power exhaust Option PE1 or PE2
Instructions: 1)
Remove the four screws as illustrated.
Lower the tray.;
2) Pull out filters. Clean with soap and
water. Allow to dry.;
3) Slide clean dry filters into tray.;
4) Re-position tray and replace screws.
1" Permanent Aluminum Filters
**A - (4) 18 x 20,
P/N 194903
**B - (4) 20 x 25,
P/N 101610
** Apply only to Cabinet Size
A and B with outside air hood
Option AS19.
4.0 Drive
Components
Bearings - Bearings with a grease fitting should be lubricated twice a year with
a high temperature, moisture-resistant grease. (Type NLGI-1 or -2 standard
grease is recommended.) Be sure to clean the grease fitting before adding
grease. Add grease with a handgun until a slight bead of grease forms at the
seal. Be careful not to unseat the seal by over lubricating. NOTE: If unusual
environmental conditions exist (temperatures below 32°F or above 200°F;
moisture; or contaminants), more frequent lubrication is required.
CAUTION: If the
blower is unused
for more than three
months, bearings
with a grease fitting
should be purged
with new grease
prior to start-up.
Setscrews - Check all of the setscrews (bearing/blower hubs and pulleys).
Torque pulley setscrews a minimum of 110 in-lb to 130 in-lb maximum.
A bearing hub setscrew for a 1-3/8" to 1-3/4" shaft requires a 5/16" socket and
a tightening torque of 165 in-lbs.
Belts - Check belt for proper tension and wear. Adjust belt tension as needed.
Replace worn belts.
Blower systems are equipped with either Power Twist Plus
®
linked blower belt
or a solid belt. The linked belts are designed in sections allowing for easy sizing
and adjustment. The belt is sized at the factory for the proper tension. If the belt
needs adjustment, the recommended method of shortening the belt length is to
count the number of links and remove one link for every 24. (A link is made up
of two joining sections of belt. For easier removal of links, turn the belt inside
out. But be sure to turn it back before installing.)
If equipped with a solid belt, adjust the belt tension by turning the adjusting
screw on the motor base until the belt can be depressed 3/4" (19mm). After
correct tension is achieved, re-tighten the locknut on the adjustment screw.