Setup 1 and 2 – PRG S400 User Manual 3.1 User Manual
Page 51
PRG SERIES 400
®
POWER AND DATA DISTRIBUTION SYSTEM USER MANUAL
45
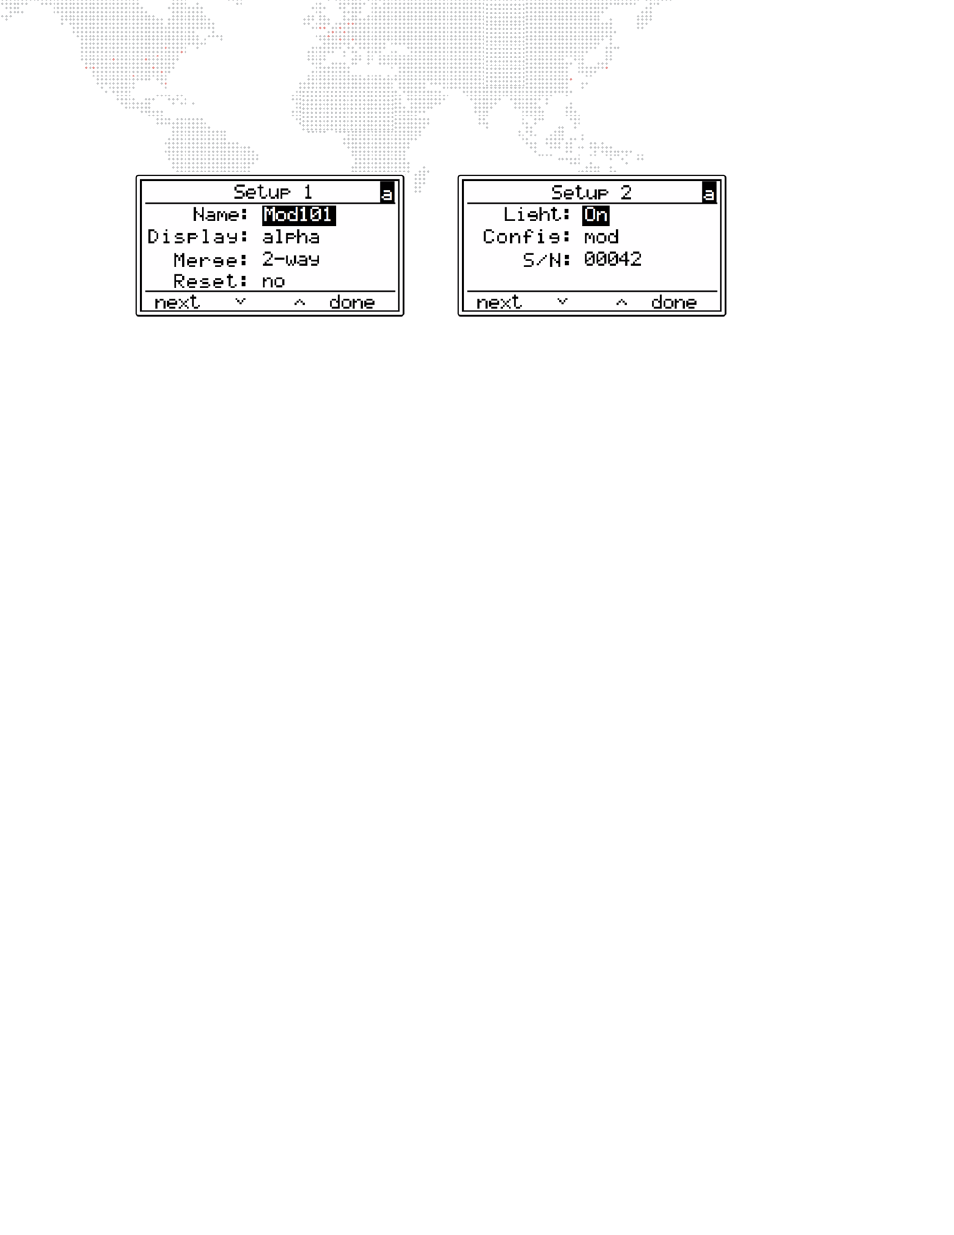
Setup 1 and 2
These menus allow configuration of system options and reset to defaults.
The highlighted option can be changed by selecting the down arrow (
) or up arrow (
). Move to the next universe by
selecting
next
. Pressing
done
will save changes and return to the main menu.
Name
+
Displays the current module device name.
+
To edit the device name, first select one of the arrow buttons, (
) or (
), while the Name menu entry is selected.
This selection will open the module name characters as fields and allow for editing. Press
next
to move to the
character(s) to be modified. The allowed characters are: letters 'a' - 'z', numerals '0' - '9', and the blank or space
character ' '. The arrow buttons will scroll through the allowed characters in the order: letters, blank, numerals
(assuming that the Up button is pressed and the initial value is the letter 'a'). If the first character of the name is a
letter, it is uppercase. All other letters are lowercase.
+
Once name editing is initiated, pressing
next
will cycle through all of the available name character positions,
followed by moving to the
Display
field, which closes name editing. The other menu entries follow as normal,
before returning to the name field. Upon returning to the name field, it will be necessary to again initiate name
editing if further modification is required. Until name editing is initiated, pressing
next
will simply cycle through the
menu items in order, starting with the name entry.
Display
+
Sets DMX512 universe display to either alpha (A-JV) or numeric (000-255).
Merge
+
Enables the ability to have more than one DMX universe input specified for the same universe. Options include 2-
Way, 3-Way and 4-Way which allows up to four inputs per universe. Merging operates under the Highest Takes
Precedence (HTP) rule and is a system-wide option. Once enabled, all inputs have merge capability.
Reset
+
The
Reset
option allows reset of all the input and outputs to the default settings. To reset to defaults, select
default
in this field and then press
done
while the reset option is still selected.
Light
+
The
Light
option (page 2) allows the display backlight to be turned on or off. This is accomplished by pressing
either arrow button (
) or (
) when the
On/Off
indication is selected. The backlight will go off (entering the
off
mode) and the indicator will be changed to
Off
. To return to the
on
mode, press either arrow button when the
Off
indication is selected. The backlight will be turned on and the indication will change to
On
.
+
If the backlight is in the
off
mode, pressing a button will turn on the light for 10 seconds, at which time it will
automatically turn itself off. Note that pressing a button while the light is temporarily on, will reset the timer. If the
light is in the
on
mode, it will stay on permanently unless it is manually turned off as described above.
+
When the backlight is in the
off
mode, the light will be turned on for about ten (10) seconds every time a button is
pressed or the module is reset. The mode is saved whenever
done
is pressed. In order to change the mode, go
to the SETUP 2 screen and explicitly change the mode by pressing an arrow button (
) or (
) and exiting by
pressing the
done
button.