A/d converter performance test, Span adjustment, Span adjustment under load – Flintec MCS-08 User Manual
Page 20: Electronic calibration (ecal)

MCS-08 Technical Manual, Rev. 1.04 December 2012
Page 20 of 52
button. The [WAIT] message appears on the virtual display during the zero adjustment. Approximately 5
seconds later the zero adjustment will be finalized.
Note: Zero adjustment is also performed over the bus interface. Refer to the data structure of the related bus
interface.
Span Adjustment
If your scale has a span drift, you may perform a span adjustmen
t only. After selecting “Span Adjustment” and
pressing the “Start” button, enter the test weight value; place the test weights on the scale and press the “Yes”
button. The [WAIT] message appears on the virtual display approximately for 5 seconds while the span
calibration is being performed. After finalizing the span adjustment, the instrument will save the span
coefficients automatically.
Note: Span adjustment is also performed over the bus interface. Refer to data structure of the related bus
interface.
Span Adjustment under Load
This feature is being used to perform a span adjustment without unloading the scale. This operation is
especially used for the span adjustment for non-empty tanks to make a span adjustment without emptying the
tank. After selectin
g “Span Adjustment under Load” press the “Start” button. The temporary zeroing message
appears on the monitor. This means the instrument will determine the existing load as the temporary zero. If the
scale is stable press the “Yes” button. The [WAIT] message appears on the virtual display approximately for 5
seconds to determine the temporary zero. Then the span calibration window will be displayed. Load the scale
and enter the loaded test weight value, then click the “OK” button. The scale must be stable in this period.
Approximately 5 seconds later, the new calibration settings are saved automatically.
Please refer to the chapter 5.6 A/D Converter Performance Test).
Electronic Calibration (eCal)
eCal allows to perform a calibration without using test weights. MCS-08AD modules are adjusted during
production for increased eCal accuracy. The calibration will be done based on the scale capacity, the total load
cell capacity, the load cell output and the estimated dead load. If the conditions are convenient for zero
calibration, you may perform automatic zero adjustment instead of entering an estimated dead load.
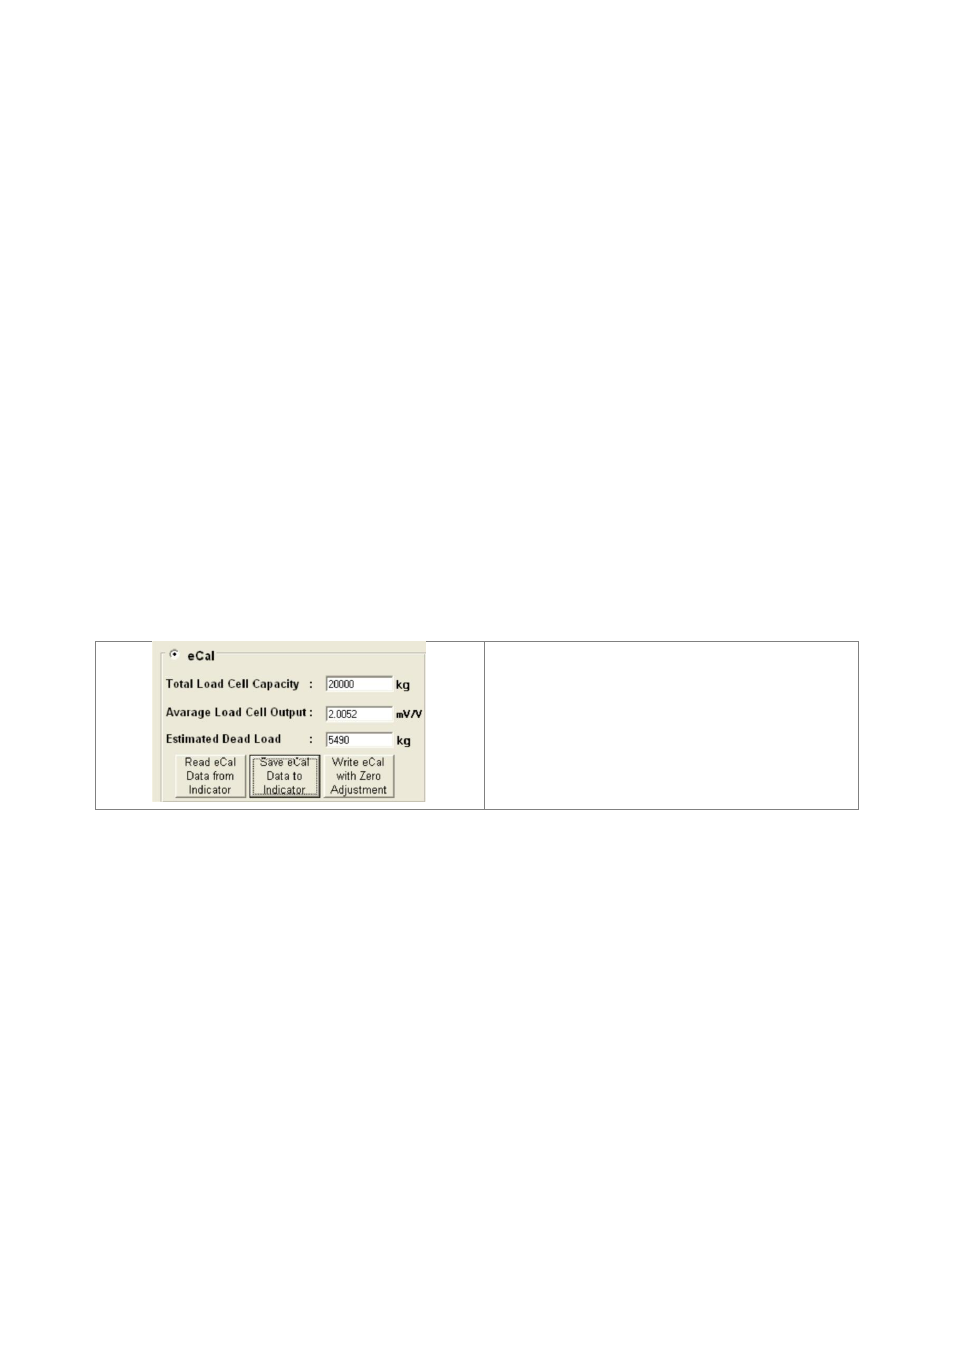
Figure 5.9
– eCal Calibration
After selecting eCal calibration enter the following values as:
Total Load Cell Capacity: Enter the total load cell capacity in kg as shown in the example below.
Example: If the weighing system has 4 pcs 1000 kg load cells, then enter 4000 kg.
Average Load Cell Output: Enter the load cell output in mV/V. If the weighing system has more than one load
cell, calculate the mean value of the load cells output as indicated in the certificates of the individual load cells.
Example: If the load cell outputs are LC1: 2.0010, LC2: 1.9998, LC3:1.9986 and LC4:2.0002, the mean value
will be LC output = ( 2.0010 + 1.9998 + 1.9986 + 2.0002 ) ÷ 4 = 1.9999 mV/V.
Estimated Dead Load: Enter the estimated dead load value of the weighing system in kg. You may perform a
zero adjustment in convenient time for an exact dead load compensation. After pressing “Save eCal Data to
Converter” these data will be transferred to the instrument and eCal will be finalized.
If the scale is empty and you want to make an automatic zero adjustment instead of entering an estimated dead
load, then press the “eCal with Zero Adjustment” button for starting the zero calibration. The display will show
the [WAIT] message during the zero adjustment for approximately 5 seconds. In this period the scale must be
unloaded and stable. The eCal calibration coefficients are saved automatically.
5.6. A/D Converter Performance Test
The scale performance test should be performed before you install the bus connection. The tests are linearity,
repeatability and eccentricity. You can follow the test at the virtual display and/or status tab which show the
measurement data, the instrument data and the software version. For convenience keys for Taring, Zeroing
and Clear are located in this tab.
