B.3.3 display set up, menu 3.1 - 3.4 9, Manual das 72.1 page 9, Select setting 0, 1 or – Flintec DAS 72.1 User Manual
Page 9
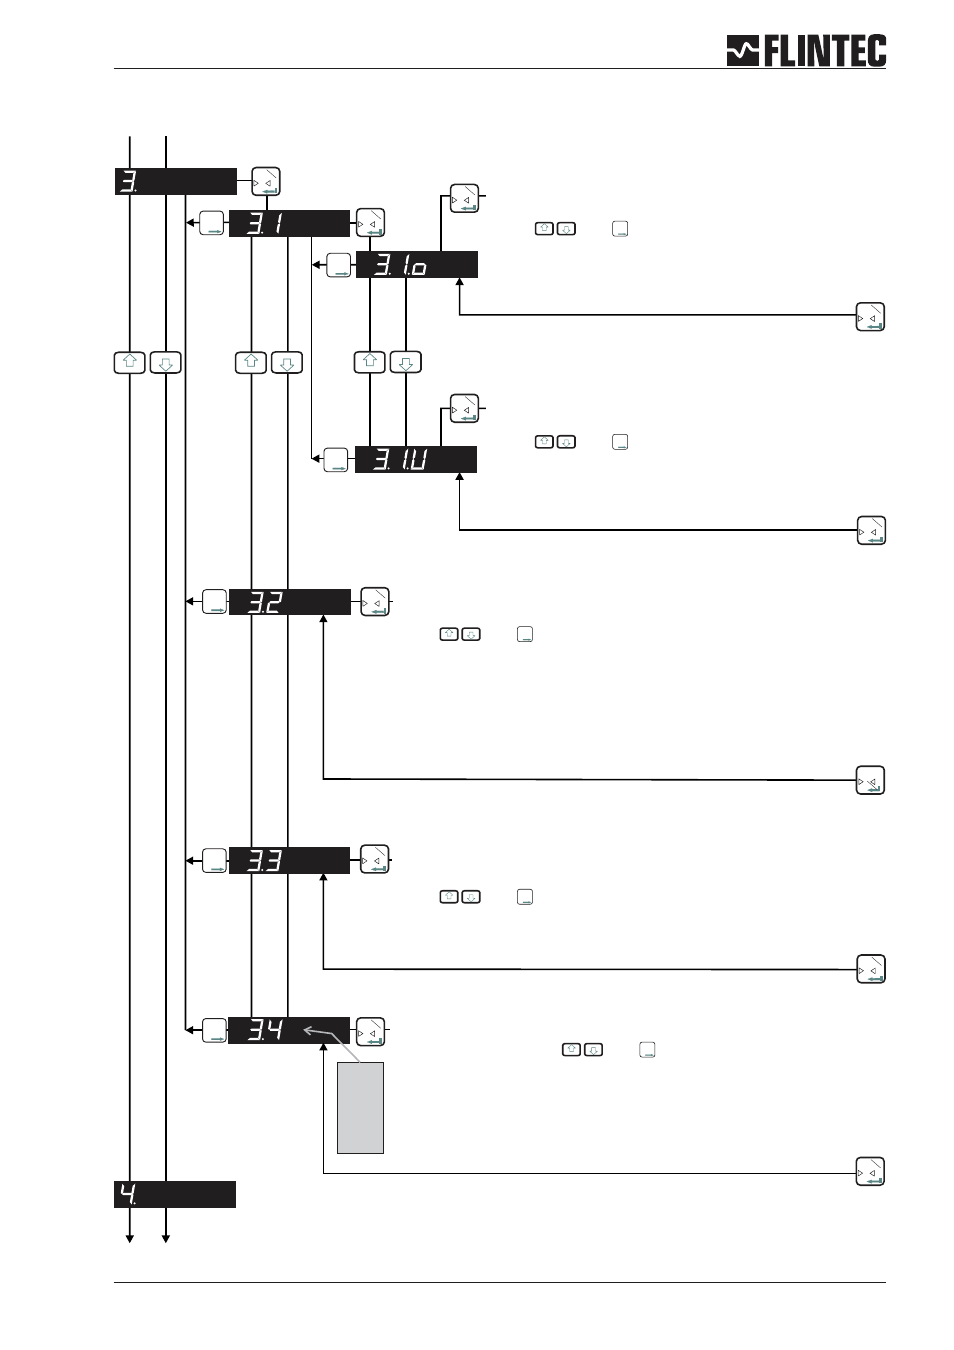
B.3.3 Display set up, Menu 3.1 - 3.4
Manual DAS 72.1
Page 9
0
T
Inp.1
0
T
Inp.1
0
T
Inp.1
0
T
Inp.1
0
T
Inp.1
0
T
Inp.1
T
T
T
T
T
T
T
T
T
Inp.2
Inp.2
Inp.2
0
T
Inp.1
0
T
Inp.1
0
T
Inp.1
0
T
Inp.1
SET THE DISPLAY OVER RANGE LIMIT
(MAXIMUM VALUE +99 999)
Use the
and
keys to set the maximum display value
above which the display shows over range (all dashes in the top of the
display).
SET THE DISPLAY UNDER RANGE LIMIT
(MINIMUM VALUE -99 999)
Use the
and
keys to set the minimum display value
below which the display shows under range (all dashes in the bottom
of the display).
SET THE DISPLAY DIVISION OR STEP SIZE
(1, 2, 5, 10, 20, 50, 100, 200, 500)
Use the
and
keys to set the required display division or step size.
SET THE DECIMAL POINT POSITION ON THE DISPLAY
(0, 0.0, 0.00, 0.000, 0.0000)
Use the
and
keys to set the required decimal point position on the
display.
LOGIC I-O STATUS
Select setting 0, 1 or
2 with
and
.
Setting 0 =
Continious indication of Weight, no input/output status.
Setting 1 =
Indication of Weight, short indication input/output status (ca. 1,5 sec)
Setting 2 =
Continious indication of input/output status.
0
T
Inp.1
T
T
T
T
T
T
T
T
T
Inp.2
Inp.2
Inp.2
0
T
Inp.1
3.4.0
3.4.1
3.4.2
T
T
T
Inp.2
T
T
T
Inp.2
T
T
T
Inp.2
T
T
T
Inp.2
T
T
T
Inp.2