Checkline TI-UMX2 User Manual
Page 12
– 12 –
MaTerIal: The TI-UMX2 includes a list of common material types with standard set
velocities. It’s important to note that the velocities associated with these materials are
general velocity values only. Materials of the same type, can have varying grades and
consistencies. As a result, the material velocity will also have slight variations. A custom
velocity has been implemented for this reason, and can be programmed via DataComm
PC software. Refer to section 7.3 for further info.
unITs: Toggle between English or Metric units. The readout will change from inches
to millimeters. Refer to section 8.3 for further info.
Mode: The TI-UMX2 is equipped with a number of advanced measurement modes,
to satisfy a variety of application scenarios. The following is a brief description of each
mode. Refer to section 6.0 for further info:
P-E (Pulse-Echo) – Common mode for measuring non-coated material
(bare metals).
PECT (Pulse-Echo Coating) – A special mode used on coated materials to
measure the thickness of both; the base material and coating.
E-E (Echo-Echo) – Common mode for measuring coated materials, and
measuring the base material only, without having to remove the coating.
E-E-E (Triple Echo) – Special multiple echo mode used only with our single
element membrane transducers.
– 45 –
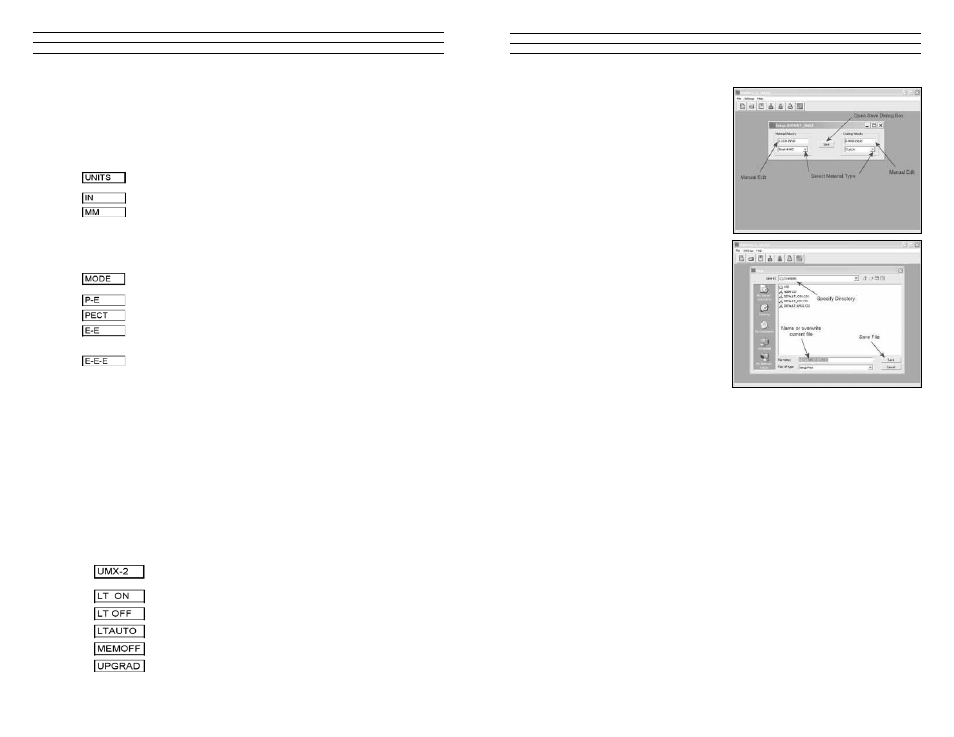
3. There are two possible velocity
settings available; material and
coating. The user can enter a known
velocity number in either field by
clickinginthe‘whitespace’andthe
current velocity number, or select a
material by clicking on the DOWN
ARROW located next to the material
type.
4. Once the material and or coating
velocities have been set, click the
SAVE button in the setup dialog box,
to display the SAVE dialog box.
5. Specify the path to the folder to store
the setup file in. Give the setup file a
unique name, or overwrite the default
file.
6. Finally, click the SAVE button to
store the file on your PC.
12.3 Connecting to a PC
Now that the new setup file has been created and saved on the PC, the next step is
connecting to a PC to transfer the setup file into the TI-UMX2. There are 2 cables
included with the TI-UMX2 kit; LEMO to 9 pin serial and 9 PIN serial to USB.
Serial:
The LEMO to 9 pin RS232 cable can be connect directly to any serial port.
However,theserialportnumbermustbeknown.Theactualportreferencecanbe
obtained in the device manager of a Windows® based operating system.
USB:
Both the LEMO to 9 pin serial and 9 pin serial to USB can be connected together
to use the serial to USB converter configuration. This option requires that a driver
is installed for the USB cable. The driver will automatically be loaded when
DataCommPCsoftwareisinstalled.However,thedriverileswillalsobeincluded
inthe‘examples’folderonyourdesktop.ThisfolderiscreatedbyDataCommwhen
installed.
The following procedure outlines the steps for connecting and transferring the setup file
to the TI-UMX2 as follows: