Row-unit opener disc adjustments, Setting planting depth, Opener disc contact region – Great Plains YP4425A Operator Manual User Manual
Page 76: Adjusting disc contact
72
YP4425A
Great Plains Manufacturing, Inc.
401-805M
2012-02-23
Row-Unit Opener Disc Adjustments
25 Series openers have three adjustments:
1.
planting/seed depth
2.
opener disc to disc clearance
3.
gauge wheel/opener disc clearance (page 73)
Setting Planting Depth
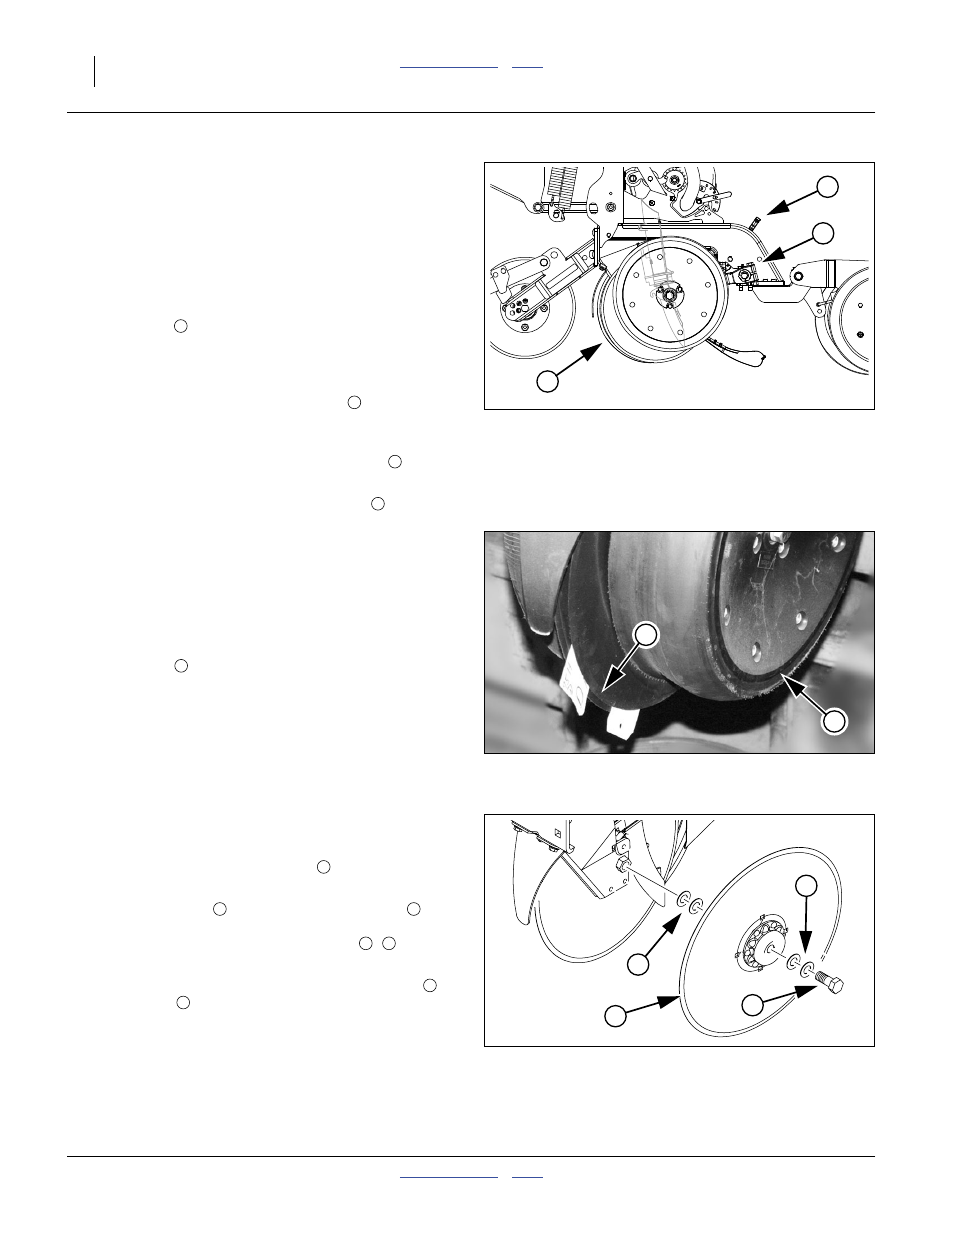
Refer to Figure 84
The “T” handle
sets planting depth by limiting the how
high the side depth gauge wheels ride relative to the
opener discs. The position of the seed tube itself is fixed
relative to the discs, and is not adjusted.
To adjust seed depth, pull the “T” handle
up and back,
move it forward or aft, and set it back in a different pair of
holes in the scale.
• For shallower planting, move the “T” handle
forward.
• For deeper planting, move the “T” handle
back.
Opener Disc Contact Region
Refer to Figure 85 and Figure 86
Opener disc angle and stagger is not adjustable, but
disc-to-disc spacing is, and may need attention as discs
experience normal wear. Spacers will need to be reset
when blades are replaced.
The ideal spacing causes the blades to be in contact for
about one inch
. If you insert two pieces of paper
between the blades, they should slide to within zero
(touching) to 1.5 inch (3.8 cm) of each other. If zero, the
gap between the blades should not be significantly
greater than the thickness of two sheets of paper.
If the contact region is significantly larger or there is a
large gap, it needs to be adjusted by moving one or more
spacer washers.
Adjusting Disc Contact
1.
Raise the planter and install lift cylinder locks.
2.
Remove the side gauge wheels
on the row unit in
need of adjustment.
3.
Remove the bolt
one side. Carefully remove the disc. Do not lose the
hub components and spacer washers
4.
To reduce the spacing between the discs (the normal
case), move one spacer washer from the inside
to
the outside
5.
Re-assemble and check disc contact.
Figure 84
Opener Adjustments
29600
1
1
Figure 85
Opener Disc Contact Region
26127
4
5
4
Figure 86
Opener Disc Spacers
26128
9
8
6
7
7
8
9