Chapter 3 setup menus, Basic setup menu, Chapter 4 setup menus – SATEC PM296 User Manual
Page 28: 1 basic setup menu
Chapter 4 Setup Menus
20
Chapter 4 Setup Menus
4. CHAPTER 3 SETUP MENUS
NOTE: Instrument setup can be performed directly on the front panel using the setup menus
or via communications using PComTest or PAS communication software, supplied with your
instrument. Alarm/Event Setpoints can be programmed only through communications. For
information on using PComTest or PAS, refer to the user documentation provided.
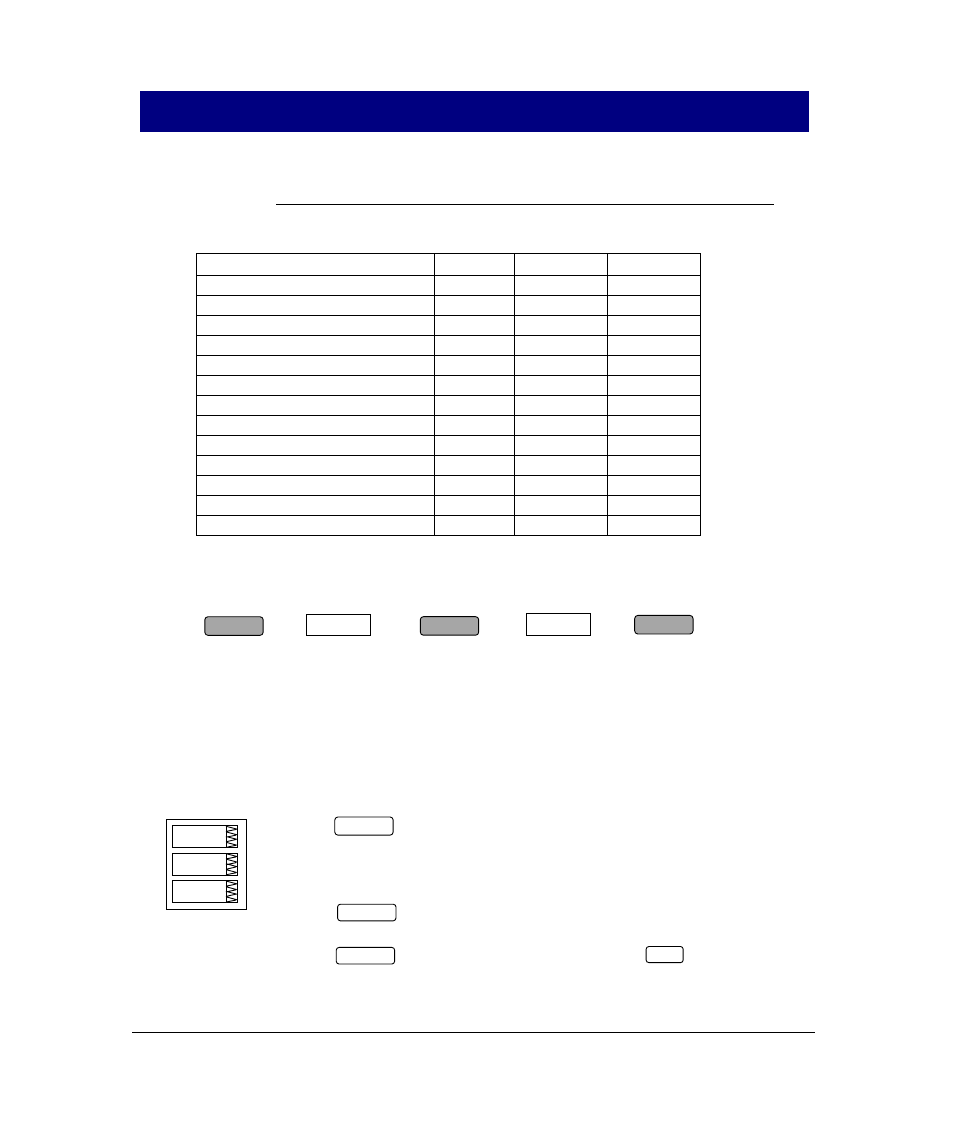
Setup Display
PComTest
PAS
Basic
+
+
++
Communication port
++
+
-
User selectable options
++
+
-
Analog output, analog expander
+
+
++
Digital inputs
+
+
++
Timer +
+
++
Alarm/Event set points
-
+
++
Pulsing output, pulse counter
+
+
++
Log memory partitions
-
+
++
Data log
-
-
++
Real time clock
+
+
++
TOU system
-
-
++
Assignable registers
-
++
-
Display
++
-
-
++ Recommended method + Possible - Not possible
4.1 Basic Setup Menu
This menu contains the basic configuration options which define the general
operating characteristics of your instrument, such as wiring mode, input scales,
the size of the RMS averaging buffer, etc. Table 4-1 lists the basic setup options,
their code names and applicable ranges.
Activate the middle window to scroll through the list of available options, and then
activate the lower window to set the option value.
To select and view a setup option:
Press to activate the middle window
Use the up/down arrow keys to scroll to the desired option. The current value
for this option appears in the lower window.
To change the value of the selected option:
Press to make the lower window active.
Press the up/down arrow keys to scroll to the desired value.
Press to store the selected value, or press to quit the menu.
bASc
4L-n
ConF
ESC
ENTER
SELECT
SELECT
SELECT
CHG
ENTER
bASc
ENTER