Step 3, Magna-loc, Installation of panel – Metal Sales Magna-Loc Installation User Manual
Page 45: Self driller xl screws
© Metal Sales Manufacturing Corporation / Subject to change without notice 6/12
45
MAGNA-LOC
INSTALLATION OF PANEL (
cont
.)
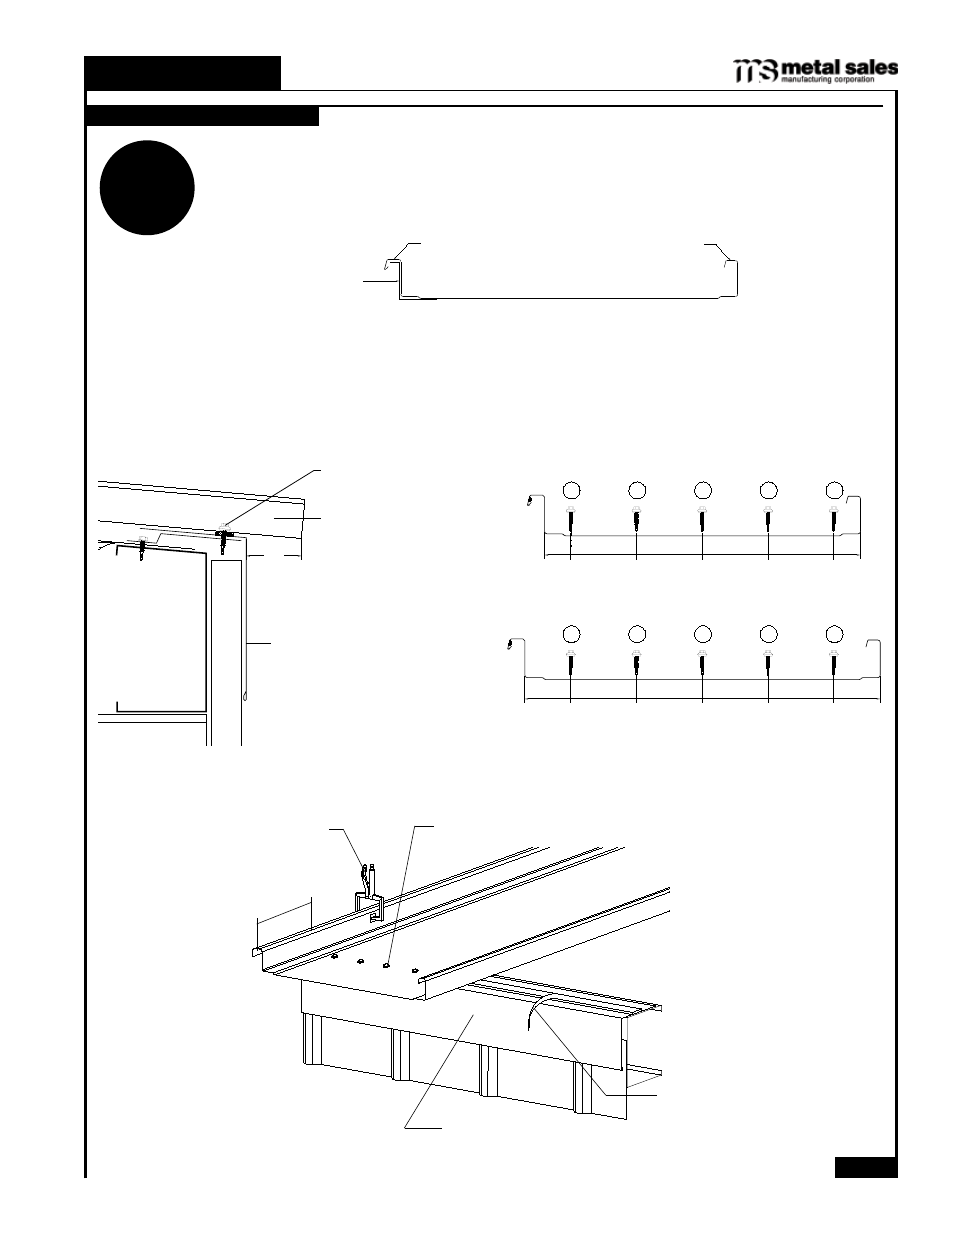
INSTALLING FIRST PANEL
Female Leg
Male Leg
Floating Rake Zee
2"
Gutter Drip
First Magna-Loc Eave
Panel
Self Driller XL
Note: Eave, Gutter Drip, Gutter, Valley, or any low side flashing must be installed prior to installation
of roof panel. The following steps are for installing Magna-Loc from left to right. Magna-Loc may be
installed from right to left if end lapping of panels is not required (See page 60 for Off Module panel
installation).
16" PROFILE FASTENING PATTERN
(Additional fasteners may be required at valley condition)
18" PROFILE FASTENING PATTERN
(Additional fasteners may be required at valley condition)
1
15
/
32
"
3
1
/
4
"
3
1
/
4
"
3
1
/
4
"
3
1
/
4
"
3
1
/
4
"
3
1
/
4
"
3
1
/
4
"
3
1
/
4
"
1
15
/
32
"
2
15
/
32
"
2
15
/
32
"
1
2
3
5
4
1
2
3
5
4
#12-14 x 1
1
/
4
" Self Driller XL
(See above)
"C" Clamp
2" Overhang
Gutter Drip
Peel back Double
Bead Tape Sealant
Paper
STEP
3
Steps:
1. Place a row of Double Bead Tape Sealant across top of Gutter Drip flashing. Be sure to place sealant where fastener will
be placed.
2. Position the first panel so the female leg is on top of the Gutter Drip and the panel is against the vertical leg of the
Floating Rake Zee.
3. Slide the panel over the eave flashing, 2" past the finished wall surface.
4. Use a C-clamp to hold the panel against the vertical leg of the Floating Rake Zee. Lift panel at the Eave Plate and strip off
the paper backing on the Double Bead Tape Sealant.
5. Recheck the panel overhang dimension at Eave, Ridge, and Endlap if required, and adjust if necessary.
6. Fasten panel through the Double Bead Tape Sealant and Gutter Drip flashing into the Eave Plate using (5) #12-14 x 1
1
/
4
"
Self Driller XL screws.