Step 1, Magna-loc, Installation of panel – Metal Sales Magna-Loc Installation User Manual
Page 43
© Metal Sales Manufacturing Corporation / Subject to change without notice 6/12
43
MAGNA-LOC
INSTALLATION OF PANEL
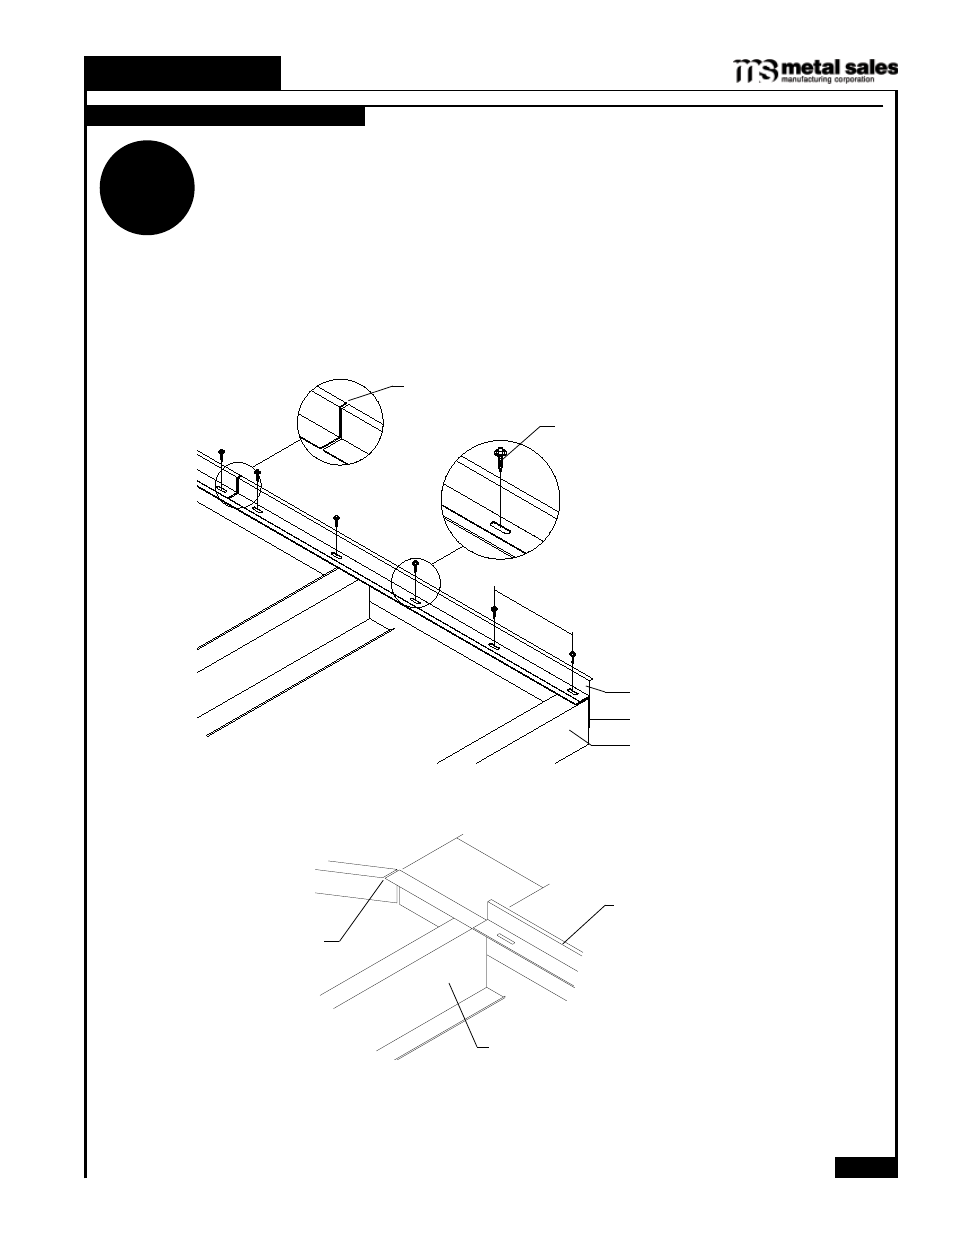
Note: The Floating Rake Zee must be attached to the framing member along the rake. Size of
Floating Rake Zee can vary, (see System Components list on page 20). The following procedures are
based on systems utilizing floating panel clips. For systems utilizing fixed panel clips, the Floating
Rake Zee is not required to move along its slotted base, (see step 2).
12"
Butt ends
Shoulder Self Driller in center of slot
Floating Rake Zee
Rake Angle
Roof Purlin / Eave Strut
6" to 12"
Floating Rake Zee
Purlin
Building Peak
INSTALLING
PANEL CLIP
STEP
1
INSTALLING FLOATING RAKE ZEE
Steps:
1. At the eave of the building (looking eave to peak), align the Floating Rake Zee flush with the existing rake angle/framing.
It is critical that the Floating Rake Zee be straight and square with the building as it controls the alignment of the
roof panels.
2. Fasten Floating Rake Zee with ¼"-14 x 1¼" Shoulder Self Driller screws into the center of each slot, (12" intervals).
Do not overtighten screws. Movement of the Floating Rake Zees are imperative for proper installation of the
roof system.
3. If two or more Floating Rake Zees are required, butt ends of Floating Rake Zees (Do not overlap) and continue fastening.
4. If necessary, field cut Floating Rake Zee to terminate 6"-12" from peak of building.
5. Install Floating Rake Zee on the opposite end where the panels terminate using the same procedures as above.
6. After applying Floating Rake Zees, insulation (if required) can be installed. Roll out insulation eave to peak, laying side
of insulation on Floating Rake Zees.
7. Avoid side lap of insulation from occurring directly beneath side lap of panel.