Troubleshooting – Prochem Legend SE AD User Manual
Page 49
TROUBLESHOOTING
LEGEND SE 980059 07/23/02
4-17
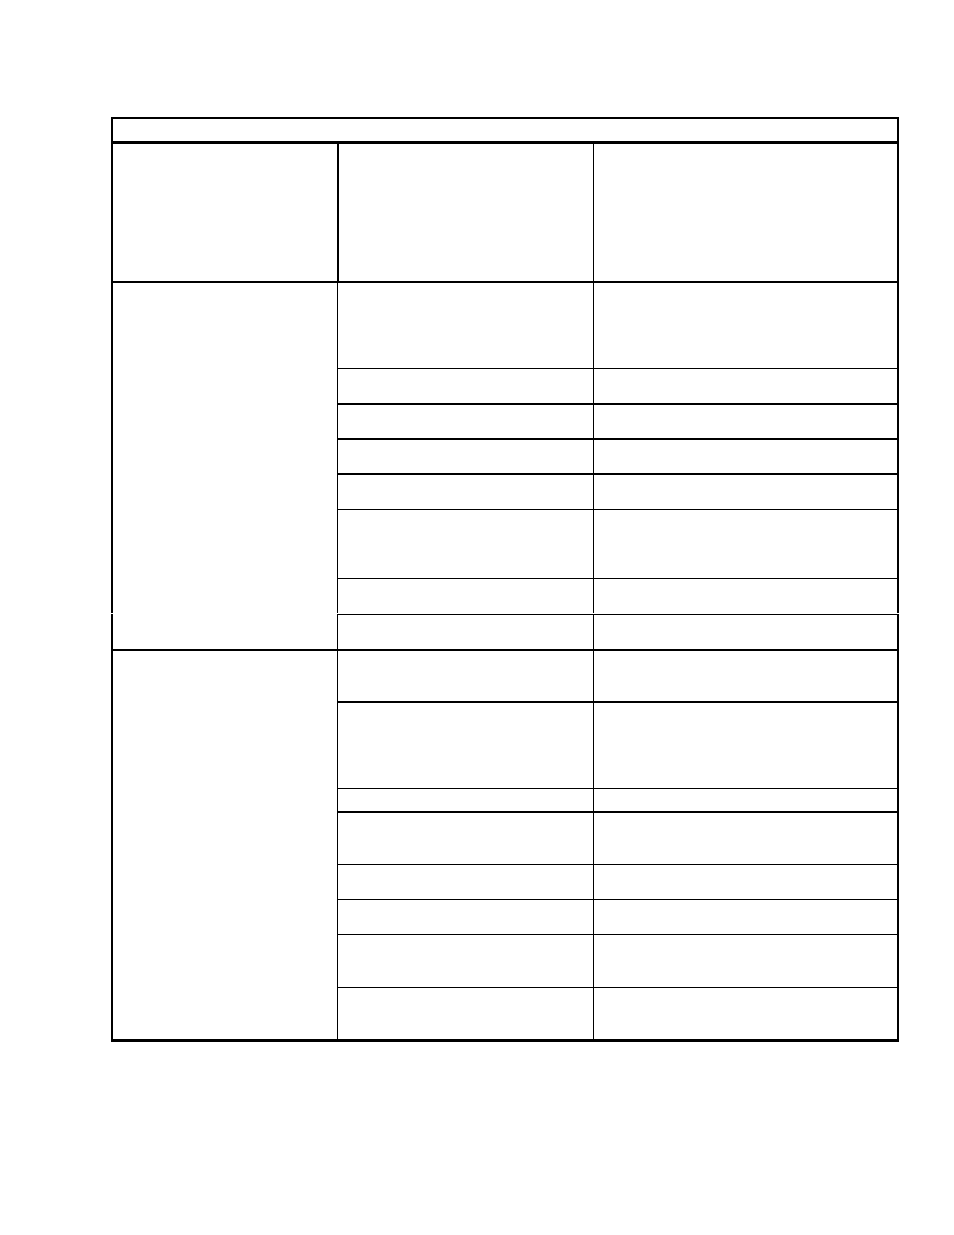
PROBLEM CAUSE SOLUTION
Heat exchanger leaks
NOTE: The engine exhaust
heat exchanger will produce
water condensation discharge
at times during normal
operation. DO NOT confuse
this with a leak.
Engine and vacuum exhaust heat
exchanger are damaged from
frozen water
Inspect heat exchanger for leaks. On pre-
heaters visually inspect for damage.
Pressure check both styles after removing
them from the unit. (Maximum test
pressure engine exhaust H.E. 1200 PSI
vacuum pre-heaters 300 PSI).
Check instrumentation settings:
Diverter valve is in the MUFFLER
position. Temperature bypass valve
is open. Temperature control is set
at a low temperature.
Turn diverter valve to the HEAT
EXCHANGER position. Close the heat
bypass valve. Set the temperature control
to a higher setting.
Defective solenoid - remains in
open position.
Inspect solenoid for proper operation.
Clean, or replace, if needed.
Temperature relief valve on water
box is stuck open.
Clean temperature relief valve and test.
Replace, if necessary.
Engine RPM is low.
Test gauge and sensor. Replace failed
component.
Defective air pump (catalytic
converter not burning).
Replace air pump.
Engine exhaust heat exchnager is
carbon-coated on outside of coil
(defective air pump).
Soak coil at a machine shop. Boil tank or
soak in an industrial cleaner. Check air
pump, replace if needed. DO NOT soak
catalytic core.
Engine exhaust heat exchanger is
scaled on inside of coil.
De-scale coil. Install water softener if
needed.
Loss of temperature
The heat output of the unit is
LESS than normal.
Excessive bypass due to loose or
damaged orifice.
Inpect bypass orifice. Repair or replace as
needed.
Automatic waster pump is
malfunctioning or not operating
normally
Debris interfering in the normal
operation of pump, pump check
valve, or float switch.
Remove pump-out from waste tank,
thoroughtly check all components, inspeck
for proper operation.
NOTE: When replacing either
the pump or float switch, use
new electrical connectors and
heat shrink. Inspect connection
for water tight seal.
Pump-out circuit breaker on the
control panel has been tripped.
After inspecting the waste pump to
determine the cause of the tripped circuit
breaker, press the reset button. (Check for
debris in the impeller inside the pump
head).
Defective waste pump float switch.
Replace float switch.
Worn out waste pump.
Check for voltage at the pump. If there is
voltage and the pump does not run, replace
the pump.
Water has penetrated the electrical
connectors.
Reseal or replace electrical connectors.
Broken wiring leading to the waste
pump.
Check for voltage at the pump. If no
voltage, find broken connection and repair.
Weak battery. Battery charge to low
to maintain pump-out operation.
Charge or replace battery, if needed. If no
voltage, find the broken connection and
repair.
Pump wired incorrectly. Pump
impeller rotates backwards
Verify rotation using arrow marking on
bottom of pump housing. Inspect using a
voltage meter.