Jenway 3540 User Manual
Page 58
Section 6
Calibration
6.10 pH
Calibration
Up to three calibration points may be used during a pH calibration procedure. Auto-
buffers may be selected from any one of four sets of five values. These will be
automatically recognised and so can be measured in any order. Their temperature
corrected values will also be automatically displayed.
Up to three values can be entered manually, but these must all be entered as values
at a fixed temperature and calibration must be carried out at this same temperature.
6.11 Preparation
Ensure the correct buffer set has been selected in the pH Calibration Set Up menu
(refer to section 5.30 and the addendum for further details).
Ensure the required number of calibration points has been selected in the pH
Calibration Set Up menu (refer to section 5.30).
Ensure that buffer solutions are available with the correct characteristics for the set
selected (see addendum) or if manually selected buffers have been chosen, that
these can be measured at the temperatures for their entered pH values.
Ensure that de-ionised water is available to rinse the electrode between buffers and
that tissue is available for removing excess liquids and cleaning spills.
Ensure that suitable containers are available for the buffers – do not place electrodes
directly into buffer bottles or return used buffer to the bottles, dispose of used buffer
solutions according to the instructions supplied with them.
Ensure that a suitable pH electrode and ATC probe are available for both the buffers
and samples to be measured – if in doubt seek advise. Where an ATC probe is not
available a manual temperature compensation value may be entered (refer to section
5.48)
Ensure you have read and understood the pH – Good Practice Guidelines in section
1.5 of this manual.
6.12 Calibration
Press the calibration [CAL] key.
Three tabbed screens will now be displayed.
Use the right or left arrow keys to select the pH Cal tab.
(It is also possible to review or alter the pH calibration set up by moving the highlight
to the Setup tab on the left-hand side – referring to section 5.3 for details.)
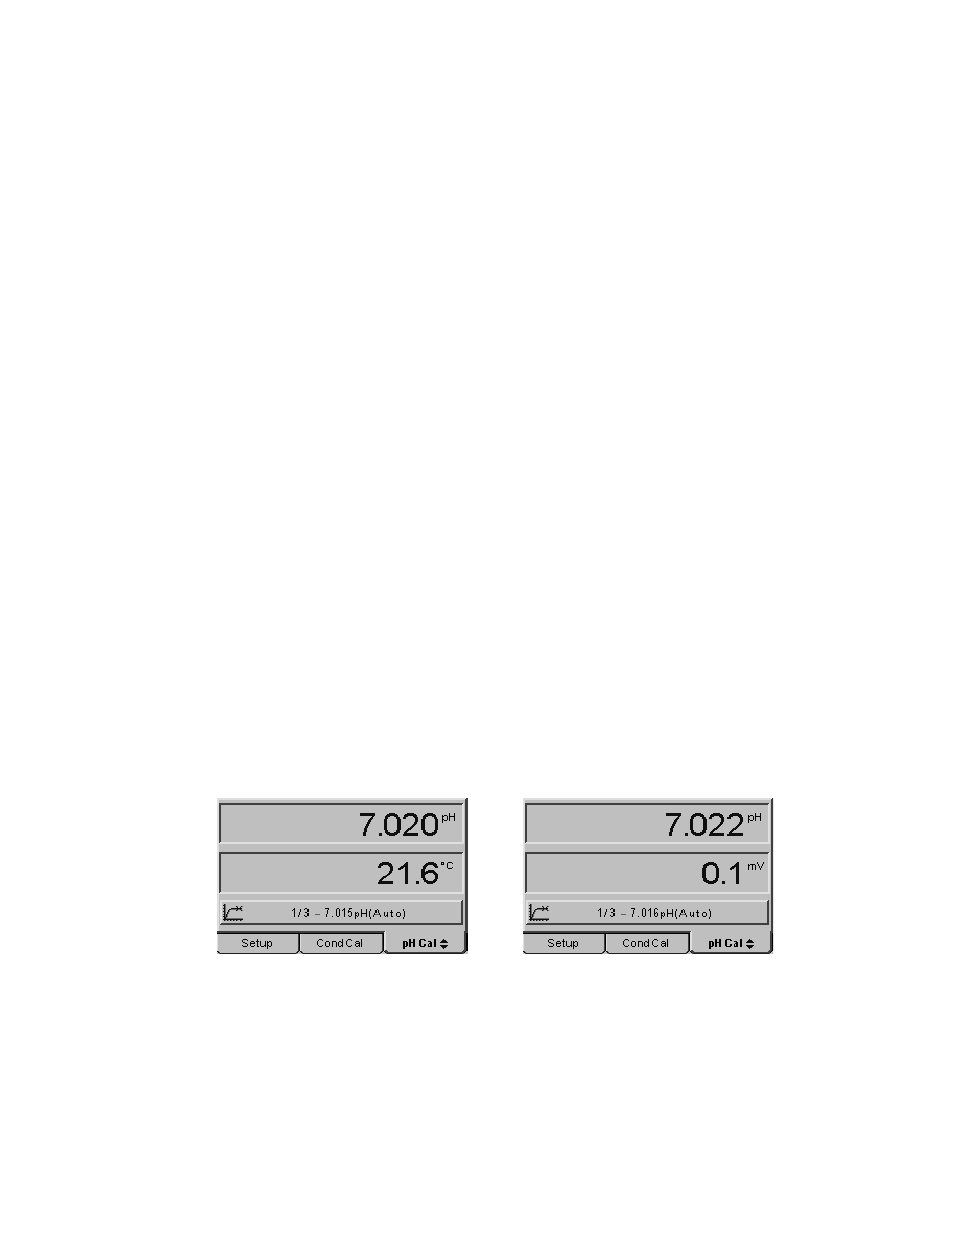
Initial pH calibration display, select temperature or mV display using up/down arrows
Place the pH electrode and ATC probe into the first buffer.
The measured pH will be shown in the top display while in the lower display either the
current temperature or mV value can be reviewed by using the up or down arrow key.
Details and prompts are shown in the Icon bar throughout the calibration procedure.
Auto buffers from the defined buffer sets can be measured in any order.