Processpro editing procedure, Step 1, Step 2 – GF Signet 8850 ProcessPro Conductivity-Resistivity Transmitter User Manual
Page 5: Step 3, Step 4, Step 5, Step 6, Step 3: finished editing, Step 5: made an error, 0 us > output1 setpnt
5
8850-3 Conductivity/Resistivity Transmitter
Notes on Steps 5 and 6:
• All output functions remain active during editing.
• Only the fl ashing element can be edited.
• RIGHT ARROW key advances the fl ashing element in a continuous loop.
• Edited value is effective immediately after pressing ENTER key.
• If no key is pressed for 10 minutes unit will restore the last saved value and return to step 3.
• Step 6 (pressing ENTER key) always returns you to Step 3.
• Repeat steps 3-6 until all editing is completed.
Notes on Step 2:
If no key is pressed for 5 minutes while display is showing "Enter
Key Code", the display will return to the VIEW menu.
Notes on Steps 3 and 4:
• Refer to pages 6 and 7 for complete listing of menu items and their use.
• From the Step 3 display, pressing the UP and DOWN keys simultaneously will
return the display to the VIEW menu.
• If no key is pressed for 10 minutes, display will also return to the VIEW menu.
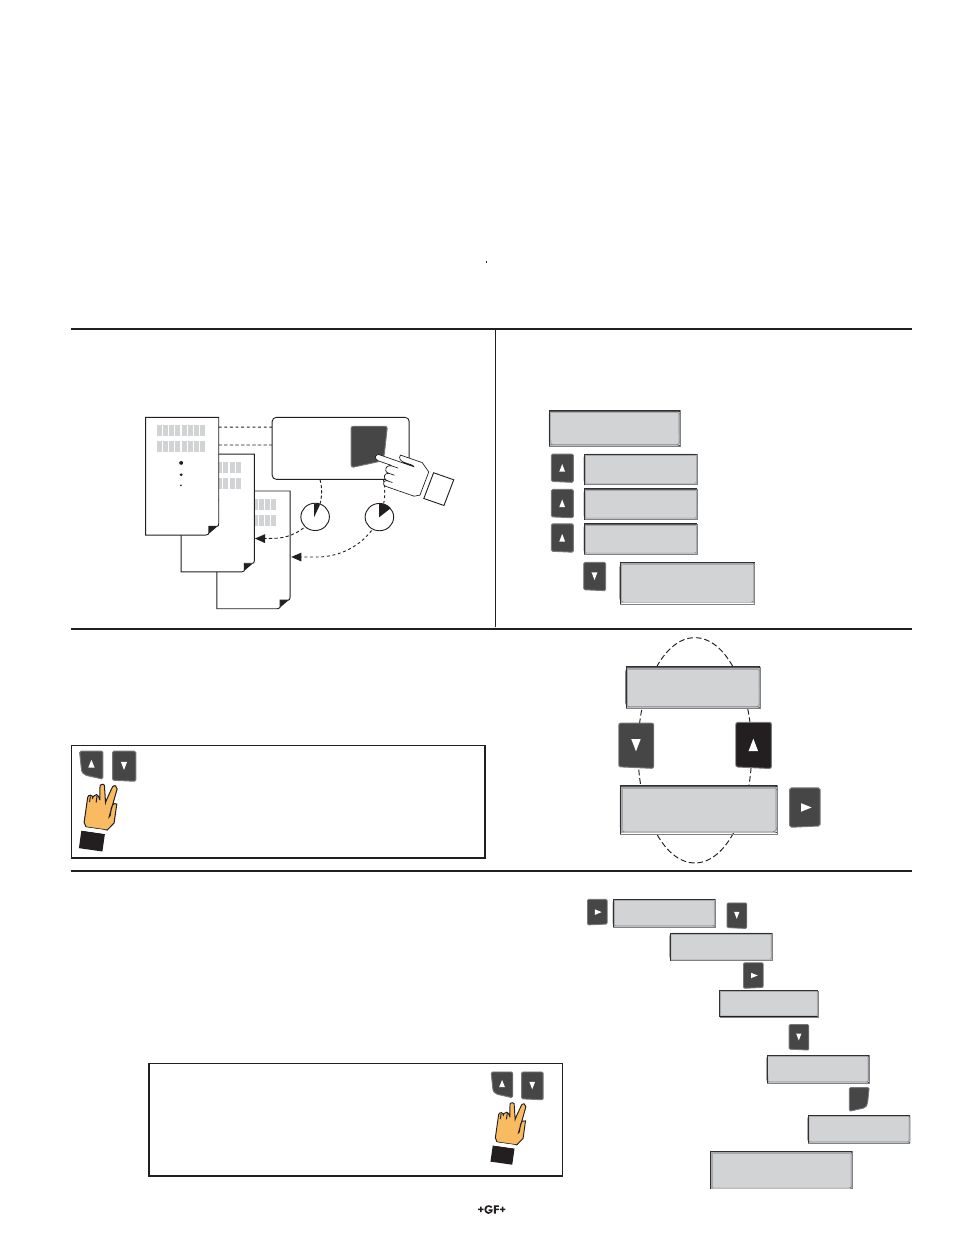
ProcessPro Editing Procedure:
Step 1.
Press and hold ENTER key:
• 2 seconds to select the CALIBRATE menu.
• 5 seconds to select the OPTIONS menu.
Step 2.
The Key Code is UP-UP-UP-DOWN keys in sequence.
• After entering the Key Code, the display will show the fi rst item in the selected menu.
Step 3.
Scroll menu with UP or DOWN arrow keys.
Step 4.
Press RIGHT ARROW key to select menu item to be edited.
•
The
fi rst display element will begin fl ashing.
Step 5.
Press UP or DOWN keys to edit the fl ashing element.
• RIGHT ARROW key advances the fl ashing element.
Step 6.
Press ENTER key to save the new setting and return to Step 3.
OPTIONS
CALIBRATE
VIEW
2s
5s
Press &
hold for
access:
ENTER
Step 5
Step 6
Notes on Step 1:
• The View Menu is normally displayed.
• The CALIBRATE and OPTIONS menus require a KEY CODE.
Step 4
First item in
CALIBRATE menu
Step 3
Step 3: Finished Editing?
Press the UP and DOWN keys simultaneously after
saving the last setting to return to normal operation.
Press the UP and DOWN keys simultaneously
while any element is fl ashing. This will recall the
last saved value of the item being edited and
return you to Step 3.
Step 5: Made an Error?
Output1 Setpnt:
2
0.00 uS
Output1 Setpnt:
1
0.00 uS
ENTER
Output1 Setpnt:
1
0
.00 uS
Output1 Setpnt:
1
9
.00 uS
Output1 Setpnt:
Saving
Output1 Setpnt:
19.00 uS >
20.0 uS
>
Output1 Setpnt:
Standard >
Cell Constant:
CALIBRATE: ----
Enter Key Code
CALIBRATE: *---
Enter Key Code
CALIBRATE: **--
Enter Key Code
CALIBRATE: ***-
Enter Key Code
Standard >
Cell Constant: