In-line assembly and installation – GF Signet 2760 DryLoc pH_ORP Preamplifier and Connectors User Manual
Page 2
2
Signet 2760 DryLoc pH/ORP Preamplifi er
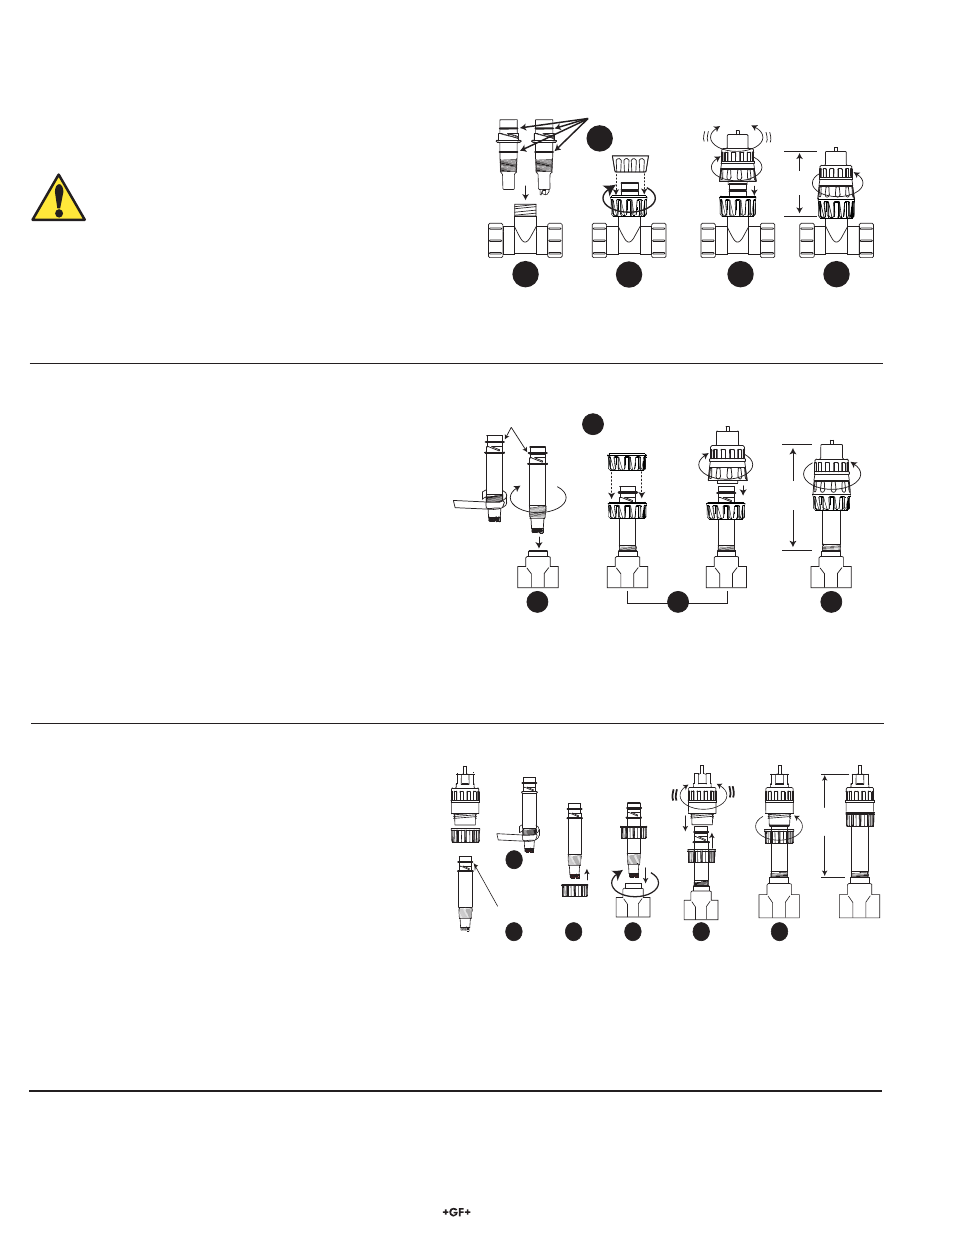
2760 In-Line models used with 2724-2726 series electrodes:
1. The 2724-2726 can use a Signet installation fi tting. Electrodes are sealed by the O-ring when it is installed into a Signet installation
fi tting.
2. The lower threaded nut is required to attach the electrode to the
installation fi tting when using a Signet fi tting.
HAND-TIGHTEN THE THREADED NUT ONTO THE
INSTALLATION FITTING.
DO NOT USE TOOLS!
DO NOT USE THREAD SEALANT OR LUBRICANTS ON
THE FITTING THREADS OR THE SENSOR CAP
.
3. Lubricate O-rings with a non-petroleum based, viscous lubricant
(grease) compatible with the system.
4. Seat the 2760 DryLoc connector onto the top of the electrode.
Open the DryLoc connector by turning the upper locking ring ¼-turn clockwise.
5. Turn the locking ring ¼-turn counter-clockwise to lock the preamplifi er in place. The mechanism will “click” when it is locked.
When fully assembled the 2760 will stand about 100 mm (4 in.) above the installation fi tting.
Lock
Unlock
100 mm
(4 in.)
Lubricate O-rings
1
2
3
4
5
In-line Assembly and Installation
2760 In-Line models used with 2724-2726, 2764-2767 or 2774-2777 series electrodes:
BEFORE YOU START:
2764-2767: Install a 1 in. NPT pipe tee into the process line.
2774-2777 and 2724-2726: Install a ¾-in. reducing tee into the
process line.
1. Wrap the process threads on the electrode with an appropriate
sealant (example: PTFE tape ) to create a water-tight
connection. HAND-TIGHTEN the electrode into the installation
fi tting. DO NOT USE TOOLS!
NOTE:
The lower threaded nut may be dropped onto the top of
the electrode or it may be discarded. It is not used with these
electrodes.
2. Lubricate O-rings with a non-petroleum based, viscous lubricant
(grease) compatible with the system.
3. Seat the 2760 DryLoc connector onto the top of the electrode.
Open the DryLoc connector by turning the upper locking ring ¼-turn clockwise.
4. Turn the locking ring ¼-turn counter-clockwise to lock the preamplifi er in place. The mechanism will “click” when it is locked.
When the 2760 Preamplifi er is fully assembled with one of the threaded electrodes (276X and 277X models) it will stand
approximately 18 cm (7 in.) from the process threads to the top of the preamplifi er.
2760 Submersible models used as in-line system:
The Submersible 2760 design can also be used in-line when
using the 2724-2764, 2764-2767 series or the 2774-2777 series
electrodes.
BEFORE YOU START:
2764-2767: Install a 1 in. NPT pipe tee in the process line.
2774-2777 and 2724-2726: Install a ¾-in. reducing tee in the
process line. DO NOT install in a ¾-inch tee or probe will be
damaged.
1. Wrap the process threads on the electrode with an
appropriate sealant (example: PTFE tape) to create a water-
tight connection.
2. Lubricate O-rings with a non-petroleum based, viscous lubricant (grease) compatible with the system.
3. Remove the threaded nut from the preamplifi er and place it around the electrode from the bottom as illustrated.
4. HAND-TIGHTEN the electrode into the installation fi tting. DO NOT USE TOOLS!
5. Seat the 2760 DryLoc connector onto the top of the electrode.
6. Lift the threaded nut up and thread it hand-tight onto the preamplifi er.
When the 2760 Preamplifi er is fully assembled with one of the threaded electrodes (276X and 277X models) it will stand
approximately 18 cm (7 in.) from the process threads to the top of the preamplifi er.
178 mm
7 in.
2760 Preamplifier
Electrode
Threaded nut
Lubricate O-ring
2
1
3
4
5
6
• The 2760 Preamplifi er signal can be routed to a Signet 5700 ProPoint pH Monitor, or to any model of the 3-8750 pH Transmitter.
• If the preamplifi er cable must be extended beyond the standard 15 ft that is supplied with the 2760, use a junction box to terminate
the wires.
Note:
Do not extend the 2760 cable more than 120 m (400 ft).
Unlock
Lubricate O-rings
2
1
4
3
Lock
178 mm
(7 in.)