Test cycles & types, How to manually start line leak tests – Franklin Fueling Systems T5 Series Fuel Management System Operators Guide User Manual
Page 24
20
Test Cycles & Types
Once installed, calibrated and enabled, the LS500 will start a cycle of tests after the hook signal becomes inactive (i.e. a
nozzle is hung up). The transducers then monitor line pressure to ensure that pressure is sufficient to proceed with the
cycle. A Gross (3.0 GPH) Leak Test will begin immediately following the pressure test, if these options are enabled in
setup. When the Gross Test is complete with a pass result, the system will wait 30 minutes prior to monitoring the line for
thermal stability. When it determines that the line is stable, another Gross Test will be performed directly followed by a
Monthly (0.2 GPH) Leak Test. When the Monthly Test is complete with a pass result, the system then monitors the line for
thermal stability once again. When that the line is stable, another Gross Test will be performed followed by an Annual (0.1
GPH) Leak Test. When the Annual Test is complete with a pass result, the system then waits 45 minutes prior to restarting
the cycle again.
Test Type
Description
Pressure Up
A pressure up test will monitor line pressure from a static line to when the pump is turned on.
Dispenser Pressure
Dispenser pressure is tested with the hook applied to ensure that line pressure does not drop too
low while dispensing. This feature can be enabled/disabled in the programming.
Catch Pressure
When the dispenser hook is dropped and the pump turns off, line pressure decay is monitored and
compared to a learned decay. This test will not cause the pump to shut down — alarm only.
Gross (3.0 GPH) Leak
The Gross Test will begin after every dispense when the line is enabled or after every 45 minutes
of quite time (no dispensing or pump running) following a line pressure test. In ideal conditions, this
test will take approximately 5 minutes to complete. In the event of a failure, the system will attempt
to run the test again after 5 minutes. After two failures an indicator light and alarm will turn on and
the pump will be shutdown. A dispense or pump shutdown by another application during this test
will cause an Abort Alarm. This test can be enabled / disabled in the programming.
Thermal Wait Time
Before initiating a precision test, the LS500 will monitor the line for thermal variations. Testing for
thermal variations takes 1½ to 10 hours of inactivity.
Monthly (0.2 GPH) Leak
If this option is enabled in the programming, the test will follow a thermal wait period and line
pressure test. In the event of a failure, the system will attempt to run the test again without
waiting. Upon three failures, an indicator light and alarm will turn on and the pump will shutdown if
programmed. A dispense or pump shutdown by another application during this test will cause an
Abort alarm. This test can be enabled/disabled in the programming.
Annual (0.1 GPH) Leak
Line Learned but Not Enabled If a line is learned and not enabled within a preset amount of time, then the console will show a
warning that the line is not enabled. This is to show that the line is not being monitored for leaks.
Sudden Pressure Loss
This is a continuous test that runs in the background. An alarm will occur if line pressure drops too
fast.
Extended Pump Run
The LS500 will detect all hook signals (if wired properly) and the time that they remain active. If
the hook signal is active for too long, the console will indicate this condition with an alarm light and
sound.
High Pressure
If line pressure exceeds the maximum allowable pressure, the pump will shut down and an alarm
will light and sound. This test will run continuously when the line is enabled.
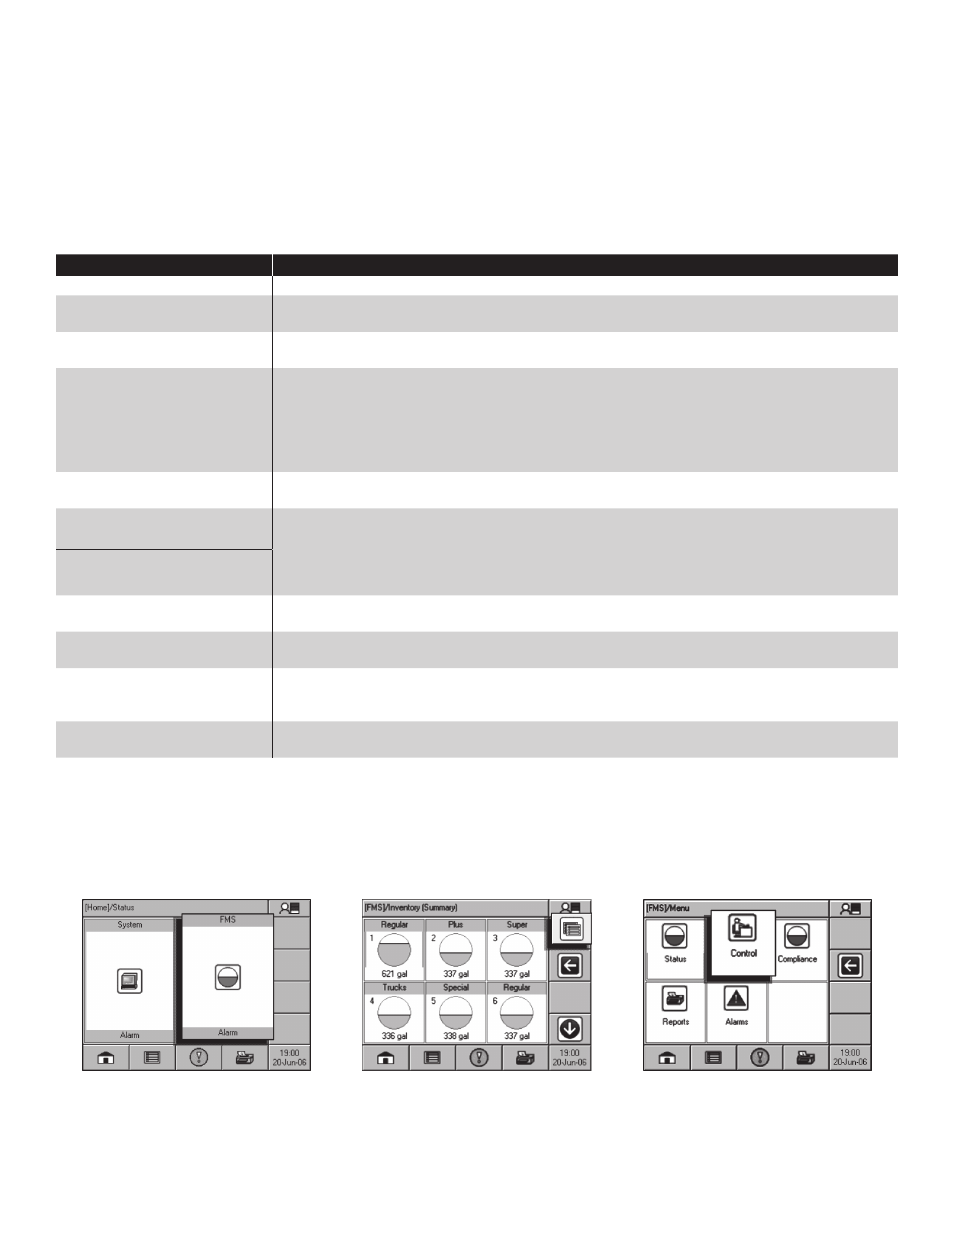
How to Manually Start Line Leak Tests
This procedure requires User level privileges.
1. Starting at the Home/Status screen, press the FMS application button.
2. Press the Application Menu button.
3. Press the Control button.
Step 1
Step 2
Step 3