Installation and operation, Mounting the units, Rear panel connections, controls, and indications – Extron Electronics PowerCage FOX Tx_Rx HDMI User Guide User Manual
Page 11: Indications
Installation and
Operation
This section describes the installation and operation of the PowerCage FOX HDMI, including:
•
•
Rear Panel Connections, Controls, and Indications
•
Transmitter Side Panel Controls
•
PowerCage Front Panel Port, Control, and Indicators
•
Mounting the Units
The PowerCage FOX transmitter or receiver must be installed in an Extron PowerCage
enclosure (see “
Installing a Board in the Enclosure
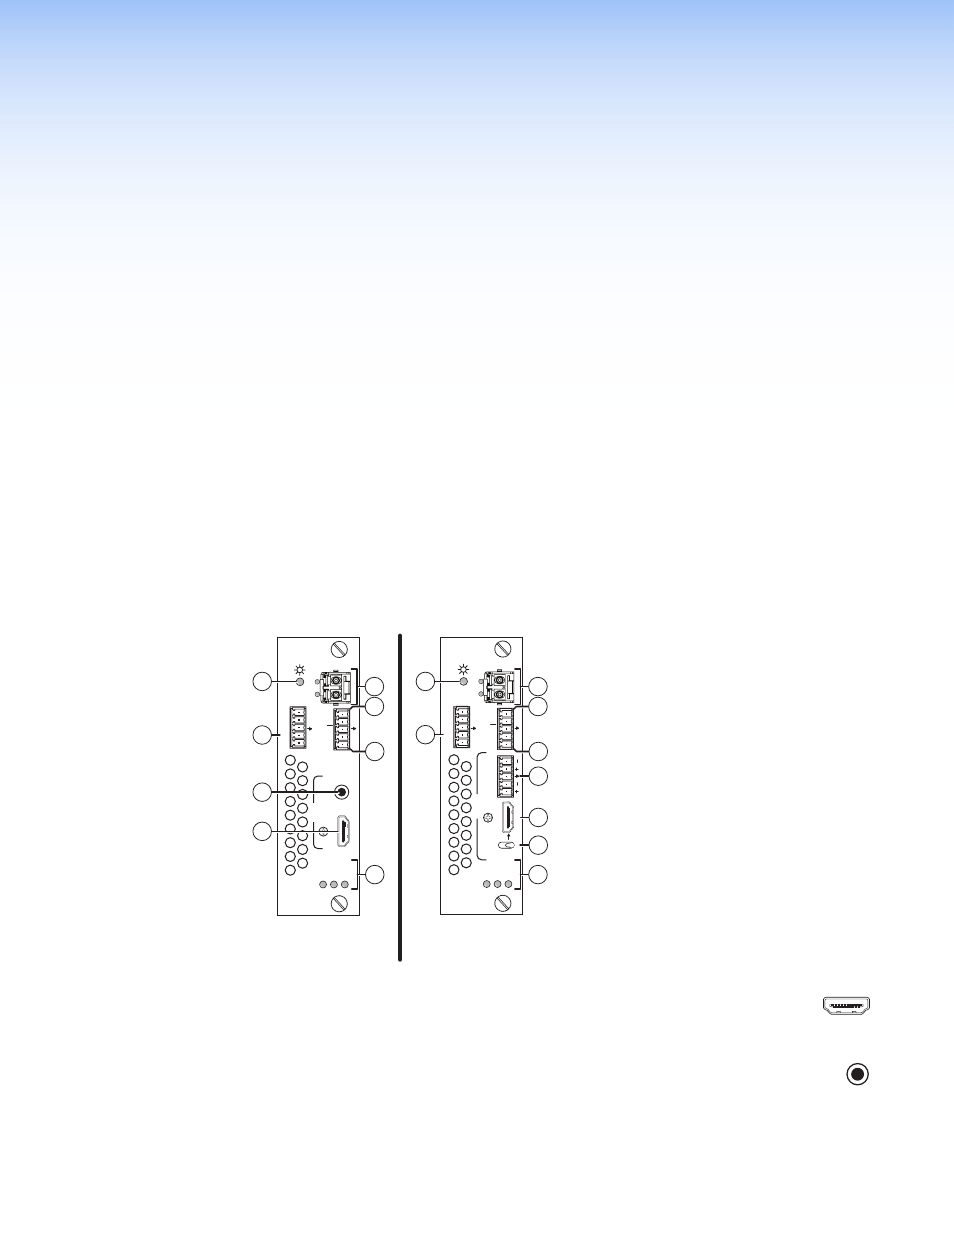
Rear Panel Connections, Controls, and Indications
PowerCage
FOX Tx HDMI
Transmitter
PowerCage
FOX Rx HDMI
Receiver
1 2
REMOTE RS-232
RS-232
OVER FIBER
Tx Rx
Tx
ALARM
INPUT
PowerCage
FOX Tx HDMI
Tx Rx
AUDIO
HDMI
HDCP
HDMI
AUDIO
Rx
1 2
REMOTE RS-232
RS-232
OVER FIBER
Tx Rx
Tx
ALARM
Rx
OUTPUT
PowerCage
FOX Rx HDMI
Tx Rx
LR
AUDIO
HDMI
HDCP
ON
HDMI
AUDIO
OFF
AUDIO
7
11
11
6
8
10
9
5
5
1
2
3
3
12
12
4
4
Figure 2.
PowerCage FOX Tx Transmitter Connectors, Controls, and Indications
a
HDMI Input connector — Connect a single link of HMI video to this
HDMI
connector. See “
“ on page 10 for pin assignments and to use
the LockIt HDMI Cable Lacing Bracket to secure the connector to the transmitter.
b
Audio Input connector — Connect an unbalanced stereo or mono
AUDIO
audio input to this connector.
The input audio level can be set via RS-232 control (see “
“ in the “Remote Control” section on page 29.
PowerCage FOX HDMI • Installation and Operation
5