Modulating the sound (lfo 1 & 2), Lfo arrangement and functions, P. 59) – Roland SH-32 User Manual
Page 59: Time key follow) (p. 59), Modulating the sound, Lfo 1 & 2), P. 59) for details, Turning the lfo on and, Off, and switching, Waveforms (lfo 1, lfo 2
59
Chapter 2. Creating Your Own Sounds
Chapter 2
Increasing and Decreasing the Rate
of Change in Volume According to
the Keyboard Position
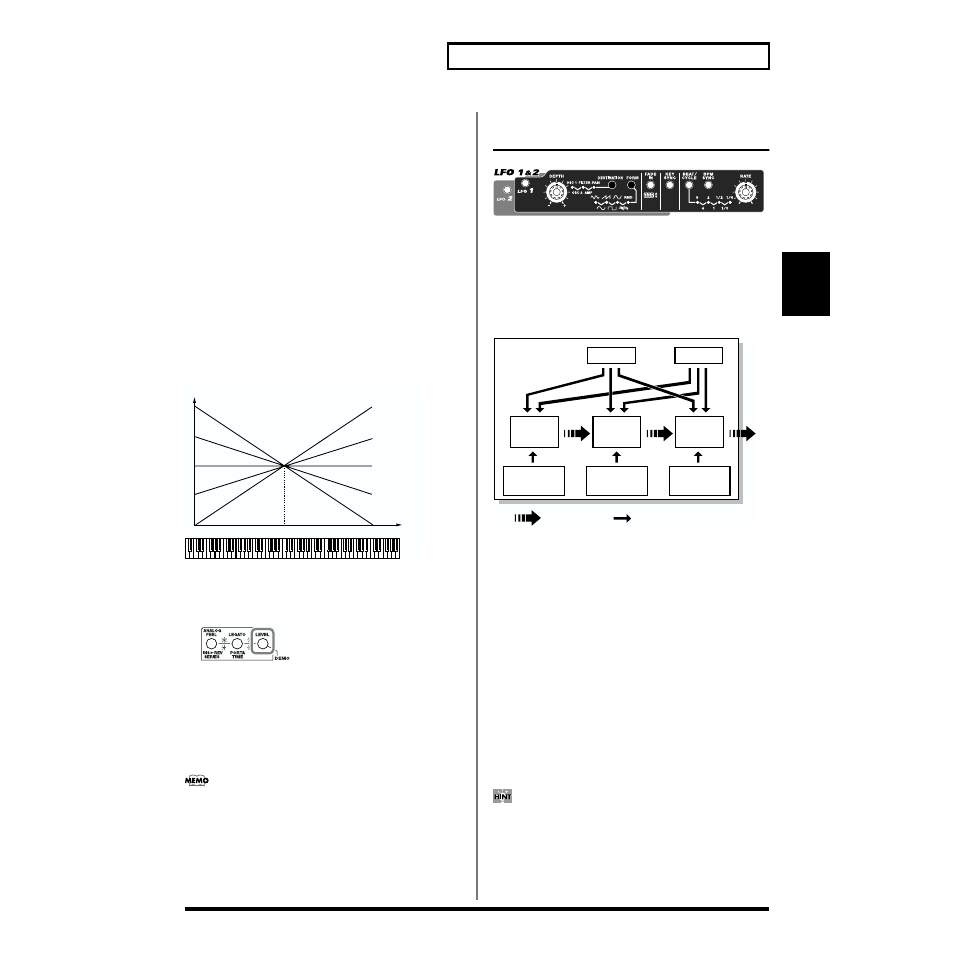
(TIME KEY FOLLOW)
[TIME KEY FOLLOW]
Set this to have the time following the decay time of the amplifier
envelope altered according to the position of the key pressed. With
the amplifier envelope for the C4 key (Middle C) as the reference,
then when values are positive (+), then the higher the key being
pressed is above the C4 key, the shorter the time, with negative (-)
values creating longer times. Larger settings will produce greater
change.
Press [TIME KEY FOLLOW], causing the indicator to blink, then
press [VALUE ▼/▲] to set the value (from -10 to 10). When you
have finished making the settings, either press [TIME KEY
FOLLOW] once more, or press [EXIT], causing the [TIME KEY
FOLLOW] indicator light to go off.
fig.Time KF.e
Setting the Volume for Each Patch,
Rhythm Set, or Performance
fig.02-28
[LEVEL]
Sets the volume for each Patch, Rhythm Set, or Performance.
Press [LEVEL], causing the indicator to light up, then press [VALUE
▼/▲] to set the value (from 000 to 127). When you have finished
making the settings, press [EXIT], causing the [LEVEL] indicator
light to go off.
• In Rhythm Tone Edit (p. 69), this procedure sets the volume of
each individual percussion instrument in the Rhythm Set.
• In Part Assign mode (p. 71), the volume settings selected in
Performance mode are enabled, and these can be saved to
individual Performances.
Modulating the Sound
(LFO 1 & 2)
fig.02-29
The LFO 1 & 2 (Low Frequency Oscillator 1 & 2) section outputs
waveforms that are used for purposes that are different than those of
the waveforms from the OSC 1 & 2 section. The waves from LFO 1 &
2 are used to create cyclic, periodic changes in the pitch, brightness,
volume, and other aspects of the OSC 1 & 2 wave sounds.
LFO Arrangement and Functions
fig.01-02.e
Use the LFO to create cyclic changes (modulation) in a sound. There
are two LFOs (LFO 1/2), and these may affect OSC 1/2 (pitch),
FILTER, AMP (volume), and PAN. When an LFO is applied to the
OSC 1/2 pitch, a vibrato effect is produced. When an LFO is applied
to the FILTER cutoff frequency, a wah effect is produced. When an
LFO is applied to the AMP volume, a tremolo effect is produced.
Turning the LFO On and Off, and
Switching Waveforms
(LFO 1, LFO 2, FORM)
[LFO 1]/[LFO 2]
These switch the LFO 1/2 on and off. Press the button; the selected
LFO is on when the indicator is lit or blinking, and off when the
indicator light is off. When both LFO 1 and LFO 2 are on, the LFO
with the blinking indicator is the one being edited. To turn off the
LFO that is not being edited, press the blinking button.
• Pressing [LFO 1] and [LFO 2] simultaneously causes both
indicators to blink, and both LFO 1 and LFO 2 become the edited
objects, thus allowing you to make identical settings to the two
LFOs at the same time.
• By holding down [LFO 1] or [LFO 2] along with [EXIT], you can
clear the current LFO 1 or LFO 2 settings. You can then redo the
settings, starting from their default state.
C4
C3
C2
C1
C5
C6
C7
0
5
10
-5
-10
Key
Time
OSC
PITCH
Envelope
FILTER
FILTER
Envelope
AMP
Envelope
AMP
LFO 1
LFO 2
control signal
Patch
audio signal