Formatting (initialization), Formatting (initialization) the hard disk, Formatting (initialization) all hard disks (unit) – Panasonic WJ-HD316 User Manual
Page 129: Screenshot 1, Screenshot 2, Screenshot 3, Screenshot 4
129
■ Formatting (Initialization) the
Hard Disk
It is necessary to initialize the hard disk in the following
cases.
• When replacing the hard disk of this unit
• When operating the unit for the first time after connect-
ing the optional extension unit to this unit
Important
When the hard disk is formatted (initialized), all of the
recorded images will be deleted.
● Formatting (initialization) all hard
disks (unit)
All hard disks including the built-in hard disks and the hard
disks in the extension units will be initialized. All units will be
initialized when the RAID 5 function is set.
z Turn on the power of any peripheral devices such as
extension unit connected to this unit.
x Turn on the power of this unit and press the SET button
after completing the system check.
Note: When the hard disk is replaced or removed, the
"TOP MENU" of the "HDD DISK MENU" will be auto-
matically displayed.
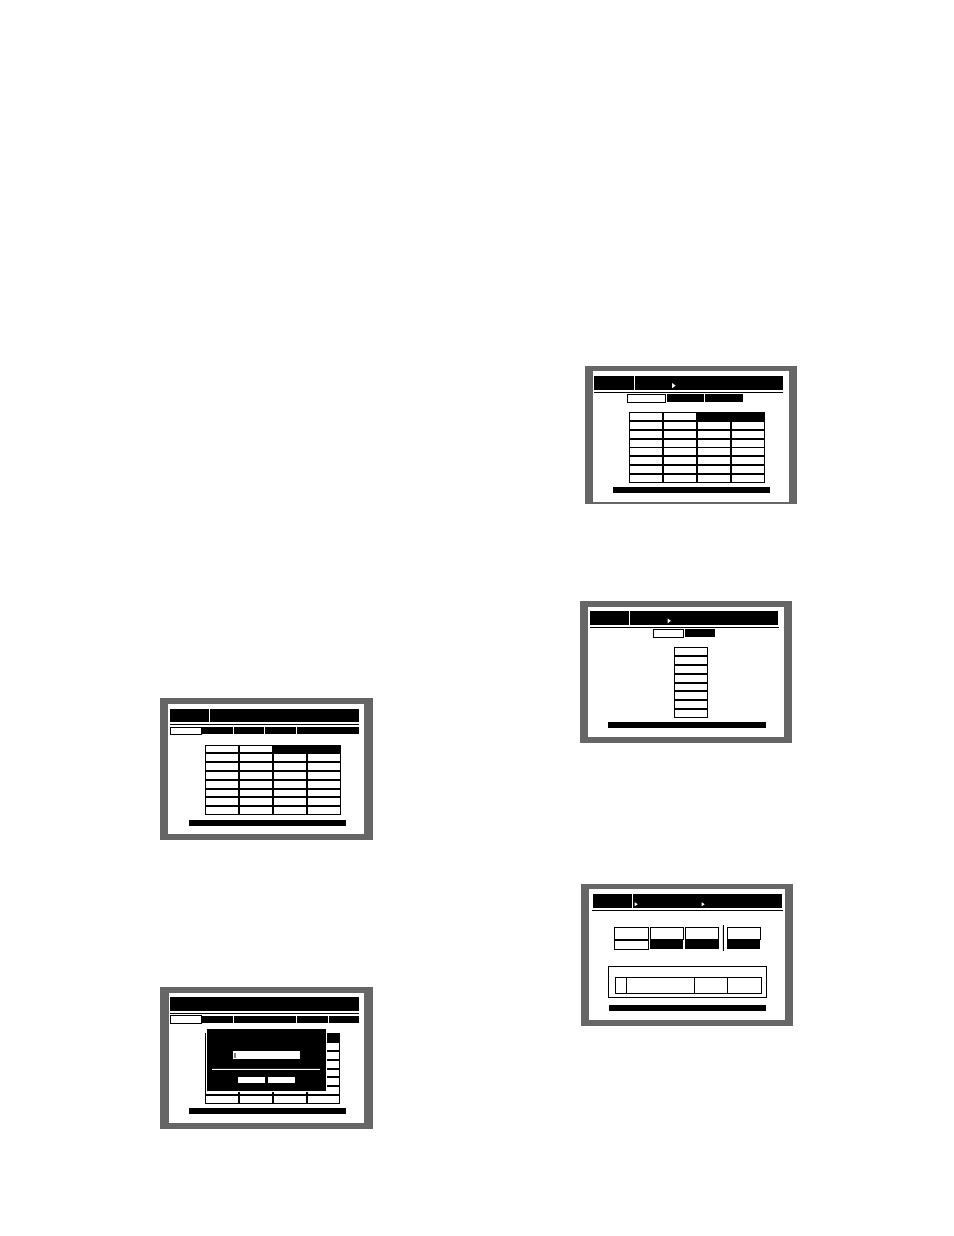
[Screenshot 1]
The "TOP MENU" of the "HDD DISK MENU" will be dis-
played.
c Move the cursor to "FORMAT" using the arrows button
(A B) and press the SET button.
[Screenshot 2]
The password entry window will be displayed.
v Enter the password for an administrator by rotating the
jog dial.
The camera selection buttons ([1] - [10/0] for the WJ-
HD316, [1] - [9], [0] for the WJ-HD309) are available to
enter numbers for password.
The same method is used to enter, insert and delete
characters as for attaching text information to images.
Refer to page 54.
b Move the cursor to "EXECUTE" using the arrows button
(C D) and press the SET button.
[Screenshot 3]
The "THE CANDIDATE FOR A FORMAT" menu will be dis-
played.
n Move the cursor to "ALL UNITS" using the arrows button
(A B) and press the SET button.
Select "ALL UNITS" when using the RAID 5 function.
[Screenshot 4]
The "RECORDING AREA SETUP OF ALL DISKS" will be dis-
played.
m Select a recording area using the arrows button (A B)
and rotate the jog dial to set the capacity for the select-
ed recording area.
Repeat this operation to set the capacity for the other
recording areas.
Digital Disk Recorder
WJ-HD300
HDD DISK MENU
TOP MENU
FORMAT
MIRROR ON
REMOVE
RESTART
EXIT
MIRROR OFF
Close the information of recording areas : [SETUP/ESC] OK : [SET]
120GB M
120GB
120GB
120GB
*(120GB)
ADD (120GB)
120GB
LOST
MAIN
EXT7
EXT6
EXT5
EXT4
EXT3
EXT2
EXT1
120GB M
120GB
120GB
120GB
*(ERROR)
ADD (ERROR)
120GB
-
120GB
120GB
120GB
120GB
120GB
120GB
-
120GB
120GB
120GB
120GB
120GB
120GB
-
1
2
3
4
Enter the password.
EXECUTE
CANCEL
Digital Disk Recorder
WJ-HD300
HDD DISK MENU
TOP MENU
FORMAT
MIRROR ON
REMOVE
RESTART
EXIT
MIRROR OFF
Close the information of recording areas : [SETUP/ESC] OK : [SET]
120GB M
120GB
120GB
120GB
*(120GB)
ADD (120GB)
120GB
LOST
MAIN
EXT7
EXT6
EXT5
EXT4
EXT3
EXT2
EXT1
120GB M
120GB
120GB
120GB
*(ERROR)
ADD (ERROR)
120GB
-
120GB
120GB
120GB
120GB
120GB
120GB
-
120GB
120GB
120GB
120GB
120GB
120GB
-
1
2
3
4
Digital Disk Recorder
WJ-HD300
HDD DISK MENU
TOP MENU THE CANDIDATE FOR A FORMAT
ALL FORMAT
SELECTED DISC MIRROR FORMAT
RETURN: [SETUP/ESC] OK : [SET]
120GB M
120GB
120GB
120GB
*(120GB)
ADD (120GB)
120GB
LOST
MAIN
EXT7
EXT6
EXT5
EXT4
EXT3
EXT2
EXT1
120GB M
120GB
120GB
120GB
*(ERROR)
ADD (ERROR)
120GB
-
120GB
120GB
120GB
120GB
120GB
120GB
-
120GB
120GB
120GB
120GB
120GB
120GB
-
1
2
3
4
Digital Disk Recorder
WJ-HD300
HDD DISK MENU
TOP MENU THE CANDIDATE FOR A FORMAT
RETURN: [SETUP/ESC] OK : [SET]
ALL UNIT
ONE UNIT
-
120GB
120GB
120GB
*(120GB)
ADD (120GB)
120GB
LOST
MAIN
EXT7
EXT6
EXT5
EXT4
EXT3
EXT2
EXT1
Digital Disk Recorder
WJ-HD300
HDD DISK MENU
THE CANDIDATE FOR A FORMAT RECORDING AREA SETUP OF ALL DISK
RETURN: [SETUP/ESC] OK : [SET]
HDD Total capacity : 2790GB
Normal area
Event area
90GB
1800GB
Copy area
450GB
Free area
450GB