Grass Valley Aurora Playout v.7.0 User Manual
Page 34
Playout, and the RJ11 end connects to the port labeled "Control" on the back of the
RDU-1510. This is an RS-422/RS-232 serial communication port.
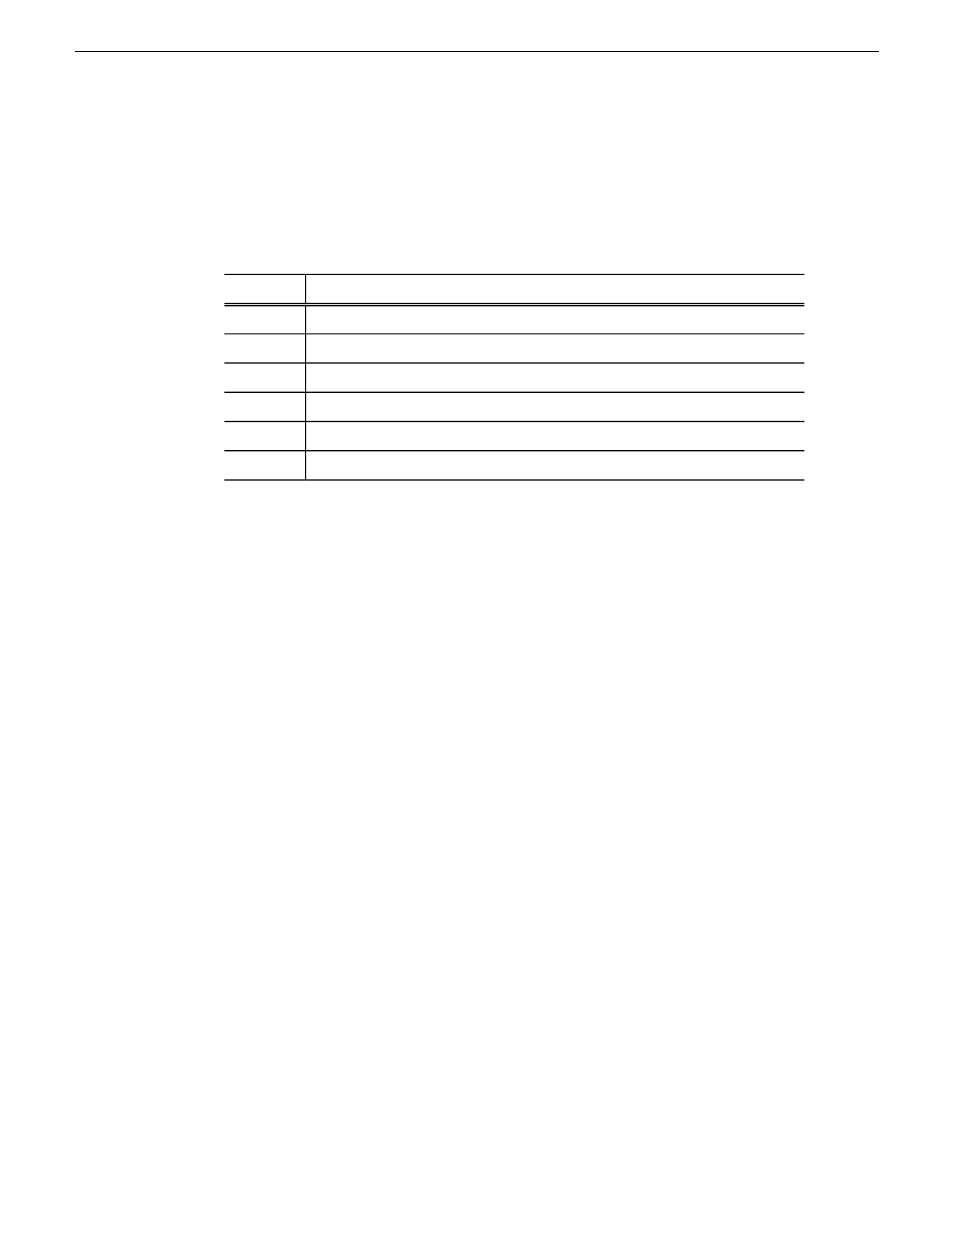
The RJ11 connector’s pinout is described in the table below. Pin 1 is at the bottom of
the connector. Aurora Playout can be connected to either pins 3 and 4 for RS-422 or
pin 4 for RS-232. When using RS-232, pin 3 must be connected to ground. The remote
display unit does not transmit data to this serial port connector.
Function
Pin
No connection
1
Ground
2
RS-422 non-inverted data or grounded for RS-232
3
RS-422 inverted data or RS-232 data
4
No connection
5
No connection
6
Installing the X-keys Jog/Shuttle Controller (optional)
Once you have installed Aurora Playout and the other components, you can install the
optional X-keys Jog/Shuttle controller.
Aurora Playout has been designed to work with the X-keys Jog/Shuttle controller
(model XPS-08-USB).
1. Plug the X-keys Jog/Shuttle controller into a USB connector on the Aurora Playout
machine.
2. On the Aurora Playout machine, insert the X-keys Macro Works installation CD
and follow instructions. Do not check the box to put shortcuts on the desktop.
If AutoRun is not enabled on your CD-ROM drive, find the file "ainstall.exe"
on the installation CD and run it.
3. Reboot the computer when prompted.
4. When the installation has completed, the X-keys Macro Maker and Macro Manager
windows automatically pop up. Close these windows. Aurora Playout comes with
a pre-configured X-keys layout.
5. Start Aurora Playout.
6. In the Aurora Playout Tools menu, select
Options
.
7. Select the
Function Keys
tab.
8. Verify the “Enable X-keys” box is checked and click
OK
.
Now you can use the X-keys Jog/Shuttle controller.
A default layout has been provided with pre-configured X-keys. You can customize
the X-keys to suit your needs.
34
Aurora Playout User Guide
14 April 2010
Installing Aurora Playout Hardware