67 cleaning the heat exchanger, Cleaning the heat exchanger – Nortec SE Series User Manual
Page 70

67 | Maintenance and Servicing
7 Reinstall the tank door gaskets and tank doors. When tightening the tank door nuts, take
care not to over tighten. The tank door nuts should only be torqued to 5 ft-lbs to prevent
crushing the gasket underneath.
Cleaning the Heat Exchanger
1 Follow Maintenance Shutdown and Extended Shutdown procedure on page 69. Give the
unit some time to cool down to avoid injury when servicing.
2 Remove the cabinet cover on the right side by removing the Phillips type screws and lifting
the covers.
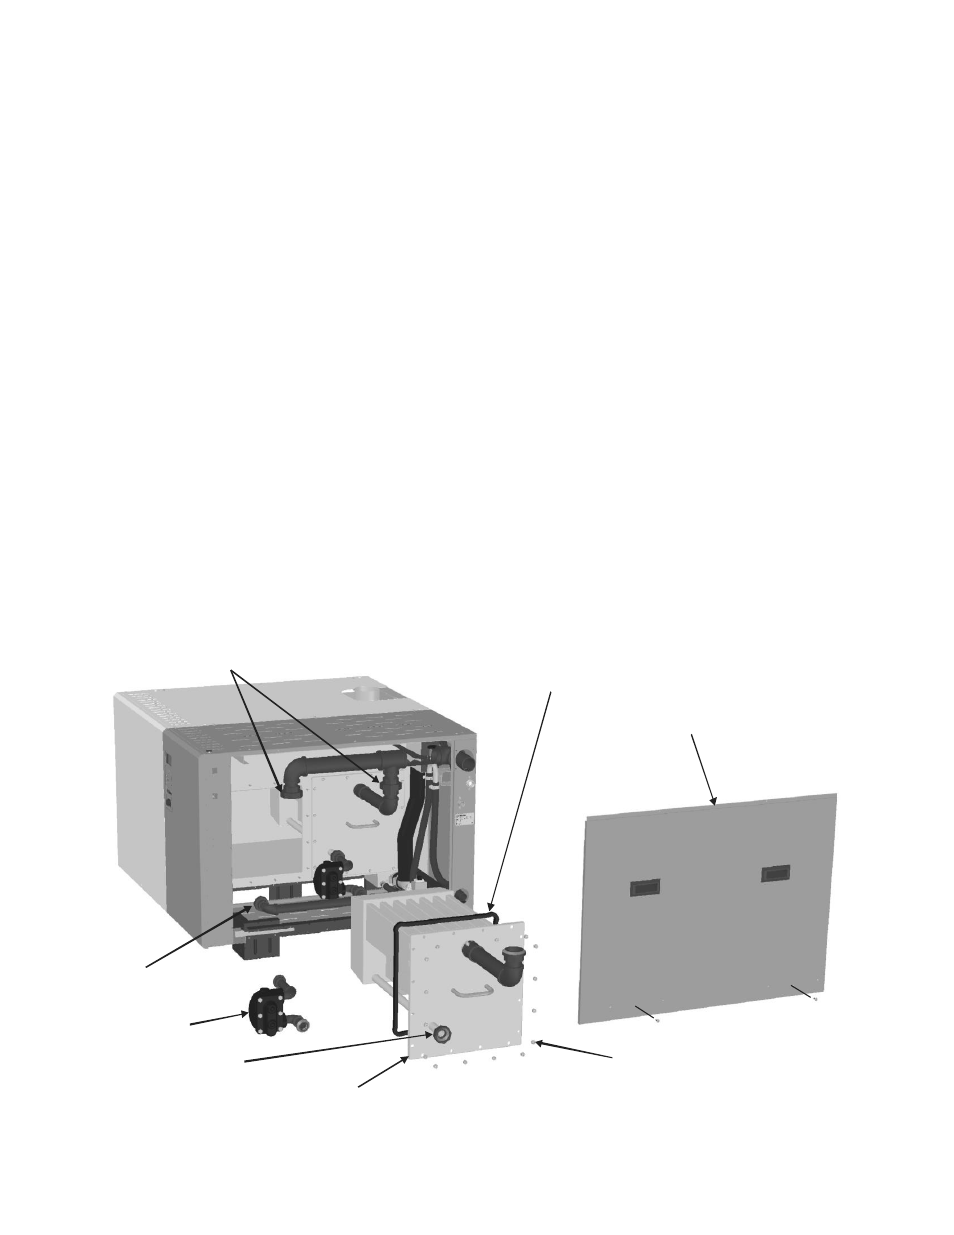
3 Disconnect the union that transports steam into the heat exchanger and remove the F&T
trap by disconnecting the two unions that hold it in place.
4 Apply anti seize compound to heat exchanger nuts and remove with 1/2 in. socket.
Remove excess anti seize compound.
5 Remove the heat exchanger(s) by pulling on the handle and sliding the heat exchanger out
of the unit.
6 Note: Heat exchangers are heavy, use proper lifting technique when removing them. It is
helpful to have an assistant help remove the heat exchanger.
7 Inspect the heat exchanger gaskets. Remove any scale from the gaskets, the heat
exchanger gasket surface, and tank gasket surface.
8 Using a plastic scraper, such as those used for car windshields, remove scale adhered to the
heat exchanger.
9 Reinstall heat exchanger gaskets and heat exchanger. When tightening nuts, take care not
to over tighten. Only torque nuts to 5 ft-lbs to prevent crushing the gasket underneath.
Figure 49: Heat Exchanger Removal
Cabinet Cover
Steam Connection Union
F&T Trap
F&T Trap
Union
F&T Trap
Union
Heat Exchanger Locknuts
Apply anti seize compound
to remove.
Do not crush gasket.
Max. 5 in-lb torque
Heat Exchanger
Heat Exchanger Gasket
