Couture au point zig-zag pespunto en zig-zag, 1 adjusting stitch width, 2 adjusting stitch length – SINGER 1425 User Manual
Page 47: 1 pour régler la largeur de point, 2 pour régler la longueur de point, 1 ajuste del ancho de la puntada, 2 ajuste de la longitud de la puntada, Adjusting stitch width and length, Ajuste del ancho y de la longitud de la, Puntada
Attention! The text in this document has been recognized automatically. To view the original document, you can use the "Original mode".
5. Basic Zig-Zag Stitching
5. Le point zig-zag
5. Pespunto básico en zig-zag
zig-zag stitching
Couture au point zig-zag pespunto en zig-zag
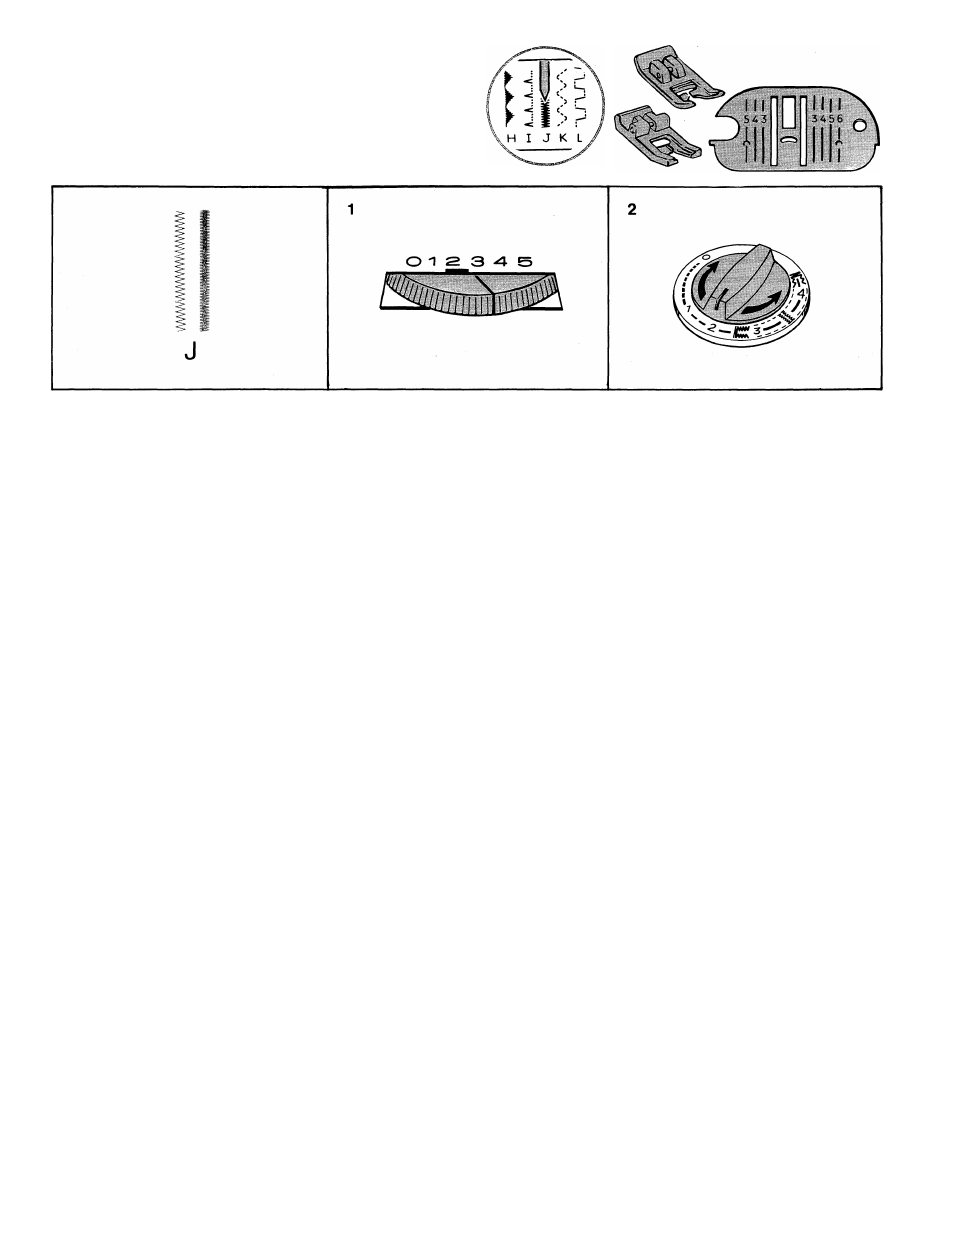
• Stitch: J 5
• Stitch width: 1-5
• Stitch length: to suit application or fabric
• General purpose needle plate
• General purpose foot or special purpose
foot
1 Adjusting Stitch Width
Before Starting to sew, adjust the stitch width
of your pattern on a scrap offabric.
Turning the stitch width control toward
figure 5 increases the width of your stitch,
and turning the control toward figure 1
decreases the width. Turn the control until
the desired width is obtained.
Note: When sewing Flexi-Stitch patterns,
stitch width control should be set on
figure 5 to achieve the best stitch appear
ance.
2 Adjusting Stitch Length
Before Starting to sew, adjust the stitch length
of your pattern on a scrap offabric.
Turning the stitch length dial toward 4
increases the length of your stitch, and
turning the dial toward 0 decreases the
length. Turn the dial until desired length
is obtained.
Note: When sewing Flexi-Stitch patterns,
adjust stitch length dial within the yellow
area 3 to 4.
Point: J §
Largeur de point: 1-5
Longueur de point: selon le tissu ou
l’ouvrage
Plaque à aiguille universelle
Pied universel ou pied spécial
1 Pour régler la largeur de point
Réglez la largeur de point sur une chute de
tissu avant d’entreprendre votre ouvrage.
En tournant le sélecteur de largeur de
point vers le chiffre 5, vous augmenterez
votre largeur de point, en le tournant vers
le chiffre 1 vous diminuerez votre largeur
de point. Tournez le sélecteur jusqu’à ce
que vous ayez obtenu la largeur souhaitée.
Note: Pour obtenir un meilleur résultat
lorsque vous cousez avec un point exten
sible, il vaut mieux mettre le sélecteur de
largeur de point sur le chiffre 5.
2 Pour régler la longueur de
point
Réglez la longueur de point sur une chute de
tissu avant d’entreprendre votre ouvrage.
En tournant le cadran de longueur de point
vers 4, vous augmenterez la longueur de
votre point, en le tournant vers 0 vous
diminuerez la longueur de point. Tournez
le cadran jusqu’à ce que vous ayez obtenu
la longueur souhaitée.
Note: Lorsque vous cousez avec un point
extensible, réglez le cadran de longueur
de point à l’intérieur de la zone jaune
entre 3 et 4.
Punto: J g
Ancho del punto: 1-5
Longitud del punto: de acuerdo con la
aplicación o la tela
Plancha de aguja para usos generales
Prénsatelas para usos generales o para
usos especiales
1 Ajuste del Ancho de la Puntada
Antes de comenzar a coser, ajuste el ancho del
punto de su modelo en un trozo de tela.
Girando el control del ancho del punto hacia
el símbolo 5 aumenta el ancho de su punto, y
girando el control hacia el símbolo 1 dis
minuye el ancho. Gire el control hasta que
obtenga el ancho que desee.
Nota:
Al coser modelos Hexi-Stitch, hace falta
poner el control del ancho del punto en el símbolo
5
para obtener la mejor apariencia del punto.
2 Ajuste de la Longitud de la
Puntada
Antes de comenzar a coser, ajuste la longitud del
punto de su modelo en un trozo de tela.
Girando el control de longitud del punto
hacia 4 aumenta la longitud de su punto, y
girando el control hacia 0 disminuye la longi
tud. Gire el control hasta que obtenga la lon
gitud que desee.
Nota:
Al coser modelos Flexi-Stitch, ajuste el
disco de la longitud de la puntada dentro del área
3fl4.
46