Preparation, Step 1, Step 2 – SINGER 1425 User Manual
Page 27: Préparation, Etape 1, Etape 2, Preparación, Paso 1, Paso 2
Attention! The text in this document has been recognized automatically. To view the original document, you can use the "Original mode".
threading the machine Pour enfiier ia machine enhebrado de ia máquina
Preparation
•
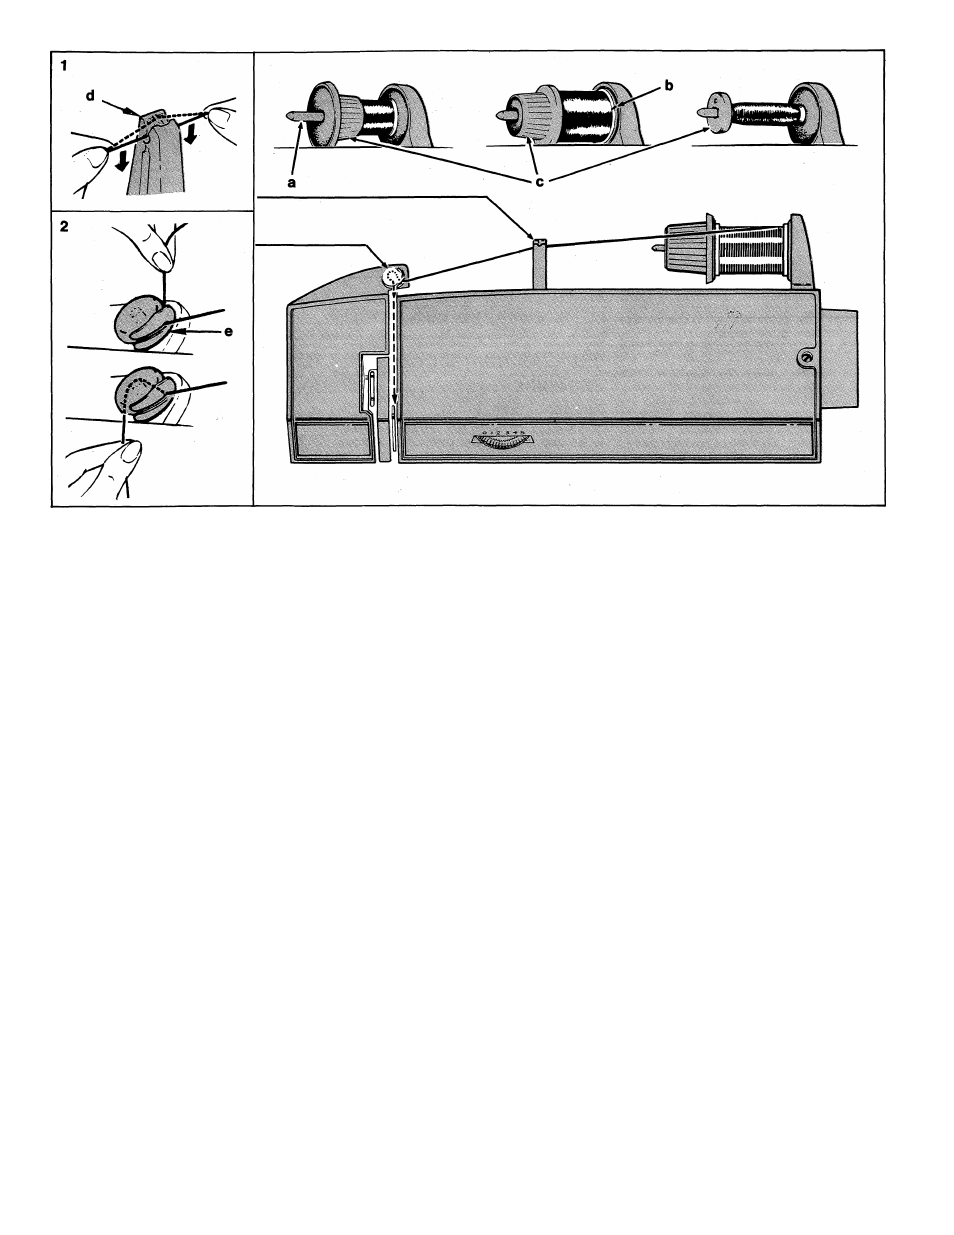
Place spool of thread on horizontal
spool pin a. If spool being used has a
thread retaining slit b, it should be
placed against the spool cushion to the
right.
• Select correct spool holder according
to type and diameter of spool being
used. The diameter of the end of the
spool holder should always be larger
than that of the spool itself.
•
Press spool holder c firmiy against
spool.
• Raise the take-up lever to highest posi
tion by turning the hand wheel toward
you.
• Raise the presser foot, to release thread
tension.
Step 1
• Snap thread into thread guide post d.
Step 2
• Thread the rear thread guide e. Pass
thread in slot of flange, then under and
around the back of the tension cap.
• Lead thread across the top cover.
Continued
Préparation
• Placez la bobine de fil sur le porte-
bobine a. Si votre bobine possède une
encoche pour arrêter le fil b, placez-la
contre le coussinet â droite pour éviter
de coincer le fil en cours de travail.
• Placez ensuite le manchon approprié.
Le diamètre du manchon doit être légè
rement supérieur à celui de la bobine.
• Pressez fermement le manchon c contre
la bobine.
• Amenez l’aiguille et le releveur de fil en
position haute, en tournant vers vous le
volant à la main.
• Soulevez le levier du presseur pour dé
gager la tension du fil.
Etape 1
• Introduisez le fil dans la fente du guide-
fil supérieur d.
Etape 2
• Enfilez le guide-fil arrière e. Passez le
fil dans la fente du flanc puis sous et
autour de l’arrière du séparateur de
tension.
•
Guidez le fil â travers le couvercle
supérieur.
Preparación
• Coloque el carrete de hilo en el pasador de
carrete horizontal a. Si el carrete tiene una
ranura de retención de hilo b, se debe colo
car contra la almohadilla del carrete a la
derecha.
• Seleccione el porta-carrete correcto de
acuerdo con el tipo y el diámetro del car
rete que esté usando. El diámetro del
extremo del porta-carrete siempre debe
ser mayor que él del carrete mismo.
• Empuje el porta-carrete c con firmeza
contra el carrete.
• Suba la palanca tira-hilos a su posición
más alta girando el volante hacia Usted.
•
Levante el prénsatelas para quitar la ten
sión del hilo.
Paso 1
• Coloque el hilo dentro del poste guía del
hilo d.
Paso 2
• Enhebre la guía posterior de hilo e. Pase el
hilo por la apertura en la brida, después por
debajo y detrás de la tapa de tensión.
• Pase el hilo por la cubierta superior.
Continúa en la próxima pàgina.
Suite page 27
26