Finish preparation, Finishing – Top Flite TOPA0120 User Manual
Page 45
❑
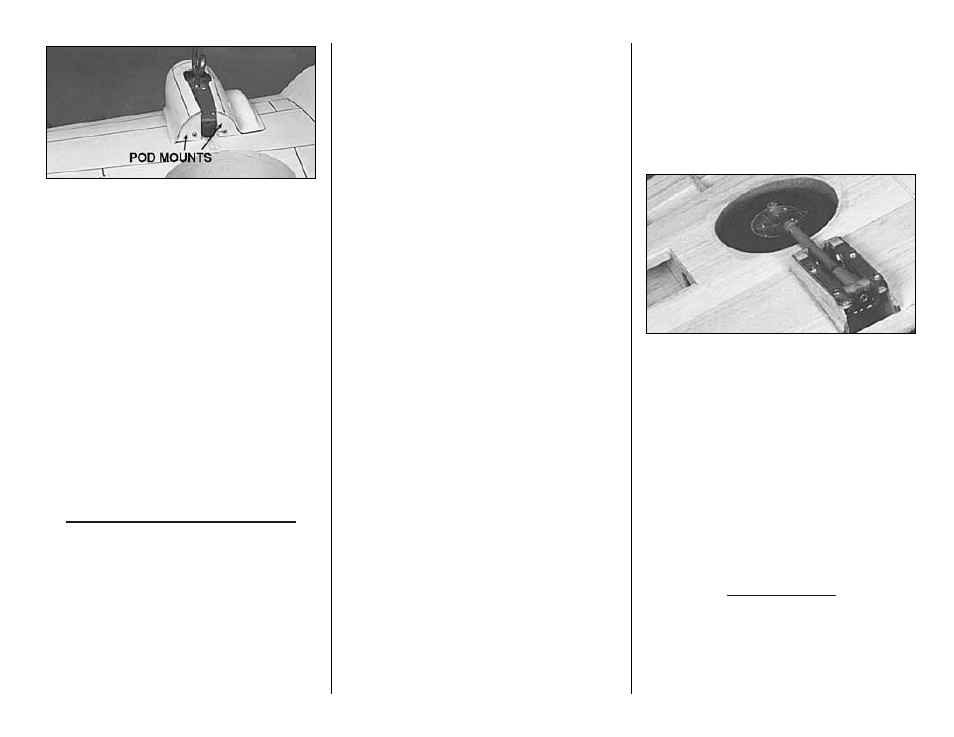
9. Place the die-cut 1/8” plywood Pod Mounts
at the rear of the gear pods, against the landing
gear support braces. The gear pods must be
installed over the landing gear mounts on the wing.
Tack glue the plywood Pod Mounts to the Gear
Pods.
❑
10. Mark and Drill 1/8” clearance holes in the
Pod Mounts only.
❑
11. Install the Gear Pods over the landing gear
mounts on the wing. Transfer the mounting holes
of the pod mounts to the landing gear supports on
the wing.
❑
12. Drill 5/64” holes in the landing gear
supports. Use #4 sheet metal screws to secure
the landing gear pods in place.
FINISH PREPARATION
FINAL SANDING
Nearly every imperfection in your wood
structure will show through the covering material;
therefore, before covering, you should make a final
check of the entire structure. Fix any “dings,” then
sand the entire structure smooth using
progressively finer grades of sandpaper.
FUEL PROOFING
Fuel proofing may be done after covering.
❑
1. Fuel proof the firewall area and the inside of
the cowl top. Grey (mix black and white) K&B
epoxy paint or 30-minute epoxy is recommended.
❑
2. Fuel proof the inside of the fuselage forward
of F-3 and the wing saddle area. 30 minute epoxy
and a bent epoxy brush was used for this on the
prototypes.
❑
3. Fuel proof any external exposed wood (e.g.,
flap pushrod exits).
BALANCE THE AIRPLANE LATERALLY
SPECIAL NOTE: Do not confuse this
procedure with “checking the C.G.” or
“balancing the airplane fore and aft.”
That very important step will be
covered later in the manual.
Now that you have the basic airframe nearly
completed, this is a good time to balance the
airplane laterally (side-to-side). Here is how to do
it:
❑
1. Temporarily attach the wing and engine
(with muffler) to the fuselage.
❑
2. With the wing level, lift the model by the
engine propeller shaft and the fin post (this may
require two people). Do this several times.
❑
3. If one wing always drops when you lift the
model, it means that side is heavy. Balance the
airplane by gluing weight to the other wing tip.
NOTE: An airplane that has been laterally
balanced will track better in loops and other
maneuvers.
RETRACTS
❑
1. Mark on the lower wing skin the location of
your strut and tire. Make a small cut-out to confirm
the correct location.
❑
2. Gradually increase the size of the cut-out
until the strut and wheel fit properly.
❑
4. You may make wheel well liners from
vertical grain 1/64” plywood (supplied) -OR- you
may leave your wheel wells open.
❑
5. Fuel proof the inside of the wing.
❑
6. Hook up the air lines to the retracts and
route them to the center of the wing.
❑
7. Bolt in the retracts, hook them up, and test
their operation.
FINISHING
The P-40 requires painting to obtain the
scheme shown on the box. There are other
schemes used on P-40s which would not require
as much painting; however, most of these are not
as attractive.
- 45 -